Deleting old Windows installations is a common task for many computer users. Over time, major Windows updates and upgrades can leave behind gigabytes of unnecessary files from old versions. Clearing this clutter helps free up drive space and keeps your system running lean. While Windows includes tools to remove these outdated files, using the Command Prompt provides more control and customization. This guide will walk through the steps to delete Windows.old using CMD commands.
What is Windows.old?
When you install a major new version of Windows, such as upgrading from Windows 7 to Windows 10, the upgrade process leaves your old Windows files intact in a folder called “Windows.old.” This serves as a backup if you need to roll back to the previous version. However, once you’ve verified the new installation works properly, the Windows.old folder just takes up space. Deleting it manually avoids the automatic disk cleanup utility removing files you may still need.
The Windows.old folder contains the entire C:\Windows directory from your previous version. This includes system files, drivers, user profiles, and applications. You may be able to recover individual files if needed, but the folder itself simply preserves your ability to revert completely back to the old OS. Once you’re happy with the new version, deleting Windows.old reclaims all that disk real estate.
When to Delete Windows.old
You should delete your Windows.old folder once you’ve spent a few days on a new Windows version and verified that everything works correctly. The specific steps to take before removal include:
- Installing all necessary applications
- Configuring settings to your preferences
- Running through daily/weekly tasks to check compatibility
- Updating all drivers
- Testing peripherals like printers and scanners
If you run into issues with a new Windows version, the Windows.old backup allows you to revert to the previous OS with all your applications and files intact. Deleting it prematurely makes going back more difficult.
In most cases, two weeks is sufficient time to evaluate a major Windows upgrade before clearing the backup. But if you need legacy applications for work and are still checking compatibility, you may want to keep Windows.old around for a month or longer.
How to Delete Windows.old in Command Prompt
Deleting the Windows.old folder using Command Prompt involves just a few quick steps. CMD provides access to the DISM and RD commands necessary to remove the backup files.
Step 1: Open Command Prompt as Administrator
The first step is to launch an elevated Command Prompt window:
- Click Start and search for “Command Prompt”
- Right-click the Command Prompt app and select Run as Administrator
- Click Yes at the User Account Control prompt
This provides full administrator access required to run DISM and RD commands.
Step 2: Use DISM to Remove Windows.old
The DISM command prepares the Windows.old folder for deletion. Run the following command, replacing C: with the actual drive letter if different on your system:
DISM /Online /Cleanup-Image /StartComponentCleanup /ResetBase
This will initiate the Component Store cleanup operation, pruning down Windows.old to a minimum size for removal.
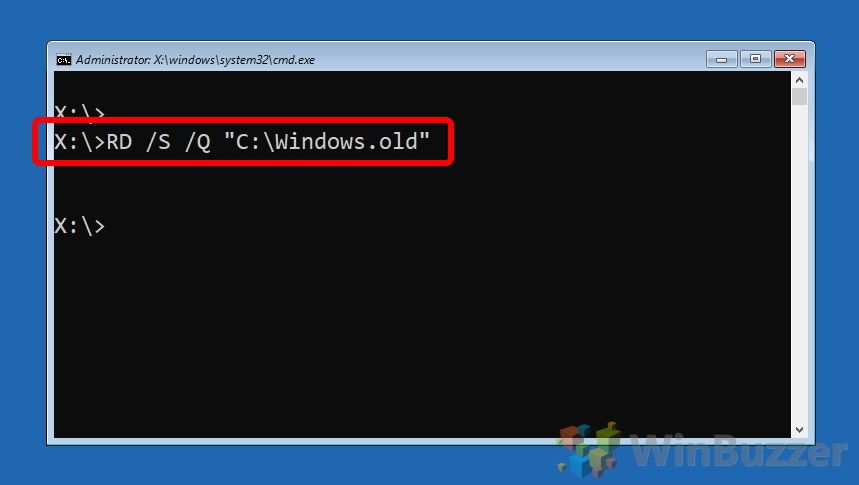
Step 3: Delete Windows.old with RD
After DISM finishes reducing Windows.old, run the RD (Remove Directory) command to delete the folder:
RD /S /Q C:\Windows.old
This will delete the entire Windows.old folder and all its contents.
Step 4: Restart Your PC
After removing Windows.old, restart your computer for the cleanup to fully complete. The folder should now be gone from your system drive.
Troubleshooting
If the Windows.old folder still remains after following these Command Prompt steps, try the following troubleshooting measures:
- Open File Explorer and make sure you don’t have Windows.old open or locked in another application.
- Run a full virus scan to check for malware blocking the folder deletion.
- Use the DIR command at the Command Prompt to verify the folder exists.
- Reboot into Safe Mode and try deleting Windows.old again.
For additional assistance, you can use the Windows Disk Cleanup utility. This provides an automated option for removing Windows.old after major upgrades.
Alternative Ways to Delete Windows.old
Aside from Command Prompt, you have a couple other options for removing your Windows.old folder:
Disk Cleanup
The built-in Disk Cleanup utility includes an option to delete previous Windows installations. To use this method:
- Open Disk Cleanup by right-clicking your C: drive and selecting Properties > Disk Cleanup
- Click Clean up system files
- Check Previous Windows installation(s)
- Click OK and then Delete Files to remove Windows.old
The main downside to Disk Cleanup is you have less control than the Command Prompt methods. But it provides a quick automated deletion option.
Deleted with Windows 10 Upgrade
When you upgrade an existing Windows 10 installation to a new feature update, such as from version 1903 to 1909, the upgrade process automatically removes the previous version’s Windows.old folder.
During the upgrade, you’ll see the message “Previous Windows installation(s) detected” and the upgrade will clear old WinSxS and Windows.old files to free space.
So if you stay current with Windows 10 updates, you typically won’t need to manually delete Windows.old.
Third-Party Tools
Third-party utilities like CCleaner and Wise Disk Cleaner also provide options to detect and delete Windows.old folders. This can simplify the process, though Windows Disk Cleanup covers the same functionality.
What’s Inside Windows.old?
The Windows.old folder contains a complete copy of your previous Windows installation. Looking at the contents provides insight into how much space it hogs and what you’ll reclaim by deleting it.
Here’s an overview of what you’ll typically find inside Windows.old if you browse the folder in File Explorer before deleting:
| Folder | Contents |
| Users | User account folders like Documents, Music, Pictures, etc. |
| Program Files | Installed desktop applications |
| ProgramData | Application data and settings |
| Windows | System files, drivers, etc. |
As you can see, the Windows.old folder contains a complete duplicate set of files, taking up a large amount of disk space. For example, if your Windows installation uses 50GB, Windows.old will occupy around 50GB as well. That adds up fast on smaller SSD system drives.
How Much Space Does Windows.old Use?
The size of your Windows.old folder depends on how big your actual Windows installation is. As a duplicate copy, it takes up nearly the same amount of drive space.
On a typical computer, Windows.old is often 20GB or larger. Here are some examples of how big it can get:
- Clean Windows 10 install – 15-20GB
- Upgraded Windows 10 with applications – 30-40GB
- Windows update on bloated system – 60GB+
The last scenario shows the downside of continually upgrading without ever cleaning older installations.Disk space keeps getting eaten up by increasingly large Windows.old folders.
Find Your Folder Size
To see how much space Windows.old uses on your own PC:
- Open File Explorer and navigate to This PC
- Go to your system drive (usually C:)
- Right click Windows.old and select Properties
This will show you the total size of the folder. Then you’ll know exactly how much drive space deleting it will free up.
Should You Delete Windows.old?
In most cases, there is no downside to removing your Windows.old folder once you are up and running smoothly on a new OS.
The backup folder serves one purpose: to allow you to revert back to your old Windows version if needed. If you have no plans to roll back, get rid of it.
On a storage-constrained computer, like a laptop with a 128GB SSD, Windows.old can rapidly consume over half your available space. Deleting it often frees up 10GB or more of drive capacity.
The only reason to keep Windows.old around long-term is if you rely on legacy programs for work that may not function on a new version of Windows. In that case, you can keep the backup folder as insurance.
Otherwise, once you’ve settled into a Windows update or upgrade, deleting Windows.old provides benefits with virtually no downsides.
When to Keep Windows.old
These are some situations where temporarily preserving Windows.old could be beneficial:
- Testing mission-critical legacy programs
- Recently upgraded and still getting settled
- Using multiple partitions and can spare the space
- Frequent OS switching for app compatibility
Again, this is generally only recommended for the first few weeks after installation.
FAQ
Is it safe to delete Windows.old?
Yes, it is completely safe to remove the Windows.old folder once you are up and running on a new Windows version. The files are simply a backup of your previous OS.
What happens if I delete Windows.old?
Deleting Windows.old frees up a large amount of drive space, providing room for more programs and data on your system drive. The only downside is losing the ability to revert back to the previous version of Windows.
Can I retrieve files from Windows.old?
Yes, before deletion you can browse your Windows.old folder and copy over any personal files or application data you need from the old installation.
How long should I keep Windows.old?
Most experts recommend deleting Windows.old after 2-4 weeks on a new Windows version. This gives you time to ensure everything works properly before removing the backup.
Does Windows.old slow down my PC?
No, Windows.old does not directly affect system performance. But filling up your drive can lead to sluggish behavior over time as free space runs low.
Conclusion
Deleting your Windows.old folder provides an easy way to reclaim a significant amount of disk space after a major Windows upgrade. Using Command Prompt gives you precision control over the process.
However, don’t rush to delete Windows.old until you’ve spent time confirming everything works fine on the new version. Allow at least 2-4 weeks before removal to ensure stability.
Once you delete the folder, make sure to restart your PC afterwards for the cleanup to fully complete. Enjoy the new free space!
