Erasing your Mac’s hard drive can be a daunting task, especially if you want to erase the drive without losing your operating system in the process. However, with the right steps, it is possible to selectively erase portions of your hard drive while keeping your OS and applications intact.
Quick Answers
Here are some quick answers to common questions about erasing a Mac hard drive without losing the OS:
- Use Disk Utility’s “Erase” function to erase the disk while keeping the OS volume intact.
- Create a bootable installer drive and use Disk Utility from the installer to erase the disk.
- Use advanced partitioning tools like gpt to selectively remove partitions without affecting others.
- Back up important data before erasing, in case anything goes wrong in the process.
- Be very careful not to erase the partition with the OS installed when erasing other partitions.
Using Disk Utility to Selectively Erase
The easiest way to erase your Mac’s hard drive without losing the operating system is to use Disk Utility’s “Erase” function. Disk Utility allows erasing the entire physical disk while keeping the partition containing the OS unaffected.
Here are the steps to selectively erase a hard drive using Disk Utility:
- Backup your Mac using Time Machine or another backup method.
- Restart your Mac and boot into Recovery mode by holding Command + R on startup.
- Launch Disk Utility from the Recovery menu.
- Select the top-level hard drive device on the left sidebar (not any of the partitions or volumes below it).
- Click the “Erase” button at the top.
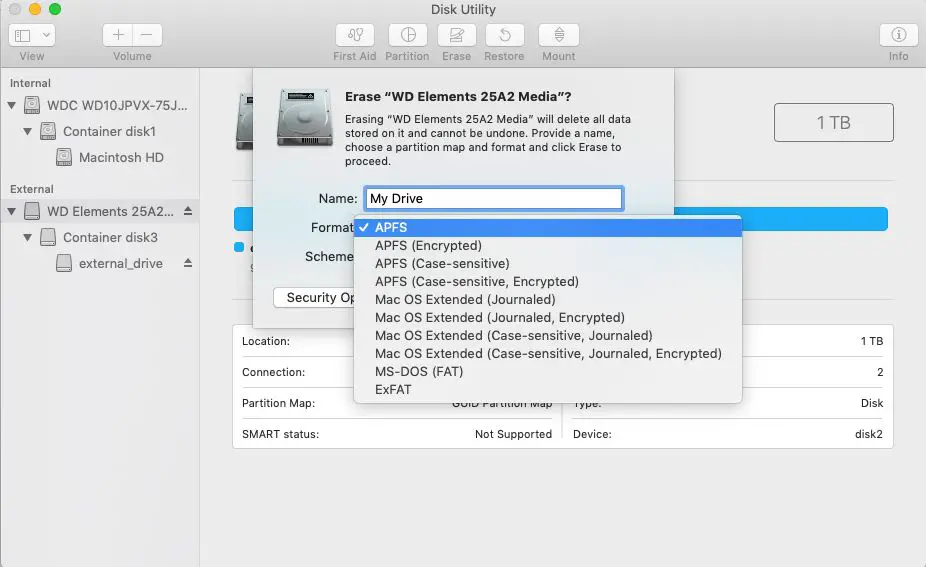
- Enter a name for the erased disk and select a format like APFS or Mac OS Extended.
- Click “Erase” to confirm.
This will erase the entire hard drive while keeping the OS volume intact. The OS partition will remain untouched, allowing you to reboot normally after erasing. Just make sure to select the actual disk device, not the volume containing the OS.
Creating a Bootable Installer Drive
Another method is to create a bootable macOS installer drive and boot into it to access Disk Utility. This allows erasing hard drive partitions more selectively from the installer drive.
Follow these steps:
- Get a USB flash drive with at least 12GB capacity.
- Use the createinstallmedia command in Terminal to create a bootable installer on the flash drive.
- Boot your Mac from the installer drive by holding Option on startup and selecting the drive.
- Open Disk Utility from the installer menu bar.
- Select the partitions or disks you want to erase, avoiding the OS volume.
- Click “Erase” and confirm.
- Quit Disk Utility and reboot normally once done.
This allows erasing specific partitions while leaving the OS volume untouched. Just be very careful to not select the wrong volume when erasing.
Using Command Line Tools Like gpt
For advanced users, command line tools like gpt provide the most flexibility for selectively erasing hard drive partitions.
gpt (GUID Partition Table) allows modifying partition tables from Terminal. With it, you can:
- View partition table details with
sudo gpt -r show /dev/diskX - Selectively remove partitions with
sudo gpt remove -i {index} /dev/diskX - Add new empty partitions with
sudo gpt add -i {index} -b {start} -s {size} /dev/diskX - Be very careful to identify the correct partition indexes to avoid removing the OS.
Similarly, tools like diskutil in Terminal can also erase volumes when used carefully while avoiding the OS volume.
Erasing Free Space Only
Instead of fully erasing partitions or disks, you can also just securely erase the free unused space on your hard drive.
This can be done from Disk Utility by:
- Selecting the top physical disk on the left sidebar.
- Clicking Erase in the toolbar.
- Selecting “Erase Free Space” and clicking Erase.
This will scrub and overwrite the unused space on the disk without modifying existing partitions or data.
Precautions When Erasing Disks
Take the following precautions when erasing disks:
- Always have a complete backup before erasing anything.
- Triple check that you are selecting the correct disk or partition to erase.
- Never erase the disk or partition containing the operating system files.
- Use Disk Utility’s “Show All Devices” view to identify disk and partition details.
- Understand the difference between physical disks, partitions, and volumes.
- Start by erasing free space only if you are unsure.
- Be prepared to reinstall macOS if something goes wrong.
It’s also a good idea to practice erasing disks on non-essential external drives first to get comfortable with the steps before erasing your main internal drive.
When Erasing is Necessary
Here are some situations where you may need to selectively erase your Mac’s hard drive:
- Removing sensitive data before selling or disposing of a Mac.
- Clearing up old unused partitions or volumes taking up disk space.
- Removing partitions or operating systems from dual boot configurations.
- Wiping free space to remove fragmented temporary files.
- Troubleshooting performance issues caused by a cluttered drive.
In these cases, being able to erase the drive selectively without losing your current OS can be very useful.
Alternative Options
In some cases, alternatives to erasing the startup drive may be preferable:
- Archive and delete files – Manually remove unwanted files instead of erasing entire partitions.
- Use external storage – Move data to external drives instead of erasing internal drive.
- Reformat OS drive – Erase and reinstall OS if your goal is a clean system.
- Encrypt data – Use FileVault encryption to secure data before later erasing.
Evaluating these options can help determine if selectively erasing is the right solution or if alternatives are better for your specific needs.
Erasing Steps for Common Mac Models
Here are the general steps for erasing specific Mac models:
MacBook Air/Pro, iMac
- Boot to macOS Recovery by holding Command + R on startup.
- Open Disk Utility from the Recovery menu bar.
- Select the top physical internal disk on the left sidebar (not a volume or partition below it).
- Click the Erase button and configure the settings.
- Click Erase to confirm and wait for the process to complete.
- Quit Disk Utility and reboot normally.
Mac Pro, Mac Mini
- Boot to macOS Recovery by holding Command + R on startup.
- Open Disk Utility from the Recovery menu bar.
- Select the physical internal disk you want to erase from the left sidebar.
- Click Erase and configure the settings.
- Click Erase and wait for the process to finish.
- Repeat steps for each disk or partition you want to erase as needed.
- Quit Disk Utility and reboot normally when done.
Older Macs (pre-2012)
- Boot from a removable macOS installer drive.
- Open Disk Utility from the installer menu bar.
- Select the disk or partition you want to erase.
- Click Erase and configure settings.
- Click Erase and wait for completion.
- Repeat as needed for other disks/partitions.
- Quit Disk Utility and reboot normally when finished.
The specific steps can vary depending on your Mac model and version of macOS. Refer to Apple support articles for your specific Mac for the most up-to-date details.
FAQs
Is it possible to erase the entire hard drive without losing the OS?
Yes, Disk Utility allows erasing the full hard drive disk device while keeping the OS partition intact. Just be sure to select the top disk device, not the OS volume.
Can I erase partitions individually without erasing the whole drive?
Yes, when booted from a removable installer drive you can selectively erase individual partitions in Disk Utility without affecting others.
What happens if I accidentally erase the OS partition?
If you accidentally erase the partition containing the OS, your Mac will no longer be able to boot normally. You’ll need to reinstall macOS from a bootable installer drive.
Is it better to reformat the OS drive instead of erasing partitions?
If your goal is to wipe the OS drive completely, then reformatting may be better. Selectively erasing is useful for removing specific data while leaving OS intact.
Can I erase free space without modifying existing partitions?
Yes, Disk Utility provides an option to securely erase only unused free space on a drive, leaving partitions untouched.
Summary
While erasing hard drives without losing the operating system carries risks, it can be done with careful usage of Disk Utility and tools like gpt. Always backup first, identify correct volumes, confirm selections, and have a bootable installer ready just in case. With caution and planning, selectively erasing hard drive partitions can be a useful data removal technique.