What is FAT32 and its file size limits
FAT32 (File Allocation Table 32) is a file system originally introduced by Microsoft in Windows 95 OSR2 back in 1996. It was designed as an upgrade to the older FAT16 file system to allow support for larger disk sizes. FAT32 became the standard file system for consumer Windows versions up until Windows XP.
Some of the main uses of FAT32 include:
- External USB flash drives, SD cards, etc.
- Shared drives between Windows and macOS
- Bootable flash drives
FAT32 has a technical file size limit of 4GB per file. This means you cannot copy or create files larger than 4GB in size on a FAT32 formatted drive. If you try, you’ll get an error saying “File size exceeds file system limitation”. This 4GB file size limit was implemented back when FAT32 was created in order to maintain compatibility with older operating systems.
While 4GB seems very small by today’s standards, it was considered a large file size back in the 90s when FAT32 was developed. For example, most songs were just a few MB, videos were not HD, and programs were under 1GB. So in its time, the 4GB limit was not very restrictive. It only becomes an issue now when transferring larger HD videos, ISO disk images, game files, etc.
Why You May Get the Error Message
The most common reason for getting the “FAT32 file system does not support 4 GB or larger files” error message is when trying to copy, move or download a file that is over 4GB in size to a drive formatted with FAT32.
FAT32 has a built-in file size limit of 4GB per file. This means any single file larger than 4GB cannot be stored on a FAT32 formatted drive. If you try to copy a 5GB movie file to a FAT32 USB drive for example, you will get the error message telling you the file size is too large for the file system.
External hard drives, USB flash drives, SD cards, and other removable media are often formatted with FAT32 by default due to its wide compatibility across devices. So if you have media formatted as FAT32 and try to transfer large files bigger than 4GB in size, you’ll run into the error message and be blocked from copying the files over.
The only way around this limitation is to reformat the drive to a file system without a 4GB file size limit like NTFS or exFAT. We’ll cover how to do that in the solutions section below. But if your drive is currently FAT32, you have no option except reformatting to be able to store files larger than 4GB in size.
Sources:
https://www.winxdvd.com/resize-video/fat32-file-size-limit.htm
Solutions for copying large files
When you need to transfer a file larger than 4GB to a FAT32 drive, there are a few solutions to work around the size limitation:
Split the file into smaller chunks – Use a file splitter program like WinRAR to break the large file into multiple smaller parts that are under 4GB each. You can then copy the split files over and recombine them later.
Compress the file to reduce its size – Use a compression tool like WinRAR or 7-Zip to compress the large file into a smaller archive under 4GB before copying it over. Just decompress it after to restore the original large file.
Use exFAT instead – exFAT is a newer file system with support for larger individual file sizes up to 16EB. Format your drive to exFAT instead of FAT32 to remove the 4GB file size limitation. [1]
For devices that don’t support exFAT like older game consoles, splitting or compressing files may be your only good options to transfer large files on FAT32 drives.
Converting FAT32 to NTFS
One way to work around FAT32’s file size limitation is to convert the file system to NTFS, which supports much larger file sizes. There are a couple ways to convert from FAT32 to NTFS without losing data:
Using Windows’ Built-in Convert Tool
Windows has a built-in utility to convert FAT32 drives to NTFS. To use it:
- Open File Explorer and right-click on the FAT32 drive you want to convert.
- Select “Properties” and go to the “General” tab.
- Under “File System” click the “Convert” button.
- A prompt will appear warning data may be lost, click “OK” to proceed.
- Windows will convert the drive to NTFS.
This process is automated and usually preserves data, but backing up important files before converting is still recommended.
Using Third Party Tools
There are also third party partitioning tools that can safely convert FAT32 to NTFS like EaseUS Partition Master. These give you more options for how to handle the conversion. However, the Windows built-in tool is simpler and sufficient for most users.
Converting FAT32 to exFAT
There are a couple different ways to convert from FAT32 to exFAT on Windows without losing data:
Using Windows Format Tool
The Windows format tool allows you to reformat a FAT32 drive to exFAT. To do this:
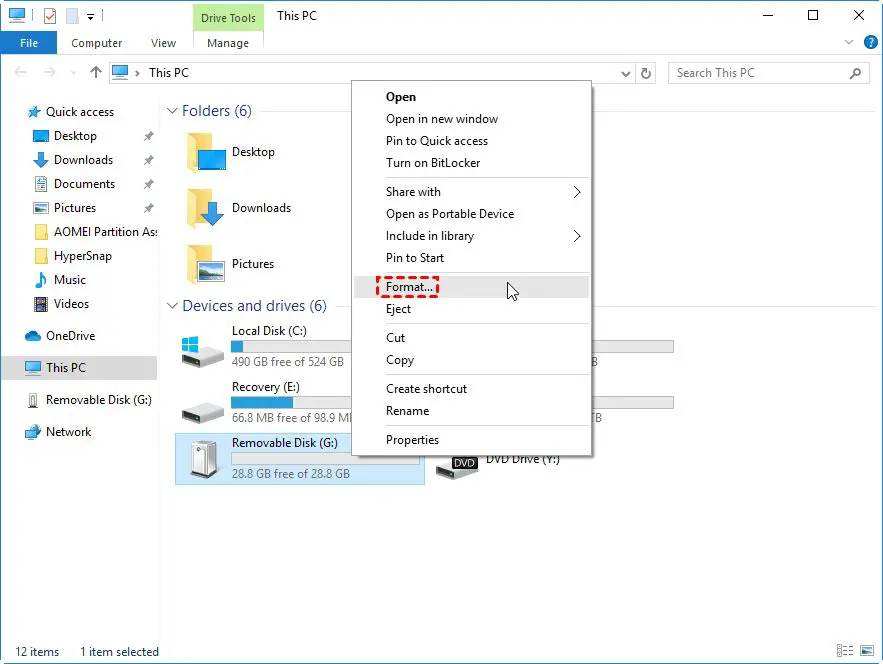
- Open File Explorer and right-click on the FAT32 drive you want to convert.
- Select “Format” from the context menu.
- Under “File System” choose exFAT instead of FAT32.
- Check the Quick Format box and click “Start” to begin the conversion.
This will reformat the drive from FAT32 to exFAT without deleting any data. However, this method can be slow for large drives.[1]
Using Third Party Tools
You can also use third party formatting tools like AOMEI Partition Assistant to quickly convert from FAT32 to exFAT.[2] With these tools you:
- Select the FAT32 partition/drive to format.
- Choose exFAT as the new file system.
- Click “Apply” to convert the partition without data loss.
Third party converters are much faster than the Windows tool and provide more formatting options.
Choosing between NTFS and exFAT
NTFS and exFAT are the two main file system options for external drives and large storage devices. Here is an overview of the differences between NTFS and exFAT to help choose the right one:
NTFS:
- Developed by Microsoft, designed for use with Windows
- Supports individual files up to 16 exabytes in size
- Better security features like encryption and permissions
- Higher reliability and stability
- Slower at writing and deleting large numbers of small files
exFAT:
- Also developed by Microsoft, compatible across platforms with Mac OS and Linux
- Supports individual files up to 16 exabytes in size
- Faster at writing and deleting large numbers of small files
- No built-in encryption or permissions
- Less overhead than NTFS, so uses space more efficiently
For external hard drives and flash drives, exFAT is generally recommended for compatibility across devices. exFAT works well for large media files like photos, videos, and music libraries where fast writing of small files is needed.
For system drives, NTFS is preferred for its security features and reliability. NTFS is ideal for drives mostly containing documents, applications, and program files where permissions and encryption are beneficial.
In summary, exFAT is great for external storage with large media files, while NTFS is better for system drives and storage with more general files and programs.
Formatting external drives to NTFS/exFAT
There are a couple ways to format an external drive to NTFS or exFAT in Windows.
Using Windows Disk Management
One method is to use the built-in Disk Management utility in Windows. Here’s how:
- Open Disk Management (right-click the Start menu and select “Disk Management”).
- Right-click on the external drive you want to format and select “Format”.
- In the format dialog, select “NTFS” or “exFAT” as the file system.
- Check the “Quick Format” box.
- Click “Start” to begin formatting the drive.
This will completely erase all data on the external drive and reformat it as NTFS or exFAT (Source).
Using Command Prompt
You can also format the external drive from the Command Prompt using the format command.
- Open the Command Prompt as administrator.
- Type “diskpart” and press Enter.
- Type “list disk” to list all disks.
- Select the external drive by typing “select disk X” (replace X with the disk number).
- Type “clean” to delete all partitions on the disk.
- Type “create partition primary” to create a primary partition.
- Type “format fs=ntfs quick” or “format fs=exfat quick” (replace ntfs or exfat as needed).
- Type “exit” twice to close Diskpart and Command Prompt.
This will format the entire external drive as NTFS or exFAT via the command line (Source).
Limitations of NTFS and exFAT
NTFS and exFAT have some limitations to be aware of, especially regarding file size and partition size limits as well as compatibility with operating systems.
NTFS has a maximum file size limit of 16 TB and a maximum partition size of 256 TB. exFAT also has a very large maximum file size limit of 16 exbibytes (EB) and partition limit of 128 PB. So both can handle extremely large file sizes and partitions (Source).
However, exFAT has more compatibility limitations. While NTFS is compatible with all modern versions of Windows, exFAT is only supported as of Windows XP SP3 and higher. exFAT is also supported on macOS 10.6.5 and higher. So older operating systems may not recognize an exFAT formatted drive (Source).
In contrast, NTFS has wider compatibility with older and newer operating systems. But NTFS is read-only on macOS by default, requiring a driver for full read and write access. So for cross-platform compatibility between Windows and macOS, exFAT may be preferable despite its limitations on older OSes.
Mitigating issues with large file transfers
When transferring large files, you may encounter slow speeds or failures due to network, storage, or other issues. Here are some tips for mitigating common problems:
Improving network speed
If transfers are slow, first check your network connection. Try switching to Ethernet if on WiFi, upgrading your router, or contacting your ISP about bandwidth options. Tools like Raysync can optimize network usage for faster transfers.
Verifying disk space
Before transferring large files, verify the destination drive has enough free disk space. Transfers may fail if the drive fills up mid-transfer. Leave at least 10-20% free space for best performance.
Checking drive health
Faulty drives can lead to failed transfers. Check the S.M.A.R.T. status of drives using tools like CrystalDiskInfo. Replace any drives reporting errors or bad sectors. Defragment drives if needed to optimize space.
Following these tips can help avoid common transfer failures and improve reliability when working with large files.
Additional tips for managing large files
Here are some extra tips for handling large media or data files:
Splitting large files into smaller parts can make them easier to transfer and share. Many compression programs like 7-Zip allow splitting archives into chunks.
Using compression software can significantly reduce file sizes for storage and transfer. Popular tools like WinRAR and 7-Zip work on most file types.
Cloud storage services like Dropbox, Google Drive, or Microsoft OneDrive provide abundant, inexpensive capacity for backups and sharing large files. Their desktop apps make cloud storage work seamlessly.
Regularly monitoring disk space usage helps avoid filling up your drives. Tools like WinDirStat visualize disk usage to find and delete unneeded large files.