The error “hard drive not detected” can be frustrating when it happens on your Windows PC. This issue prevents your computer from properly accessing the files and data stored on the hard drive.
It’s important to resolve this problem so that you can regain full access to your drive. Lost files and data can be difficult or impossible to recover if the hard drive is not working properly.
In this guide, we will walk through several potential solutions to fix a HDD not detected in Windows. We will cover checking connections, initializing the disk, updating drivers, using CMD commands like CHKDSK, and formatting as needed. With the right steps, you can get your hard drive back up and running.
Prerequisites
Before attempting to fix an undetected hard drive using Command Prompt, there are a couple prerequisites you should have in place:
First, you need administrative access on the computer. Many of the commands require elevated privileges to run properly. So make sure you open Command Prompt as an admin.
Second, you should have a basic understanding of how to use Command Prompt. You don’t need to be an expert, but knowing how to navigate directories, run commands, and interpret the output will be very helpful. If you’re completely new to Command Prompt, spending 5-10 minutes familiarizing yourself will make this process smoother.
As long as you have admin access and a basic comfort level with Command Prompt, you should be set to follow the steps to potentially fix your undetected HDD.
Check Connections
One of the most common reasons a hard drive is not detected is due to a loose connection. Check that the power and data cables are properly seated on both ends – on the hard drive itself and on the motherboard. Wiggle the connections and press down firmly to ensure there are no loose connections.
Try connecting the hard drive to a different SATA port on the motherboard if possible. Use a different SATA cable as well, in case the cable is faulty. Connect the hard drive directly to the motherboard SATA port instead of through a docking station or enclosure, if applicable. If it is an external drive, try using a different USB port and cable. The drive should be detected if there is a solid connection.
References:
https://www.easeus.com/recoverdata/hard-disk-not-detected.html
Check in Disk Management
To check if your hard drive is detected in Disk Management, first open Disk Management in Windows. To do this, right-click the Start button and select “Disk Management” 1. You can also search for Disk Management and select the “Create and format hard disk partitions” app.
In Disk Management, look in the lower pane for a list of all the connected drives on your computer. If you see your hard drive listed here, it is detected. Note the drive letter assigned to the HDD. If the drive does not have a letter, you will need to assign one for it to be accessible in Windows.
If your HDD is not listed at all in Disk Management, it means it is not detected properly. You will then need to try some troubleshooting steps like updating drivers or initializing the disk to get it working.
Assign a Drive Letter
If the hard drive is showing in Disk Management but doesn’t have a drive letter assigned, you can assign one. Here are the steps:
- Open Disk Management (right click the start menu and select “Disk Management”).
- Right click on the disk that needs a drive letter assigned.
- Choose “Change Drive Letter and Paths…”
- Click “Add…” to assign a new drive letter.
- Select a drive letter from the dropdown that is not already in use.
- Click “OK”.
This will assign a new drive letter to the disk so that it shows up in Windows Explorer. Make sure to pick a drive letter that is not already assigned to another disk or partition 1.
Initialize the Disk
If your HDD is not initialized, Disk Management will show it as an “unallocated” space. Initializing the disk will prepare it for use in Windows.
To initialize the disk:
- Open Disk Management (press Windows Key + R and type “diskmgmt.msc”).
- Right click the unallocated space and choose Initialize Disk.
- Select either MBR (Master Boot Record) or GPT (GUID Partition Table) as the partition style. MBR is compatible with older systems while GPT supports larger disk sizes.
- Click OK. The disk will now show up as an initialized disk.
Initializing the disk assigns it a partition style and prepares it for partitioning and formatting. Once initialized, you can create partitions on the disk and assign drive letters (source).
Update Drivers
One potential solution is to update the drivers for the hard drive or storage controller in Device Manager. Here are the steps:
1. Open Device Manager by right-clicking the Start button and selecting Device Manager.
2. Expand the Disk drives category and right-click on the hard drive that is not being detected.
3. Select Update driver. This will launch the Update Driver Software wizard.
4. Select Search automatically for updated driver software. Windows will search for and install an updated driver if one is available.
You can also try updating the driver for the storage controller:
1. Expand the Storage controllers category in Device Manager.
2. Right-click on the storage controller and select Update driver.
3. Follow the same steps to search for and install an updated driver.
Be sure to get the latest drivers directly from the manufacturer’s website. See this Microsoft guide for more details on updating drivers manually in Windows.
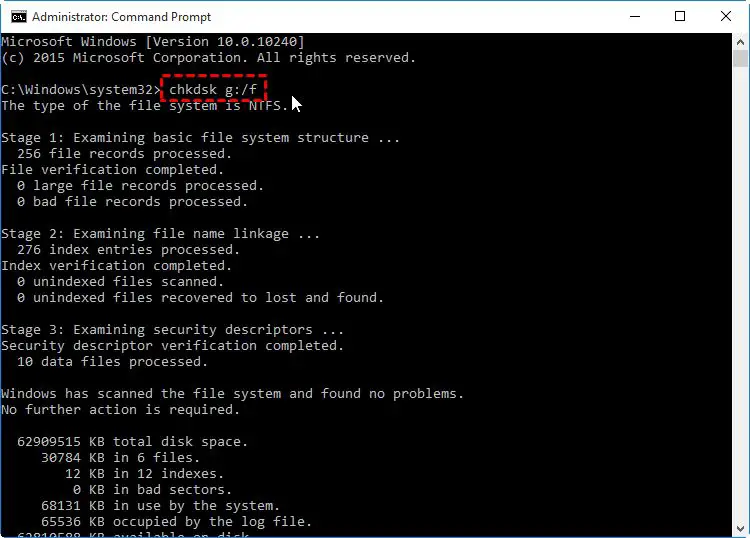
Run CHKDSK
CHKDSK is a Windows utility that scans drives for errors and attempts to repair any issues it finds. Running CHKDSK can potentially fix HDD not detected errors by repairing file system issues or bad sectors on the drive.
To run CHKDSK on the undetected drive:
- Open Command Prompt as an administrator. You can do this by searching for “Command Prompt” in the Windows search bar, right-clicking on the Command Prompt app, and selecting “Run as administrator”.
- In Command Prompt, type the following command and press Enter:
chkdsk /f X:Replace “X” with the letter of the drive that is not being detected (for example chkdsk /f G:).
The /f parameter tells CHKDSK to fix any errors found on the drive. CHKDSK will now scan the drive and attempt to repair any file system errors or bad sectors. This process can take some time depending on the size of the drive and severity of errors.
Once CHKDSK is finished, reboot your computer and check if the HDD is now detected by Windows. If it is still undetected, you may need to try additional troubleshooting steps.
Sources:
https://learn.microsoft.com/en-us/windows-server/administration/windows-commands/chkdsk
https://www.avast.com/c-chkdsk-windows
Format the Disk
If the hard drive is still not detected in Windows after trying the other troubleshooting steps, you may need to format it. Formatting erases all data on the disk, but can help resolve detection issues.
To format the disk using Disk Management:
- Open Disk Management – Press Windows Key + R to open the Run dialog box. Type “diskmgmt.msc” and click OK.
- Right click the disk – In the lower panel, right-click the disk that you want to format.
- Choose Format – Click “Format” from the right-click menu.
- Select options – Choose the filesystem (e.g. NTFS), allocation unit size, and volume label. Check “Perform a quick format” to save time.
- Start format – Click “OK” to begin formatting the disk.
The format process may take several minutes depending on the drive size. Once completed, the disk should be detected in File Explorer and available for use.
Conclusion
In summary, there are several steps you can take to try to fix an HDD not being detected using CMD:
- Check the physical connections and cables
- Look for the drive in Disk Management and assign a drive letter
- Initialize the disk if unallocated
- Update drivers for the disk
- Run CHKDSK and formatting tools
While the CMD tools may help troubleshoot and repair disk issues, it’s critical to have backups of your important data. Hardware can fail unexpectedly, and you don’t want to lose your files. Consider regularly backing up to an external drive or cloud backup service.
If DIY troubleshooting does not work, you may need to seek help from a professional data recovery service. While this can be expensive, it may be your last resort for recovering data from a failed drive. Select a reputable recovery firm and be prepared for costs starting around $300-500 depending on the drive size and amount of data.
