Assess the Damage
The first step is to determine which keys are not working after the water spill. Try pressing each key on the keyboard to identify any keys that are unresponsive or not inputting characters properly. Pay special attention to keys in areas where the water made contact.
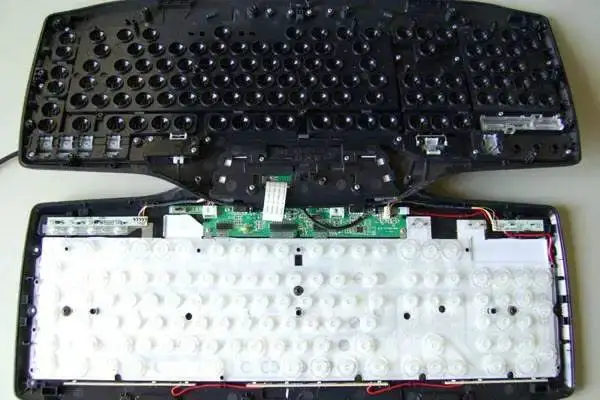
Next, you’ll need to open up the laptop to inspect for any internal water damage. Refer to a service manual for your specific laptop model to properly disassemble the laptop and gain access to the keyboard and mainboard. Look for visible water residue, corrosion, mineral deposits, or damage. Parts that may have been affected include the keyboard, trackpad, battery, and logic board. According to research, water damage is the cause of 60% of laptop repairs. Keys not working properly are a common symptom when liquid has infiltrated the keyboard or internal components (SewellTech).
Disconnect Power
After a liquid spill on your laptop, the first thing you’ll want to do is cut the power to all of the components. This helps prevent shorts and further damage while you are cleaning the laptop.
First, shut down the laptop if it is still on. Press and hold down the power button for 5-10 seconds until the laptop fully shuts off. Unplug the AC adapter from both the wall and laptop to disconnect the main power.
Next, remove the battery from the bottom of the laptop if possible. Look for a sliding latch or release button to pop the battery out. Removing the battery fully cuts power to the components and prevents possible short circuiting while cleaning and drying.
With the battery removed and the laptop unplugged from the AC adapter, you can safely work on cleaning and drying it out without causing further damage.
Dry Out the Laptop
It’s crucial to thoroughly dry out the laptop before attempting to turn it on again. Any remaining moisture can short circuit and permanently damage components.
First, wipe away any pooled water on the exterior of the laptop using a dry microfiber cloth. Be gentle to avoid scratching the surface.
Next, flip the laptop upside down on top of a towel or laptop cooling stand. This will allow water to drain out rather than pooling deeper inside. Let it sit this way for at least 24 hours. Do not shake or rotate the laptop as this can spread water to unaffected areas.
To help evaporate internal moisture, set up a fan blowing over the open laptop or use a dehumidifier in the room. The goal is to thoroughly dry out all internal components before turning on again. Be patient during this step, as it can take 72 hours or longer for the laptop to completely dry after a spill.
According to computerrepairltd.co.uk, “Don’t turn on your laptop in the middle of the drying process. Give it at least 24 hours to dry. Be patient! Turning laptop with liquid inside can cause more damage.” Allowing time for proper drying is crucial.
Clean with Isopropyl Alcohol
One of the most important steps is to thoroughly clean the laptop keyboard and internal components with isopropyl alcohol. You’ll need isopropyl alcohol that is at least 70% concentration. Higher concentrations like 91% work even better for cleaning and disinfecting.
Use cotton swabs, towels, or cloths dampened with isopropyl alcohol to gently clean under the keyboard keys and other areas that got wet. Be very gentle when lifting keys to avoid damaging them. Slowly move the damp swabs or cloths around to dissolve and absorb any remaining water or stickiness. According to GFlesch.com, “isopropyl alcohol dissolves minerals and other residues left behind once water has evaporated from the electronics.”
Avoid using excessive force and let the isopropyl alcohol do the cleaning work. Pay special attention to any corrosion around microchips since this can cause shorts. Keep cleaning with new swabs until you have thoroughly removed any remaining moisture or stickiness from the spill.
Check for Corrosion
After drying out the laptop, it’s important to thoroughly inspect the motherboard and other components for signs of corrosion. Water can cause corrosion, which is the gradual eating away of metal components. According to Technology Solved, discoloration inside or outside the computer is a telltale sign of moisture damage. Look closely at the motherboard for any residue, mineral deposits, green corrosion, rust, or other discoloration.
Pay special attention to exposed circuits and places where water may have pooled or sat for awhile. Corrosion can build up in small crevices and cause components to short or fail over time. Check the underside of the keyboard and trackpad, as well as around ports and openings. If corrosion is present, it’s likely caused permanent damage that requires replacement of affected parts. Severe corrosion on the motherboard may mean a full logic board replacement is required.
Replace Damaged Parts
If the keyboard, battery, RAM, or other components appear corroded from the water damage, you may need to replace them. Assess whether the cost of replacing these parts is worth it compared to just buying a new laptop.
Replacing a laptop keyboard can cost $50-200 depending on the model (source). More complex keyboards like backlit or chiclet style may cost more. Also factor in labor costs if you can’t do the repair yourself.
Replacing the RAM or battery has similar costs – around $50-150 for the part, more for installation. If multiple components need replacement, it quickly adds up.
Compare these costs to a replacement laptop with similar specs. You can often find good deals on refurbished or open-box laptops under $300. If your repair costs approach this amount, it’s probably better to invest in a new machine.
But if the cost is low, or you have an expensive high-end laptop, repair may make more sense than replacement. Just be sure to fully dry and clean all components before reassembling.
Reassemble and Test
After leaving the laptop to dry for at least 48 hours, you can start to reassemble the device. Be patient and do not rush this process. The laptop needs to be 100% dry before powering back on, otherwise you risk further water damage.
Carefully reattach any parts you removed back onto the laptop, like the bottom case, RAM, wireless card, heat sink, fan, etc. Reconnect all ribbon cables and ensure each component is seated properly.
With everything assembled, it’s time to test the laptop. Press the power button and observe if the device turns on. If it boots up, that’s a great sign! Proceed to test every key on the keyboard. Make sure each one is functioning properly and not sticking.
If the laptop powers on and all keys work correctly, immediately back up your data if possible. Then, consider formatting the hard drive to wipe away any potential lingering issues from water exposure. This also provides a fresh start for your laptop.
If the device fails to power on or exhibits other issues like a distorted display, it’s best to seek professional repair. Water damage can cause complicated problems due to corrosion, short circuits, etc. Don’t attempt complex repairs on your own.
Cleanup Software
Water damage can corrupt system files, drivers, and settings on your laptop. After drying out the hardware, it’s important to clean up the software side as well.
Start by updating the BIOS and chipset drivers to the latest versions. Water may have corrupted key firmware files, and installing fresh BIOS and driver files can fix issues caused by the spill. Refer to your laptop manufacturer’s website to find the latest updates.
If you experience crashes, instability or performance issues even after updating drivers, it may be necessary to reinstall the operating system. Back up any important data first, then perform a clean install of Windows, macOS or your Linux distro. This will give you a fresh start with the OS and eliminate any corrupted files.
On Windows machines, you may need to reformat the drive before reinstalling. On Macs, you can use Disk Utility to erase the drive. Make sure to install the latest updates after reinstalling the OS.
Reinstalling apps can be tedious, but is worthwhile to eliminate any corrupted program files. If issues persist after updating the BIOS, drivers and OS, your laptop may require repair to address any lingering hardware problems.
Prevent Future Damage
There are a few simple steps you can take to help prevent liquid damage to your laptop in the future:
Use a spill-proof keyboard cover – These inexpensive, thin covers sit directly on top of your keyboard to protect it from spills and leaks. They allow you to still use your keyboard normally while adding a water-resistant barrier.
Keep drinks away from your laptop – Don’t place drinks on the same surface as your laptop. Use a separate table or desk for beverages. This removes the risk of accidentally knocking them over.
Respond quickly if spilled on – If you do spill a liquid on your laptop, react immediately. Quickly unplug it, turn it off, and start the drying process. The sooner you can stop the flow of electricity and dry it out, the better chance you have of saving it.
When to Seek Repair
In some cases of severe water damage, it may be better to seek professional repair or replace the laptop rather than attempting to fix it yourself. Here are some signs it’s time to take the laptop to a repair shop or replace it entirely:
- The laptop won’t power on at all, even after drying out for several days. This could indicate shorted components or corrosion on the motherboard.
- There are visible signs of corrosion, especially on electronic components or circuit boards. Corrosion can quickly spread and damage connections.
- You opened the laptop case and found standing water or moisture inside. Internal moisture increases the likelihood of unrepairable damage.
- Important components like the motherboard, CPU or GPU got wet. These parts are delicate and expensive to replace.
- The laptop requires disassembly of the entire casing to access internal components. It’s risky for inexperienced people to completely take apart a laptop.
- Replacement parts are expensive compared to the value of the laptop. For older models, it may not be worth investing in new components.
In these situations, it’s often better to hand the laptop over to a professional repair service. They have the expertise and parts inventory to properly diagnose issues and make necessary replacements. If the projected repair costs exceed the value of the laptop, it’s reasonable to invest in a replacement rather than sink money into an extensively damaged, older machine.