What is RAID 0?
RAID 0, also known as disk striping, is a type of RAID (Redundant Array of Independent Disks) configuration that spreads data evenly across two or more disks with no parity or redundancy. The main benefit of RAID 0 is increased disk performance and storage space compared to a single disk.
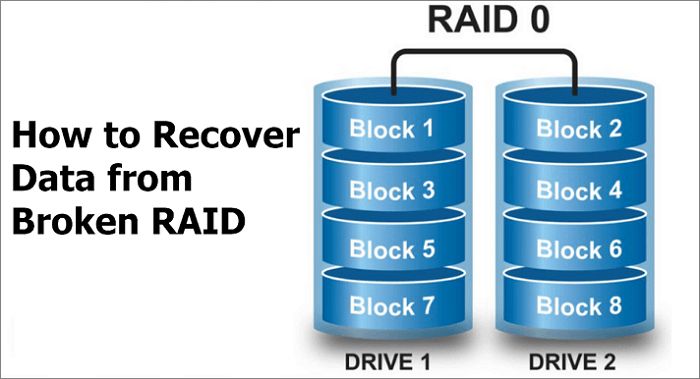
With RAID 0, data is split up into blocks called stripes that get written across the disks in the array. For example, in a 2 disk RAID 0 array, the first stripe gets written to disk 1, the second stripe to disk 2, the third to disk 1 again, and so on. This allows read and write operations to be performed in parallel across multiple disks, improving overall disk I/O performance.
However, RAID 0 provides no data protection. If one disk fails, all data across the RAID 0 array will be lost. For this reason, RAID 0 is generally used in non-critical storage environments where maximum performance is desired and potential data loss is an acceptable risk.
Benefits of RAID 0
RAID 0 offers performance benefits due to its striping mechanism, which splits and distributes data evenly across multiple drives (Source). There is no parity calculation, unlike RAID levels 1, 5, and 6. With no parity overhead, RAID 0 can achieve faster read and write speeds. Data can be accessed in parallel from multiple disks, allowing for increased bandwidth and I/O performance.
Specifically, RAID 0 provides faster reads and writes, very low latency, and high throughput. By spreading data across disks, the workload is distributed which maximizes the total disk bandwidth. The performance scales linearly with the number of drives. Overall, RAID 0 is ideal for applications that demand fast speeds and maximum throughput.
Risks of RAID 0
The main risk of using RAID 0 is that it has no fault tolerance. This means that if one disk in the RAID 0 array fails, all data across the entire array will be lost. There is no data redundancy in a RAID 0 setup.
Some key risks to understand with RAID 0 include:
- One disk failure results in total data loss – With the lack of redundancy, the failure of just a single disk will cause the entire RAID 0 array to fail, leading to complete data loss.
- Increased risk from multiple disks – The more disks in a RAID 0 array, the greater the likelihood of one disk failing. This exponentially increases the risk of failure and data loss.
- No protection during rebuild – Unlike RAID 1 or 5, rebuilding a RAID 0 provides no data protection. All data will be inaccessible during a rebuild attempt.
According to this Tom’s Hardware article, RAID 0 arrays are 10 times more likely to fail than a single disk. With no parity or mirroring of data across disks, RAID 0 is a very risky setup for any critical or valuable data. Any RAID 0 implementation requires accepting the possibility of catastrophic data loss.
Common RAID 0 Issues
RAID 0 arrays are prone to certain issues that can lead to data loss or inaccessibility. Some common problems include:
Degraded Array – If one disk in the RAID 0 array fails, the entire array will become degraded. This means the data is still accessible but there is no redundancy. Any further disk failure will result in complete data loss.
Disk Failure – With no parity or mirroring, the failure of just one disk in RAID 0 configuration will make all data on the array inaccessible. Rebuilding the array requires the failed disk to be replaced and the data to be restored from backup.
Controller Failure – The RAID controller is a critical component that manages the array. If the controller fails or malfunctions, access to the disks and data will be disrupted. The controller may need to be replaced to restore functionality.
According to datarecoveryuk.co.uk, other common RAID 0 problems include bad sectors on hard disks, failure due to overheating, and accidental deletion or corruption of disk partitions.
Checking RAID 0 Status
There are a few ways to check the status of a RAID 0 array in Windows to identify any issues. First, you can look at the RAID configuration using the Windows Disk Management utility (diskmgmt.msc). This will show you the RAID 0 volume and whether all disks are functioning and online.
To check from the command line, you can use the command wmic diskdrive get status to view the status of each disk (as referenced in this Microsoft article). All disks in the RAID 0 array should show a status of “OK”.
Additionally, you can check the status of the RAID volume itself using wmic LOGICALDISK GET HealthStatus (as shown in this guide from Promax). This will specifically indicate if the RAID 0 array is healthy or degraded/failed.
Regularly checking the RAID 0 status in Windows helps identify any disk failures or degradation issues before they become catastrophic failures. Keeping the disks and RAID volume healthy is critical for performance and protecting against data loss.
Rebuilding Degraded RAID 0
If one disk in a RAID 0 array fails, the array will go into a degraded state. This means the data is still accessible but at risk until the failed disk is replaced and rebuilt. To rebuild degraded RAID 0:
- Shut down the system and replace the failed physical drive with a new disk of the same capacity or larger.
- Restart the system and enter the RAID configuration utility, usually accessed during POST or through a specific hotkey during boot.
- The utility should detect the new drive and display the degraded array. Select the option to rebuild the array.
- The rebuilding process will take some time depending on the RAID 0 stripe size and disk capacity, but when finished the status should show as online and fully redundant.
It’s crucial to rebuild the RAID 0 array as soon as possible after a disk failure. The longer you wait, the higher the risk of a second disk failure and complete data loss. Regular backups are still essential for protecting against array failure. Consult your RAID controller documentation for full instructions on monitoring status and rebuilding degraded arrays.
Recovering Failed RAID 0
If your RAID 0 array has failed completely, the data will be inaccessible. This usually happens when both disks in the array fail or one disk fails and before you can rebuild the array, the second disk also fails. Here are two ways you can attempt to recover the data:
- Use data recovery tools – Specialized data recovery software like R-Studio can scan the failed disks and reconstruct the original RAID 0 array. This allows you to recover the data as long as the disks have not been completely corrupted or damaged. The data recovery process can be complex so it’s best to use an expert service if you do not have experience with RAID recovery tools. Some examples are R-Studio, ReclaiMe, and UFS Explorer.
- Restore from backup – Having a complete backup of your RAID 0 array is the best way to recover from failure. Simply restore the backup to a new set of disks to get your RAID 0 array up and running again. Regular backups are essential for RAID 0 since failure results in complete data loss without backups.
Recovering data from a failed RAID 0 is difficult and not always successful. That’s why it’s critical to take preventative measures like monitoring the array health and maintaining backups. Avoiding RAID 0 altogether and using RAID 1 or RAID 5 can also prevent the risk of catastrophic data loss.
Source: https://www.mcgm.gov.in/irj/
Migrating RAID 0 to New Disks
When it’s time to upgrade your storage disks, you’ll need to migrate your RAID 0 array to the new disks. Here are the steps to safely move your RAID 0 data to new disks:
1. Back up your RAID 0 data. Since RAID 0 provides no redundancy, it’s crucial to have a complete backup before beginning the migration. Back up all critical data to an external drive or cloud storage.
2. Install the new disks and create a new RAID 0 array. In the RAID management software, select the new disks and create a new striped RAID 0 array. Make sure the array is the same size or larger than the original.
3. Restore the backup to the new RAID 0 array. With the backup complete and new array created, restore the backup data to get your files onto the new RAID 0 volume.
Migrating RAID 0 to new disks requires careful planning and execution. Always back up data first since RAID 0 offers no redundancy. With a good backup, you can safely transfer RAID 0 to new drives when it’s time to upgrade storage. See this IBM article for more details on the migration process.
Converting RAID 0 to RAID 1
If you want the redundancy and protection against drive failure that RAID 1 offers, you can convert an existing RAID 0 array to RAID 1 without losing your data. Here are the steps:
-
Back up your RAID 0 data. Copy the data to an external hard drive or other location outside of the RAID 0 array. This protects your data in case anything goes wrong during the conversion process.
-
Add a drive to the RAID 0 array that is at least as large as the existing drives. For RAID 1, you need two drives of equal size.
-
Use your RAID management software to create a new RAID 1 array using the new drive and one of the existing RAID 0 drives. Make sure the array is initialized but don’t format it yet.[1]
-
Restore your data back to the new RAID 1 array.
-
Once your data is restored, you can format the new RAID 1 array.
-
After formatting, your data will remain intact on the RAID 1 array.
-
You can now remove the old RAID 0 drive that was not converted to RAID 1 if desired.
Converting from RAID 0 to RAID 1 allows you to gain fault tolerance without having to reconfigure your setup or migrate data to entirely new drives.
Best Practices
When using RAID 0, there are some best practices to follow to help maximize performance and minimize the risk of data loss.
It’s important to regularly monitor the SMART status of the disks in the array to check for signs of potential failure. Many RAID controllers and disk utilities provide tools to monitor SMART attributes like reallocated sectors, spin retries, and temperature [1].
Maintaining hot spares can help reduce downtime if a disk does fail. The hot spare will automatically rebuild the RAID array if a disk fails. However, you still risk data loss during the rebuild process.
Backups are critical with RAID 0 since it does not provide redundancy. Frequent backups to an external location allow you to recover data if the entire RAID 0 array fails.
Other best practices include using enterprise-grade disks designed for RAID environments and monitoring array and controller logs for errors.
