exFAT is a file system introduced by Microsoft in 2006. It was designed to offer improved performance and larger file size limits compared to the older FAT32 system. exFAT is a lightweight file system well-suited for flash drives and other external storage devices like SD cards and SSD drives. It allows for much larger file sizes of up to 16 exbibytes and for faster file operations.
diskpart is a command-line disk partitioning utility included with Microsoft Windows operating systems. It allows you to manage disks, partitions, and volumes from the command prompt. diskpart can be used to create, delete, format, extend, and shrink partitions. It is a powerful tool for preparing and configuring storage devices like USB drives and hard disks. To use diskpart, you open the Command Prompt app and type ‘diskpart’ to launch the utility.
Prerequisites
Before formatting a drive to exFAT, there are a few prerequisites that need to be met:
You need administrative privileges on the computer in order to access diskpart and format drives. On Windows, you’ll need to open the Command Prompt as an administrator. On macOS, you’ll need to use the Terminal app with sudo privileges.
You’ll also need a drive to format. This can be an internal hard drive, solid state drive, external USB drive, or other storage device. The drive must be connected and accessible from your computer.
Importantly, back up any important data on the drive before formatting. The formatting process will erase all data, so make sure anything you need is saved and backed up elsewhere. Copy important files and folders to another drive or cloud storage.
Once you meet these prerequisites, you’ll be ready to use diskpart to format the drive to exFAT.
Open Diskpart
To open Diskpart, you first need to open an elevated Command Prompt window. This allows Diskpart to run with administrator privileges and access all disks.
According to Seagate, you can open an elevated Command Prompt by searching for “Command Prompt” in the Windows search bar, right clicking on the top result, and selecting “Run as administrator”.
Once you have an elevated Command Prompt open, simply type “diskpart” and hit enter to launch the Diskpart utility, as explained on NeoSmart Technologies’ Diskpart guide. You will see the Diskpart prompt appear, indicating you are now ready to run Diskpart commands.
List Disks
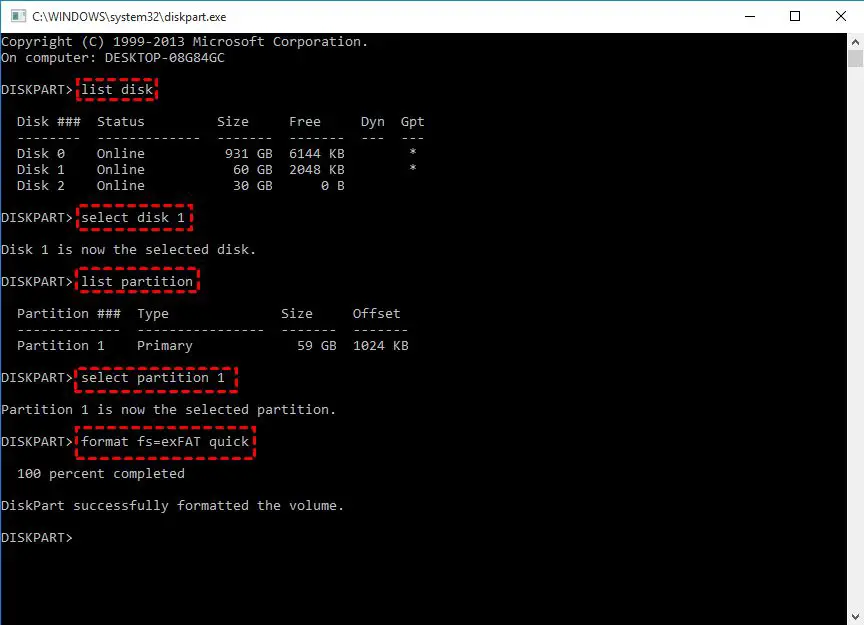
The first step is to list the available disks in diskpart so that you can identify the drive you want to format. Use the list disk command for this:
At the diskpart prompt, type list disk and press Enter. This will display all the disks detected by diskpart with information like disk number, size, and status.
For example:
DISKPART> list disk

  Disk ###  Status         Size     Free     Dyn  Gpt
  --------  -------------  -------  -------  ---  ---
  Disk 0    Online          119 GB      0 B
  Disk 1    Online          931 GB      0 B
Here you can see there are 2 disks – Disk 0 of 119 GB and Disk 1 of 931 GB. Identify the disk number of the drive you want to format.
For more details on the list disk command, refer to Microsoft’s Diskpart documentation.
Select Disk
The next step is to select the disk you want to format with the select disk command. To do this:
- At the Diskpart prompt, type ‘select disk #’ where # is the disk number you want to select. You can find the disk numbers by using the ‘list disk’ command first.
- For example, to select disk 0, type ‘select disk 0’ and press enter.
- This will select the disk you want to format going forward.
As explained on the Microsoft documentation, “You can view the numbers for all the disks on the computer by using the list disk command in DiskPart.” [1] It’s important to specify the correct disk number to avoid accidentally formatting the wrong drive.
Clean Disk
Before formatting the disk, you’ll want to clean it to remove any existing partitions or data. The clean command in diskpart will do this.
Type the following command at the diskpart prompt:
clean
This will erase the disk’s partition table and file system information, effectively wiping it clean (Source). The clean command permanently deletes all data on the disk by overwriting it, so be certain you have backups of anything important.
After running the clean command, the disk will show as “Unallocated” space and be ready for a new partition to be created and formatted.
Create Partition
To create a new primary partition using Diskpart, you need to use the “create partition primary” command. Here is the syntax:
diskpart> create partition primary [size=n] [offset=n]
The size parameter specifies the size of the partition in MB. If not specified, it will use the maximum available unused space. The offset parameter specifies the starting offset of the partition from the start of the disk in MB. If not specified, it will start the partition at the first available unused space.1
For example, to create a new 50GB primary partition, you would run:
diskpart> create partition primary size=51200
This will create a 50GB (51200 MB) primary partition using the free space on the disk. After creating the partition, you will need to format it before it can be used.
Format Partition
Once you have created the new partition on the disk, the next step is to format it to exFAT. This is done using the “format” command in diskpart. The basic syntax is:
format fs=exfat [volume]
For example, if your new partition is volume 3, you would type:
diskpart> format fs=exFAT 3
This will format the partition to exFAT file system. You can also add the “quick” parameter to do a quick format:
diskpart> format fs=exFAT quick 3
The quick format just writes an empty file system table to the partition without scanning the entire disk for errors. This makes the format process much faster.
Once the format command completes, the selected partition will now be formatted as exFAT and ready for use. The diskpart utility will indicate “100 percent completed” when done.
For more details and examples, see this guide on formatting exFAT in diskpart: https://www.diskpart.com/articles/diskpart-format-exfat-1984.html
Assign Letter
Once the partition is formatted, you can assign a drive letter so that it shows up in Windows Explorer. To do this, type the following command in Diskpart:
assign letter=[drive letter]
Replace [drive letter] with the letter you want to assign to the partition. For example:
assign letter=F
This will assign the letter F to the selected partition.1 The drive will now appear in File Explorer with the assigned drive letter.
To view the changes, you can type “exit” to close Diskpart and open up File Explorer to confirm the drive letter has been assigned as intended.
Exit
To exit Diskpart, type “exit” at the Diskpart prompt and press Enter:
diskpart> exit
This will close the Diskpart utility. You can also type “exit” at the command prompt to completely close the command line interface.
According to the Microsoft documentation on Diskpart, the “exit” command “Exits the diskpart command interpreter.” So this command will close out of Diskpart and return you to the standard command prompt.
Once Diskpart is exited, you will no longer be able to execute Diskpart commands until you open it again. Exiting is an important final step after completing all the necessary disk partitioning and formatting commands.