The FAT32 and exFAT are two common file systems for formatting storage drives like USB flash drives, memory cards, and external hard drives. Both have advantages and disadvantages compared to each other.
FAT32 (File Allocation Table 32) is an older file system that has been around since Windows 95. It uses 32-bit disk addressing, allowing for a maximum volume size of 2TB. FAT32 has widespread compatibility with devices and operating systems. However, it has limitations like a maximum file size of 4GB and slower performance with larger volumes.
exFAT (Extended File Allocation Table) is a more modern file system introduced in 2006. It supports larger volume sizes up to 128PB and has no file size limit. exFAT is optimized for flash drives and performs better with large volume sizes compared to FAT32. However, exFAT has less compatibility with older devices. https://history-computer.com/exfat-vs-fat32/
This article provides a detailed guide on formatting a flash drive to FAT32 instead of the default exFAT format. It will cover when to use each format, how to check the existing format, procedures to format to FAT32, and how to verify the new format.
When to Use FAT32
FAT32 is the oldest and most compatible file system of the three. It was introduced in Windows 95 to replace the older FAT16 file system. Nearly every operating system supports reading and writing to FAT32 drives today.
The main advantage of FAT32 is its broad compatibility with older devices. If you have a device older than 10 years, it most likely only supports FAT32 and cannot read drives formatted with exFAT. Examples include:
- Older digital cameras from the 2000s
- Original Xbox and Xbox 360 gaming consoles
- Older DVD players, TVs, and car media systems
- Older routers, printers, scanners, and other devices
So if you have older equipment that needs to access the contents of a flash drive or external hard drive, formatting to FAT32 is often the only option to ensure compatibility across devices. The tradeoff is FAT32’s limitations for larger drives and file sizes.
Source: https://www.howtogeek.com/235596/whats-the-difference-between-fat32-exfat-and-ntfs/
When to Use exFAT
exFAT (Extended File Allocation Table) is optimized for handling large file sizes that are larger than 4GB, which is the maximum file size limit for FAT32. With exFAT, you can store files that are larger than 4GB, with a maximum file size limit of 16EB (exabytes). This makes exFAT a good choice if you need to store very large files like movies and other media files larger than 4GB on your flash drive (1).
However, while exFAT eliminates the 4GB file size limitation of FAT32, it is not quite as compatible with older devices. Most modern operating systems like Windows 10, macOS, Linux, Android, and others support exFAT, but some older systems may not recognize an exFAT formatted flash drive. So exFAT is ideal for situations where you need to store very large files, as long as your devices support exFAT file systems.
Check Current Format
Before formatting a flash drive, it’s important to check the current format. This can easily be done using File Explorer in Windows. Simply right-click on the flash drive and select “Properties”. In the Properties window that pops up, look under the “General” tab for “File system”. This will indicate if the flash drive is currently formatted as FAT32, exFAT, NTFS, or another file system.
For example, this guide shows how right-clicking the flash drive in File Explorer, selecting Properties, and checking the File system field will identify the format. This simple check confirms the current format before making any changes.
Back Up Data First
Before formatting your flash drive, it’s crucial to back up all the data on it first. This ensures that you don’t risk losing any important files or information in the formatting process.
The best way to back up a flash drive is to copy all the data from it onto another location, such as your computer’s internal hard drive, an external hard drive, or cloud storage. Be sure to copy all folders and files – don’t miss hidden files as well.
Once you’ve verified the backup copy contains all the data, you can safely proceed with formatting the flash drive. If anything goes wrong during formatting, you’ll still have the data saved elsewhere.
There are also USB flash drive backup software tools that can simplify and automate the process of creating a backup. For example, Handy Recovery allows you to quickly backup a flash drive before formatting.
Taking the time to properly back up your flash drive avoids the risk of permanent data loss. The minor inconvenience of backing up data is a small price to pay for the peace of mind of knowing your files and folders are safely stored elsewhere before formatting.
Use Windows Tool
Disk Management is the built-in Windows tool for managing hard disk drives and the volumes or partitions they contain. To access Disk Management in Windows 10 or 11:
1. Press the Windows key + R to open the Run dialog box.
2. Type diskmgmt.msc and hit Enter 1.
This will launch the Disk Management console. You can also access Disk Management by right-clicking This PC from File Explorer and selecting Manage > Disk Management 2.
Disk Management allows you to view information about attached drives, create and delete partitions, format drives, and more. Use this tool to format your flash drive to FAT32.
Select Drive to Format
The first step is to identify the flash drive you want to format. This is done in Windows Disk Management.
To open Disk Management in Windows 10 and 11:
- Press Windows Key + R to open the Run dialog box.
- Type diskmgmt.msc and click OK or press Enter.
In Disk Management, the flash drives are listed in the lower pane. They are typically labeled as Removable Disk with a drive letter assigned. Make sure you have selected the correct removable disk that represents your flash drive.
To select the flash drive to format:
- In Disk Management, locate the removable disk that represents your flash drive.
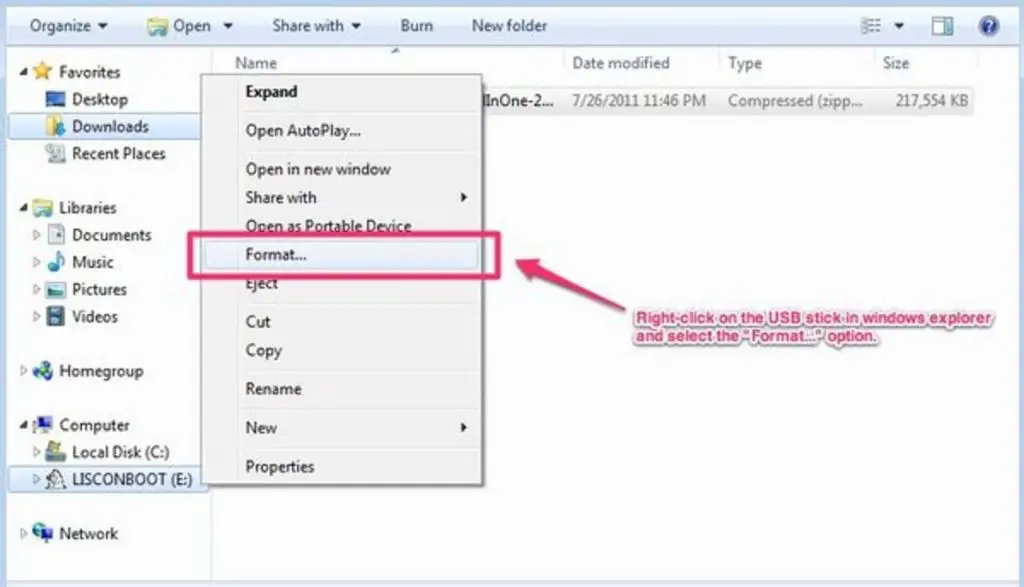
- Right-click on the disk and select Format.
This will open the Format dialog box for that specific disk. From here, you can select FAT32 as the file system.
It’s critical to select the proper removable disk, so you don’t accidentally format another drive. Check the disk capacity and drive letter to ensure you are formatting your intended flash drive.
Choose FAT32
When the Format dialog box opens, you’ll need to select FAT32 as the file system. This is done by opening the “File system” drop-down menu near the top of the dialog box. The default option is usually NTFS. Click on the drop-down arrow to view all available choices. Select “FAT32” from the menu options.
According to MiniTool, sometimes FAT32 may not appear as an option if the drive is over 32GB. In that case, you may need to split the drive into smaller partitions first. Once each partition is 32GB or less, the FAT32 option should become available when formatting each section.
Assign Drive Letter
Assigning a drive letter is an optional step if you want the flash drive to have a specific letter designation like E: or F:. This can be useful for referencing the drive in shortcuts or scripts. Here’s an example of creating a shortcut that relies on a specific drive letter.
To assign a drive letter in Windows:
- Open Disk Management.
- Right-click on the flash drive and choose Change Drive Letter and Paths.
- Click Change and select the desired drive letter.
- Click OK to assign it.
Now the flash drive will mount with the chosen letter whenever it’s plugged in. Keep in mind the letter could change if another drive takes the letter when this one isn’t connected.
Check New Format
After formatting the drive, it’s important to verify that the format was successful. Here are a few ways to check the new format on Windows and Mac:
On Windows 10 and 11:
1. Open File Explorer and locate the flash drive under “This PC”.
2. Right click on the drive and select “Properties”.
3. Under the General tab, next to “File system:” it should show “FAT32”.
On Mac:
1. Open Finder and locate the flash drive on the left sidebar.
2. Right click on the drive and select “Get Info”.
3. Under “General”, next to “Format:” it should show “MS-DOS (FAT32)”.
You can also use third party tools like guiformat (http://www.ridgecrop.demon.co.uk/index.htm?guiformat.htm) to quickly check the format of a drive.