USB flash drives are a convenient way to store and transport files. However, sometimes a USB drive may become write-protected, meaning you cannot add, change or delete files on the drive. Write protection helps prevent accidental deletion or modification of important files. But if you need to use the USB drive, write protection can be a hindrance.
This article will provide step-by-step instructions to remove write protection from a USB drive using Command Prompt in Windows. We’ll cover how to check the write protection status, the reasons a drive may be write-protected, how to disable protection, and troubleshooting tips.
By following this guide, you’ll be able to format your write-protected USB drive and use it fully again.
Reasons for Write Protection
One of the most common reasons a USB drive becomes write protected is due to a physical switch on the drive itself. Many USB drives have a small toggle or slider switch on the body of the drive that can be moved to enable or disable write protection.
When this switch is slid into the “lock” position, it sets the drive to be read-only and prevents any new data from being written to it. This acts as a safeguard against accidentally deleting or overwriting files already on the drive.
Before attempting any troubleshooting steps, it’s important to check whether the write protection switch is simply enabled. If so, carefully sliding it back to the unlocked position should immediately resolve the issue and allow the drive to be formatted as normal.
For example, SanDisk Cruzer drives have a small switch on the body of the drive, while Kingston DataTraveler drives use a slider toggle. Consult your drive’s manual or online references to locate any similar physical write-protect controls if unsure.[1]
Check Write Protection Status
You can check the write protection status of a USB drive using the command prompt in Windows. This allows you to view if write protection is enabled without having to check the physical switch on the USB drive.
To check the status, first connect the USB drive to your computer. Then open the command prompt by pressing Windows key + R and typing “cmd”.
In the command prompt, type the following command and press Enter:
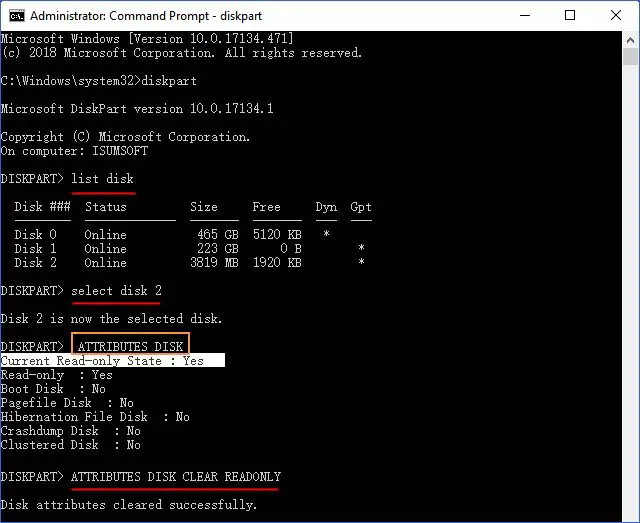
diskpart
This will open the DiskPart utility. Next, type the following command and press Enter to list all connected disks and drives:
list disk
Locate the disk number for your USB drive in the list. Then type the following command, replacing X with your disk number:
select disk X
Finally, type this command and press Enter:
attributes disk
Check the attributes listed for the disk. If you see “Read-only” listed, then write protection is enabled on the USB drive. If not, write protection is disabled.
You can exit DiskPart and the command prompt when finished.
For more details on using the command prompt to manage disks, see this guide from Computer Hope: How to Enable or Disable Write Protection on a USB Flash Drive
Disable Write Protection
One of the easiest ways to disable write protection is to simply flip the small hardware switch on the USB drive to the unlocked position. Most USB drives have a tiny physical slider or tab that slides between a “locked” and “unlocked” position to control write protection (1). To disable write protection:
- Locate the small slider or tab on your USB drive. This is usually on the side or top of the drive. The locked position may be indicated by a small padlock icon or label.
- Gently slide the tab to the unlocked position, often indicated by an open padlock. Be careful not to use too much force.
- The drive can now be written to. Remember to slide the tab back to the locked position when you want to re-enable write protection.
Flipping this hardware switch is the easiest way to instantly disable or enable write protection as needed. However, if your USB drive doesn’t have a physical write-protect tab, or if you want to enable write protection through software instead, there are additional options covered next.
(1) https://www.usbmemorydirect.com/blog/remove-write-protection-usb-drive/
Format the USB Drive
To format the USB drive using command prompt, the diskpart utility will need to be used. Diskpart is a command line tool that allows you to manage disks and volumes from the command line. Here are the steps to format a USB drive using diskpart:
1. Open command prompt as administrator. To do this, search for “command prompt” in the Windows search bar. Right click on the command prompt app result and select “Run as administrator”.
2. Type “diskpart” and press Enter. This will start the diskpart utility.
3. Type “list disk” and press Enter. This will show all the disks connected to your computer. Identify the disk number for your USB drive.
4. Type “select disk X” where X is the disk number for your USB drive, and press Enter. This will select the USB disk.
5. Type “clean” and press Enter. This will completely erase all data on the USB drive.
6. Type “create partition primary” and press Enter. This will create a primary partition on the USB drive.
7. Type “format fs=ntfs quick” and press Enter. This will format the USB drive with the NTFS file system.
8. Type “assign” and press Enter. This will assign a drive letter to the USB drive.
9. Type “exit” to close diskpart.
The USB drive is now formatted and ready to use. Make sure to backup any important data before formatting a drive using these steps, as all data will be erased.
For more details, refer to this guide: https://www.wikihow.com/Format-a-USB-Using-Cmd
Troubleshooting
If the format fails, there are a few things you can try:
- Make sure the USB drive is properly connected. Try unplugging it and plugging it back in.
- Try formatting the USB on a different computer.
- Use the diskpart utility to clean and format the drive. Open an elevated command prompt and type:
diskpart
list disk
select disk X (where X is the USB disk number)
clean
create partition primary
format fs=fat32 quick
assign
exit
- If the drive has a physical write-protection switch, make sure it is disabled.
- The drive may be damaged and unusable. Try a different USB drive.
- Use third-party formatting tools like EaseUS Partition Master Free or MiniTool Partition Wizard to format the USB.
If nothing works, the USB drive is likely faulty and may need to be replaced.
Re-enable Write Protection
Once you have finished formatting the USB drive and no longer need to write to it, you can re-enable write protection. This will prevent any further changes to the data on the drive.
For USB drives with a physical write-protect switch, simply flip the switch back to the locked or protected position. This is usually labeled on the housing of the drive or denoted with a lock icon (https://www.lenovo.com/us/en/glossary/write-protect/). Flipping this hardware switch back will re-enable write protection and prevent further writing to the drive.
For other drives without a physical switch, you will need to re-enable software write protection. On Chromebooks, run the flashrom --wp-enable command in developer mode (https://wiki.mrchromebox.tech/Firmware_Write_Protect). For Windows, re-enable write protection through the registry, diskpart, or other utilities depending on the specific device (https://chromium.googlesource.com/chromiumos/docs/+/master/write_protection.md).
Re-enabling write protection ensures no additional data can be written to the USB drive until it is intentionally disabled again. This prevents accidental or unauthorized changes to the data.
Alternative Methods
Using 3rd party software is another way to format a write-protected USB drive. There are various premium and free tools available that can override or remove write protection on USB drives and allow you to format them.
Some popular options include:
- AOMEI Partition Assistant – Allows you to format read-only USB drives and has a free version
- EaseUS Partition Master – Can format write-protected USB drives and manage disk partitions
- HP USB Disk Storage Format Tool – Specifically for HP USB drives to remove write protection
- Kingston USB Format Tool – Official tool from Kingston for their USB drives
These tools are relatively easy to use. You simply need to install them, connect the write-protected USB drive, choose the format option, and click format. The software will override the write-protection and reformat the USB drive.
Data Recovery
If you formatted your USB drive and need to recover lost files, there are a few options available. The easiest way is to use reliable third party software like EaseUS Data Recovery Wizard which can scan your drive and retrieve deleted or lost data after being formatted. This kind of software is usually very effective at recovering data unless it has been overwritten. You can download a trial version for free and see if it is able to find your lost files before purchasing the full software.
If you need a completely free solution, you can try using the command prompt. Open a command prompt window as administrator and type:
chkdsk x: /f
Where x is the letter of your USB drive. This will scan and attempt to recover readable data. You can also use a free live Linux USB like Ubuntu to boot your computer from the USB, then access the formatted drive and copy any retrievable data off of it.
As a last resort, if no DIY software recovery options work, you can turn to a professional data recovery service. They can physically access and repair drives to rescue data, but this option is expensive. It’s best to avoid formatting drives unnecessarily, and remember to always backup your important files.
Conclusion
In summary, if your USB drive shows as write-protected, there are several potential causes to check. First, look for a physical lock switch on the drive casing that needs to be slid to unlock. If that is not present, the issue may be due to a corrupted registry key, which you can resolve by editing the registry to disable write protection. Using the Command Prompt to remove write protection is another option that involves using the ‘attributes’ command. If you need to reset the USB completely, formatting can be done via Command Prompt as well, using the ‘format’ command.
The most common mistakes when trying to format write-protected drives are not checking for the physical lock first, forgetting to run Command Prompt as Administrator, and entering the format command incorrectly. With the steps outlined here, you should be able to successfully remove write protection and reformat your USB drive through either the registry editor or Command Prompt in Windows.