Formatting an external hard drive for use with Mac without losing data is a common task for many Mac users. The goal is to reformat the drive to a Mac compatible format like Mac OS Extended (Journaled) or APFS without erasing or losing any of the existing data on the drive. This allows you to use the external drive seamlessly with Time Machine backups, FileVault encryption, and other Mac features, while still retaining all your files and folders already stored on the drive.
Reformatting a drive normally requires erasing all contents, so special steps must be taken to change the format without touching the actual data. This involves techniques like partitioning or adding a new blank partition while leaving existing ones intact. With the right preparation and tools like Disk Utility, Terminal, and third-party software, you can reformat the drive properly for Mac while keeping all your data safe.
Back Up Your Data
Before formatting your external hard drive for Mac, it is critically important to back up your data to avoid permanent data loss. As recommended by Wondershare, “creating a backup is the necessary step to secure the data before any process of reformatting the device or drive” (source). Backing up copies your files to another location so you have a restore point if something goes wrong during the formatting process.
There are a few options for backing up your data:
- Copy files to another external drive or cloud storage
- Use backup software to create a system image
- Manually drag and drop files to another location
The key is to have at least one copy of your data in a different physical location before formatting. Don’t skip this step! Taking the extra time upfront to properly back up your data can save you from catastrophic data loss down the road if anything goes wrong.
Check Drive Format
Before formatting your external hard drive, it’s important to check what format it is currently using. This will let you know if it is already formatted for Mac or Windows.
To check the format of your external hard drive on a Mac:
- Open Disk Utility on your Mac. The easiest way is to use Spotlight by hitting Command + Spacebar and typing “Disk Utility”.
- In the left sidebar in Disk Utility, you will see a list of all connected drives. Select your external hard drive from this list.
- Look at the information presented on the right side of the Disk Utility window. Under “Format” it will indicate if the drive is formatted for Mac (Mac OS Extended/APFS/HFS+) or Windows (ExFAT, FAT32, NTFS).
If it is already formatted for Mac, you can use the drive without reformatting. If it is formatted for Windows, you will need to reformat it using Disk Utility before you can use it.
Checking the format ahead of time prevents you from accidentally erasing data if the drive is already Mac compatible.
Use Disk Utility
The easiest way to format your external hard drive for Mac without erasing data is by using Disk Utility. Disk Utility is a built-in app on Mac that allows you to manage internal and external drives. Here is a step-by-step guide to using Disk Utility to format your drive:
- Connect your external hard drive to your Mac.
- Open Disk Utility (located in Applications > Utilities).
- Select your external hard drive from the left side panel in Disk Utility.
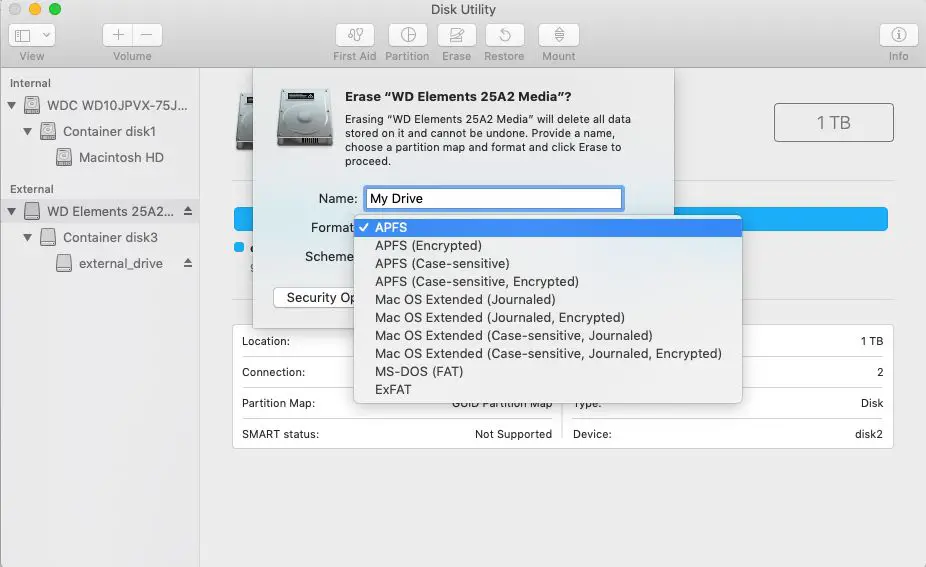
- Click the Erase button along the top menu bar.
- Choose a name, format, and scheme for your drive. Select “ExFAT” as the format to make your drive compatible with both Mac and Windows.
- IMPORTANT: Make sure to uncheck the “Erase” checkbox next to the format options. This will reformat the drive without erasing any data.
- Click Erase to reformat the drive.
Disk Utility will reformat the drive to be compatible with your Mac without erasing any existing data. Just make sure to uncheck the erase data option before clicking Erase. Your files will still be accessible after the reformat.
Source: How to Format an External Drive without Losing Data
Format as ExFAT
ExFAT is an optimal file system to use when formatting an external hard drive for use between Mac and Windows computers. The ExFAT file system has the benefit of being compatible with both Mac OS X 10.6.5 and up as well as Windows Vista SP1 and up (Seagate).
Unlike FAT32, ExFAT does not have limits on file sizes or volume sizes, making it ideal for large external hard drives. ExFAT also has better performance than FAT32. In addition, ExFAT supports Unicode file names, while FAT32 only supports short 8.3 file names (UNSW).
By formatting an external hard drive as ExFAT, you can easily transfer files between Mac and Windows computers without having to constantly reformat the drive. Just remember to install the necessary ExFAT drivers on any Windows or Mac computers you want to use the drive with.
Troubleshooting
Formatting an external hard drive in Mac doesn’t always go smoothly. Here are some solutions for common formatting issues:
If you receive an error like “Format did not complete successfully”, it could indicate a corrupted file system or bad sectors on the drive. Trying formatting the drive using Disk Utility’s “Erase” function instead of “Partition”. This will completely reformat the drive and could resolve any underlying issues. See this guide for more troubleshooting steps.
Slow or stalled formatting is also common. This is often caused by bad blocks or sectors on the drive. Let the formatting run and see if it eventually completes, even if it takes hours. You can also try re-formatting the drive after restarting your Mac. Check this article for tips on resolving stalled formatting.
If formatting fails or data seems to be corrupted after formatting, your drive itself may be damaged. Try reformatting on a different Mac or PC to test the drive hardware. You may need to replace the drive if it consistently fails formatting across different machines.
Restoring Data
If you backed up your data before formatting the external hard drive, you can easily restore it after formatting. Here are the steps:
1. Reconnect the newly formatted external hard drive to your Mac.
2. Open Time Machine and enter Time Machine Recovery Mode by clicking “Enter Time Machine”.
3. Navigate to the time right before you reformatted the external hard drive and find the files/folders you want to restore.
4. Select the files/folders and click the “Restore” button. This will copy the files from your backup to the newly formatted external drive.
If you use backup software other than Time Machine, consult the documentation for that software on how to restore files from a backup. The key is that reformatting the drive does not delete backup data, so you can retrieve your files after formatting as long as you have a backup.
For more information, see this Apple support article on how to recover files from Time Machine.
Partitioning
When formatting an external hard drive for use with Mac, you may want to create separate partitions on the drive for different purposes. For example, you can create one partition for Time Machine backups and another partition for general data storage.
To partition a drive in Disk Utility on Mac (source):
- Open Disk Utility and select the external drive from the sidebar.
- Click the Partition button.
- Under Volume Scheme, choose the number of partitions you want to create.
- For each partition, give it a name, select a format (APFS or exFAT), and specify the storage capacity.
- Click Apply.
This will partition the external drive without having to erase it first. You can create one APFS formatted partition for Time Machine and one exFAT partition for cross-platform file storage.
Partitioning allows you to segment the drive into logical volumes for different purposes, while still having it accessible as a single physical disk.
Summary
In summary, the key steps to format an external hard drive for Mac without losing data are:
1. Back up your data on the external drive to another location first, so you have a copy.
2. Use Disk Utility on your Mac to select the external drive and click “Erase” in the toolbar.
3. Choose “ExFAT” as the format, which works with both Macs and PCs.
4. Click “Erase” to format the drive – this will delete all existing data.
5. Once formatted, you can restore your data back to the external drive.
Following these steps allows you to reformat the drive while keeping a separate backup copy of your data, so no files are permanently lost in the process.
Additional Resources
For more help formatting an external hard drive for Mac without erasing data, check out these resources:
Apple’s support article on erasing and reformatting a storage device in Disk Utility.
A video tutorial from MacMost on how to format an external hard drive for Mac without losing data.
Apple’s guide on how to back up your Mac before erasing or reformatting a drive.
An article from MakeUseOf explaining how to format an external hard drive for Mac and Windows.
Apple’s support site containing Disk Utility help resources and documentation.