Formatting a USB drive to create a bootable Windows installation media is a common task for many computer users. A bootable Windows USB allows you to install or repair Windows on a computer. This guide will walk through the steps to properly format a USB flash drive and create a bootable Windows installation drive from an ISO file.
Why Format a USB Drive for Bootable Windows Installation Media?
There are several reasons you may want to create a Windows bootable USB drive:
- Install Windows on a new computer that does not have an optical disc drive
- Reinstall or repair Windows on an existing computer
- Install multiple versions or editions of Windows without swapping discs
- Test new versions or builds of Windows without burning discs
- Boot into Windows recovery tools to troubleshoot problems
- Migrate Windows installations to new computers or hard drives
A bootable Windows USB drive provides flexibility and convenience compared to using DVD installation media. USB flash drive prices have dropped significantly in recent years, making them an inexpensive option for system deployment and maintenance.
Requirements
To create a bootable Windows installation drive, you will need the following:
- A USB flash drive with at least 8GB of space – 16GB or larger recommended
- A Windows ISO file or installation disc
- Windows 7 or later – Windows Vista and earlier do not support USB booting
- Administrative access to a Windows PC for formatting and setup
The process will involve formatting the USB drive, mounting the Windows ISO file, and copying installer files to the USB. This guide covers the most common methods using tools included in modern versions of Windows.
Step 1 – Format the USB Drive
The first step is to connect the USB drive to your current Windows PC and format it properly for a bootable installation drive.
Warning: This process will erase all data on the USB drive. Back up any files you need to keep before formatting.
To format the drive:
- Connect your USB flash drive to the computer.
- Open File Explorer and locate your USB drive.
- Right click on the drive and select Format…
- In the Format window:
- Under File System, select NTFS.
- Check the Quick Format box.
- Click Start to begin formatting.
Your USB drive is now formatted and ready for the bootable Windows installation files.
Step 2 – Mount Windows ISO
To add the Windows installation files, you’ll need to mount the ISO file to a virtual drive on your computer. This allows you to access the contents like a normal drive.
If you have the Windows ISO file:
- Locate the ISO file on your computer.
- Right click the file and select Mount (or Burn depending on your system).
- This will mount the ISO and assign it a drive letter.
If you have the Windows installation disc:
- Insert the disc into your computer’s optical drive.
- Open File Explorer and locate the optical drive.
- This assigns it a drive letter you can access just like the ISO.
Now that the ISO or disc is mounted, you can view the Windows installation files.
Step 3 – Copy Windows Installation Files to USB
With the USB drive formatted and Windows ISO mounted, it’s time to transfer the required boot files.
- Open File Explorer and locate your mounted Windows ISO/disc and formatted USB drive.
- Select and copy all files and folders from the mounted Windows drive.
- Paste the files and folders into the root of your USB drive.
- The required Windows installation files are now copied to your USB drive.
The exact file structure may vary slightly depending on your specific version of Windows. But you need everything from the ISO/disc for a complete installation.
Step 4 – Configure USB for Bootable Installation
The final step is to configure the USB drive boot sector properly for booting the Windows installation files.
If you formatted your drive using the steps above in Disk Management, it should already be bootable. You can test by restarting your computer, entering the BIOS/EFI boot menu, and selecting your USB drive to boot from it.
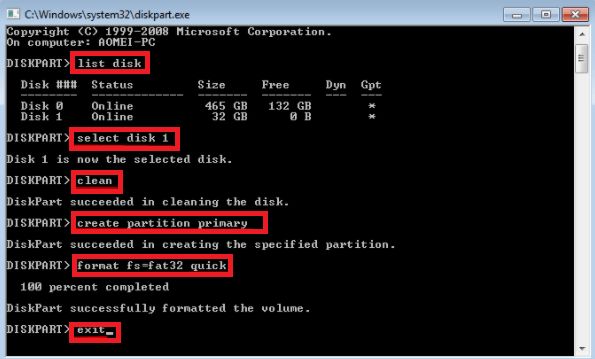
If your drive does not boot, you need to set the active partition flag on it using DiskPart:
- Open the Command Prompt as Administrator.
- Enter the command diskpart to open the DiskPart utility.
- Enter list disk to list all disks.
- Select your USB drive by entering select disk # (replace # with its drive number).
- Enter list partition to list partitions on this drive.
- Select the primary partition by entering select partition #.
- Enter active to set the active flag on this partition.
- Enter exit to close DiskPart.
Your USB drive primary partition is now active and bootable. You can test by restarting and booting directly to the drive.
How to Use Your Windows Bootable USB Drive
Once you have formatted and configured your bootable Windows USB drive, you can use it for various installation and recovery tasks.
When booting a computer from the drive, you will enter the standard Windows setup process. This allows you to:
- Install Windows on a new or wiped computer.
- Perform clean reinstalls of Windows over an existing OS.
- Downgrade or upgrade Windows versions and editions.
- Partition and format disks during the installation process.
If you boot into Windows setup on an existing OS, look for the Repair your computer link on the lower left corner of the first screen. This opens the Recovery Environment, providing advanced recovery tools:
- System Restore – Rollback system files and settings.
- Startup Repair – Fix boot issues.
- Command Prompt – Advanced troubleshooting and repairs.
- System Image Recovery – Restore full system backup images.
Refer to Microsoft support documentation for your specific version of Windows to learn more about utilizing these recovery tools.
Tips for Creating a Windows Bootable USB
Follow these tips for a smooth process creating and using a Windows bootable USB:
- Back up your data – Formatting erases the drive, so save any data first.
- Use a fast USB 3.0 drive – Faster read/write speeds result in better performance.
- Stick to major brands – Avoid cheap no-name drives that may be unreliable.
- Disconnect other drives – Disconnect other USB and hard drives to avoid selecting the wrong drive to format.
- Use official ISOs – Download Windows ISOs directly from Microsoft to ensure authenticity.
- Test before use – Validate the drive boots correctly on the intended computer before relying on it.
Additional Software for Creating Windows Boot USB
While the manual formatting steps above work, there are a few software utilities that simplify the creation of a Windows bootable USB drive:
Rufus
Rufus is a free utility specifically designed for making bootable USB drives on Windows. It allows you to:
- Select Windows ISOs or disc image files.
- Choose USB drive and partition scheme.
- Enable bootable MBR partition.
- Automatically download Syslinux boot files.
Rufus handles the formatting, ISO mounting, and boot configuration automatically with an easy to use interface.
Microsoft Windows 7 USB/DVD Download Tool
Microsoft offers an official tool for Windows 7 that downloads ISO files and creates bootable USB drives. While designed for Windows 7, this tool also works to make bootable drives for newer Windows 10 and 11 installation ISOs.
Media Creation Tool
The Media Creation Tool from Microsoft allows you to both download the latest Windows 10/11 ISOs and create bootable USB installation drives. This automates ISO setup in one tool.
FAQs
Here are answers to some frequently asked questions about formatting a bootable Windows USB installation drive:
Should I use NTFS or FAT32 for bootable USB?
For Windows ISOs, you should format your USB drive with NTFS rather than FAT32. NTFS supports larger files required by the installation media.
How much space do I need for a Windows USB?
8GB is the minimum size USB drive, but 16GB or larger is recommended to store all Windows installation files. The drive needs to match or exceed the ISO file size.
Can I use the same USB for multiple versions of Windows?
Yes, you can format the USB drive and copy the desired Windows ISO files to create various bootable drives. Just reformat each time to wipe the previous OS version.
How do I boot from the USB drive?
With the USB drive connected, you need to select it as the first boot device in your computer’s BIOS or EFI settings menu. The key to enter the menu varies by system.
Can I install drivers during Windows setup?
Yes, you can load drivers from a separate USB drive during the Windows installation process, allowing support for storage controllers or other devices.
Conclusion
Creating a dedicated bootable USB drive provides a simple way to install and maintain Windows. Formatting the drive, mounting the ISO, and copying critical files takes just a few minutes. The result is a portable boot media allowing you to install Windows on any computer.
Just remember to back up any data first before formatting a USB drive. And use a quality USB 3.0 flash drive from a reputable brand for best performance.
Following the steps in this guide, you now have an understanding of how to properly format a USB drive for use as a bootable Windows installation tool. Keep this portable Windows-to-go drive on hand for computer troubleshooting and repair whenever you need to reinstall or rescue an operating system.