Installing a new 3.5 inch SATA hard drive is a straightforward process that can help upgrade or expand the storage capabilities of your computer. SATA (Serial ATA) is the most common hard drive interface used today, with the 3.5 inch form factor being the most popular size for desktop computers. While the process may seem daunting for beginners, it only requires a few simple steps and some basic computer hardware knowledge to complete successfully.
In this 5000 word guide, we will cover everything you need to know to install a 3.5 inch SATA hard drive, from picking the right drive, preparing for installation, step-by-step installation instructions, configuring the drive on your system, transferring data, to best practices and troubleshooting tips. Let’s get started!
Quick Questions and Answers
What is a 3.5 inch SATA hard drive?
A 3.5 inch SATA hard drive is a high capacity data storage device designed to be installed internally in desktop computer systems. It connects to the motherboard via a Serial ATA interface and is the most common hard drive size for desktops today, typically offering 500GB to 10TB of storage capacity.
What tools do I need to install a 3.5 inch SATA hard drive?
You will need a Phillips head screwdriver, four drive mounting screws (often provided with new hard drives), SATA data and power cables, and a drive sled/mounting bracket if your computer case requires one. Anti-static precautions like an anti-static wrist strap are also recommended.
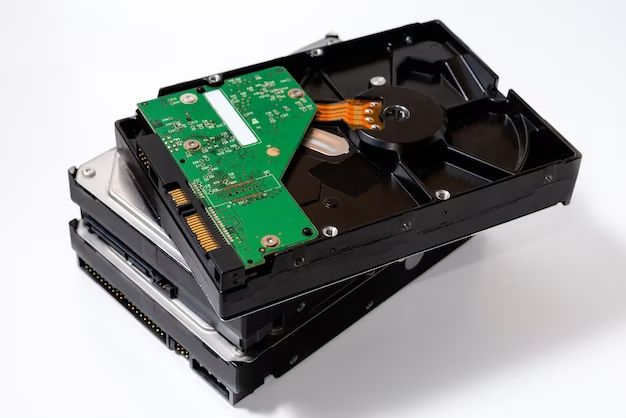
How do I physically install a 3.5 inch hard drive?
Installing a 3.5 inch hard drive involves securing it into an open drive bay or mounting bracket in your computer case using the included screws, connecting the SATA data and power cables to the back of the drive, sliding the drive sled back into position if needed, and booting up your computer for drive configuration.
How do I set up the drive after physical installation?
Once installed, you’ll need to partition and format the new drive using Disk Management on Windows or Disk Utility on Mac. Afterwards, you can configure the drive by assigning a drive letter or mount point and begin transferring data over.
What are the steps to installing a SATA hard drive on my computer?
The basic installation steps are:
1. Select an appropriate 3.5 inch SATA drive
2. Prepare your computer case with power and data cables
3. Mount the hard drive into the drive bay
4. Connect the SATA and power cables
5. Partition and format the drive after boot up
6. Configure the drive by assigning a drive letter/mount point
7. Transfer data and applications to the new drive
Choosing the Right 3.5 inch SATA Hard Drive
The first step in installing a new 3.5 inch SATA hard drive is selecting the right drive for your needs and computer system. Here are some key factors to consider when choosing a drive:
Drive Capacity – Consider how much storage space you need. 3.5″ hard drives are available in capacities ranging from 500GB to 10TB or more for enterprise models. For everyday computing, 1TB to 4TB is common.
Drive Speed – Faster drives offer better performance but cost more. The main specs to look for are cache size, interface type, and rotational speed (5400RPM or 7200RPM usually).
Drive Interface – Most modern drives use the SATA III interface which provides 6Gbps data transfer speeds. Make sure your motherboard supports SATA III for maximum performance.
Cache Size – More cache (up to 256MB) allows the drive to access data faster. Bigger is better for performance.
Reliability Rating – Important for drives storing critical data. Look at ratings like mean time between failures (MTBF) and workload endurance.
Brand and Model – Stick with major brands like WD, Seagate, Toshiba, Hitachi for proven reliability. Check reviews on specific drive models as quality can vary.
Warranty Coverage – Most drives come with 2 to 5 year warranties. Longer coverage periods indicate better expected reliability and lifespan.
Compatibility – Make sure the drive will work with your PC’s motherboard chipset, OS version, and BIOS version. The specs will indicate compatibility.
Purpose – Determine if you need an everyday drive for PC activities or a higher performance drive for gaming, video editing workloads.
Budget – Hard drive prices vary greatly based on size, speed, and features. Determine how much you can spend on your new drive.
Take the time to weigh these factors carefully based on your specific needs to select the ideal 3.5 inch SATA hard drive for your system. Checking the manufacturer’s documentation and reviews can help narrow down the right choice.
Preparing for Installation
Once you’ve selected the right 3.5 inch SATA hard drive, the next step is preparing your computer for installation. Follow these tips for proper preparation:
– Anti-static precautions – Use anti-static wrist straps, mats, or sprays when handling computer components to avoid static discharge damage.
– Ensure SATA compatibility – Verify that your computer’s motherboard has open SATA ports and supports the SATA version (e.g. SATA III 6Gbps) used by your new drive. Consult your motherboard manual if unsure.
– Backup critical data – Always backup sensitive data before working inside your PC to avoid unrecoverable data loss if anything goes wrong.
– Gather necessary tools – Have ready a Phillips-head screwdriver, four 6-32 UNC drive mounting screws, SATA data and power cables, and any drive sleds or trays required by your case.
– Review drive bay options – Check that your computer case has open 3.5 inch drive bays internally. You may need to remove an existing drive or install using a 5.25 inch bay with a mounting bracket.
– Verify power supply capacity – Make sure your power supply unit (PSU) can deliver adequate power for an additional internal hard drive. This is rarely an issue with modern PSUs.
– Read drive manual – Review the installation and configuration sections of the hard drive’s manual for manufacturer-specific instructions.
– Windows update & drivers – Update Windows and motherboard/chipset drivers before installing for maximum compatibility.
With these preparatory steps completed, you’ll be ready to safely and seamlessly install your new SATA hard drive. Proper planning prevents problems down the line.
Step-by-Step Installation Guide
Ready to get your hands dirty? Here is a step-by-step guide to installing a 3.5 inch SATA hard drive in a desktop PC:
Step 1 – Power down and unplug your computer. Open the case side panel using a Phillips screwdriver.
Step 2 – Locate an open 3.5 inch drive bay and remove the cover plate/bracket. This will expose side screw holes to mount the drive.
Step 3 – Slide the hard drive into the drive bay lining up the side screw holes on the bottom of the casing with the holes on the bay.
Step 4 – Insert the mounting screws (often included with new drives) into the bottom screw holes and tighten gently using the screwdriver to secure the drive. Do not overtighten.
Step 5 – Attach the SATA data cable to the data port on the rear of the hard drive. This port is usually labeled SATA or has an icon resembling an L or I shape. Connect the other end to an open SATA port on the motherboard.
Step 6 – Connect the SATA power cable from your power supply unit to the power port on the back of the hard drive. The power port has an L-shape and may be labeled PWR.
Step 7 – If you disconnected any drive sleds or trays earlier, gently slide the tray back into its original bay with the new drive secured inside.
Step 8 – Close your PC case side panel and reconnect power and peripherals. Power your system back on.
Step 9 – Boot into BIOS and verify that your motherboard detects the newly installed hard drive.
Step 10 – Boot from your OS drive and use Disk Management (Windows) or Disk Utility (Mac) to partition, format, and assign a drive letter to your new drive.
You have now completed the physical installation! Your new drive will be ready for data migration and use after formatting. Remember to activate Trim if supported by your SSD for optimal performance. Enjoy your expanded storage!
Configuring and Setting Up the New Hard Drive
Once the physical installation is complete, you’ll need to properly configure the hard drive for it to become accessible in your operating system. This involves partitioning, formatting, assigning a drive letter, and modifying system settings.
Partitioning – Partitioning divides the raw drive space into logical storage units called volumes. This allows for separate drives or partitions on the same disk. Popular partition schemes include MBR and GPT. Use the full capacity for a single partition unless you have specific needs.
Formatting – Formatting writes a file system to the partitions so the OS can read/write data to the drive. Common file systems are NTFS for Windows and HFS+ for Mac. Formatting permanently erases any existing data.
Drive Letter – This assigns a letter designation like “F:” that identifies the drive so you can easily access it on your system. Typically letters are assigned sequentially after existing drives.
Mount Point – On Macs, new drives are mounted as a volume/location under /Volumes rather than a drive letter. The mount point is the label for the volume you see for the new drive.
Activate Trim – For SSDs, enable Trim support with your OS if available. This maintains performance by clearing junk data during routine drive maintenance.
Storage Spaces – You can pool multiple disks into a single storage space on Windows under Settings > Storage Spaces. Useful for managing large drive arrays.
Configuring these settings correctly ensures seamless usage of your new hard drive. Consult your operating system’s help documentation for detailed assistance if needed.
Migrating Data to the New Drive
Once configuration is complete, it’s time to start using that spacious new drive! Here are some ways to transfer data over:
– File Copy/Paste – Directly copy/paste files and folders to the new drive letter/mount point from your original drive through your OS file manager. Simple drag and drop works too.
– Disk Imaging – Make an exact sector-by-sector clone of your original drive using disk imaging software like Macrium Reflect (Windows) or Carbon Copy Cloner (Mac). This replicates the OS and applications.
– File Sync Tools – Apps like FreeFileSync (Windows) or ChronoSync (Mac) sync specific files/folders between drives based on set criteria. Helpful for routine backups.
– Manual Program Reinstallation – Reinstalling apps directly to the new drive rather than copying allows you to start fresh and only transfer critical user data.
– Folder Redirect – Redirect the path for default user folders like Documents, Pictures, Downloads to corresponding folders on the new drive instead of the OS drive.
– Migration Utilities – Some drives include tools to automate copying entire partitions or mirroring primary system drives for easy 1-to-1 migration. Check your drive’s included software.
Take it slow and verify transfers to avoid corruption or missing data. Now enjoy that new-drive feeling!
Best Practices and Optimization
Follow these tips for ongoing performance and longevity when running your new SATA hard drive:
– Keep 15-20% free space to avoid sluggish behavior as drives fill up
– Perform regular file backups in case of failure
– Use the disk cleanup utility to delete junk files
– Defragment periodically to prevent performance loss from fragmentation
– Install updates/patches for drive firmware when available
– Disable disk indexing if drive usage is primarily for storage
– Manage drive power settings to reduce power consumption
– Use the Safely Remove Hardware tool before unplugging external drives
– Install the drive in a cool, dry, ventilated spot away from sources of heat/moisture
– Handle drives gently and ensure proper airflow in your PC case to reduce vibration
– For SSDs, enable Trim support and avoid excessive disk imaging to maximize lifespan
Following best practices tailored to your specific 3.5 inch SATA hard drive will provide the best stability, performance, and usable lifespan from your new storage upgrade.
Troubleshooting Common Problems
Though the installation process is typically straightforward for 3.5 inch SATA hard drives, you may encounter minor hiccups along the way. Try these troubleshooting tips if you run into any of these common problems:
Hard drive not detected in BIOS
– Verify SATA cable connections are secure on both ends
– Try a different SATA data cable if available
– Connect the drive to a different SATA port on the motherboard
– Ensure the drive is getting sufficient power from the PSU
Hard drive not showing up in operating system
– Check if the drive appears in Disk Management as an unallocated volume
– Try partition recovery software to restore missing partitions
– Look for newly assigned drive letters just in case
Boot failure after hard drive installation
– Boot into Safe Mode and rollback any recent driver updates
– Access BIOS and make sure the new drive is not first in the boot order
– Try disconnecting the new drive and seeing if system boots normally again
Hard drive errors like bad sectors
– Scan for errors and attempt repairs using CHKDSK (Windows) or Drive First Aid (Mac)
– Backup data and reformat the drive (existing data will be wiped)
– Replace failing drive if errors persist after reformatting
Slow hard drive performance
– Resolve excessive fragmentation with defrag utilities
– Scan for malware, viruses, or bad software using antivirus tools
– Upgrade to a higher speed SATA interface like SATA III for SSDs
Unusual noises from hard drive
– Determine the type of noise and match to known mechanical failure types
– Immediately backup data and replace the drive
Catching and addressing issues early minimizes potential data loss from a failing or misconfigured drive. Always check indicators like noises, SMART errors, and performance changes.
Conclusion
Installing a 3.5 inch SATA hard drive is one of the easiest and most affordable ways to upgrade a desktop PC. This 5000 word guide covers the complete installation process starting with drive selection, preparing your system, step-by-step installation, configuring and setting up the new drive, data migration, best practices, and troubleshooting advice.
The benefits of adding a new SATA hard drive are well worth the minimal effort for most users. Just be sure to select a compatible and reputable drive model, take anti-static precautions, securely mount the drive in a 3.5 inch bay with the necessary cabling, partition and format the drive properly after installation, and set up transfers to migrate your data and programs over.
Follow the steps and tips outlined here and you can quickly experience the joys of expanded high-speed storage. That new terabyte drive will open up possibilities ranging from storing immense media libraries to enabling advanced gaming that truly puts your rig to the test.
Remember to always backup your data, maintain your drives, and properly configure settings to maximize the potential of your SATA hard drive upgrades. With the right drive and some helpful guidance, anyone can pull off this very approachable PC upgrade project and take their storage to the next level.