Installing a new hard drive can help increase your computer’s storage capacity and performance. SATA (Serial Advanced Technology Attachment) is the most common interface used for connecting internal hard drives in modern computers. With the right tools and basic knowledge, installing a SATA hard drive is a straightforward process that most users can complete themselves.
In this guide, we will cover everything you need to know to successfully install a new SATA hard drive. We will go over:
- SATA hard drive basics
- Choosing a SATA hard drive
- Necessary tools and materials
- Pre-installation steps
- Physically installing the hard drive
- Configuring the hard drive in the BIOS
- Partitioning and formatting the drive in Windows
Follow along carefully and you will have your new SATA hard drive up and running in no time.
SATA Hard Drive Basics
Before we get into the installation steps, let’s briefly go over some key information about SATA hard drives.
What is a SATA Drive?
SATA or Serial ATA is an interface used to connect storage devices like hard drives and solid state drives to a computer’s motherboard. SATA was designed as the successor to the older Parallel ATA (PATA) standard and has become the most common type of hard drive connection.
Some key advantages of SATA compared to PATA are:
- Faster transfer speeds – SATA supports speeds up to 6 Gb/s while PATA maxes out at 133 Mb/s.
- Thinner cabling – SATA cables are much thinner and more flexible compared to bulky PATA ribbon cables.
- Native hot swapping – SATA drives can be connected and removed without shutting down the system.
The SATA standard has gone through several revisions but SATA III (6 Gb/s) and SATA II (3 Gb/s) are the most widely used today.
SATA Drive Form Factors
SATA drives come in two common physical sizes or form factors:
- 3.5-inch – The traditional size of hard drives. They require more power and space but offer larger storage capacities.
- 2.5-inch – A smaller form factor commonly used in laptops. They use less power but typically have lower capacities.
3.5-inch drives are designed to be mounted into drive bays within a desktop PC case while 2.5-inch drives can be mounted in laptops and some desktops using brackets or adapters.
When shopping for a new SATA drive, be sure to get the appropriate physical size for your computer.
Choosing a SATA Hard Drive
The main factors to consider when choosing a new SATA hard drive are:
- Capacity – How much data storage space do you need? 1TB to 4TB is typical for desktops.
- Interface – Make sure the drive is SATA III for maximum speed.
- Form factor – Pick a 3.5-inch or 2.5-inch drive to fit your computer.
- RPM – Faster drives (7200 RPM or more) offer better performance.
- Cache – Larger cache buffers improve read/write speeds.
- Price – Hard drives offer more affordable storage vs. SSDs.
It’s also a good idea to read reviews and benchmarks to help choose a reliable and high-performing drive. Popular SATA drive manufacturers include Western Digital, Seagate, Toshiba, and Hitachi.
Once you’ve selected the best SATA hard drive for your needs and budget, it’s time to gather the necessary installation tools.
Necessary Tools and Materials
Installing a SATA hard drive into a desktop computer is a straightforward process and requires just a few tools and supplies:
- Phillips-head screwdriver
- SATA data cable
- SATA power cable
- Mounting screws (often included with hard drives)
Some additional items that can be useful:
- Anti-static wrist strap – prevents static discharge from damaging computer components
- Drive bracket – adapts 3.5″ drives to 5.25″ bays (if needed)
Magnetic screwdriver – helps handling screws in tight spaces
Make sure you have access to the necessary cables from inside your desktop computer case. It’s also wise to have your motherboard manual on hand for reference during BIOS configuration.
With the new hard drive and installation accessories gathered, you can move on to the pre-installation steps.
Pre-Installation Steps
Completing these preparatory tasks first will smooth the installation process:
1. Back Up Your Data
Always back up any important data from your main hard drive before beginning. This provides a safety net in case anything goes wrong during the installation. Copy critical files to an external drive or cloud backup.
2. Anti-Static Precautions
Use an anti-static wrist strap while handling computer components to avoid damaging them with electrostatic discharge. If you don’t have a strap, periodically touch a metal part of the computer case to ground yourself.
3. Unplug Power and Remove Case Side
Disconnect the power cable from the back of the computer and remove the left side panel of the case. This provides access to the internal components for installation.
4. Locate Drive Bay
Determine an open 3.5″ or 5.25” drive bay to mount the new SATA hard drive. Consult your computer’s manual to identify bays if you’re unsure.
5. Power Down Computer and Discharge
Turn off the computer completely and press the power button briefly to discharge residual power. This protects against potential damage while installing the new drive.
With these pre-installation steps complete, you’re ready to get hands-on and install the physical SATA hard drive.
Physically Install the Hard Drive
Follow these steps to insert the new SATA hard drive into the computer:
1. Remove Bay Cover
Use a screwdriver to remove any existing cover or faceplate from the drive bay you’ll use. Put screws in a safe place.
2. Slide In Hard Drive
Insert the new SATA hard drive, carefully sliding it into place within the drive bay. Make sure the connection ports line up with the back of the bay.
3. Secure Hard Drive
Screw the drive into place using the included mounting screws or ones from your computer case. Tighten screws carefully to avoid stripping.
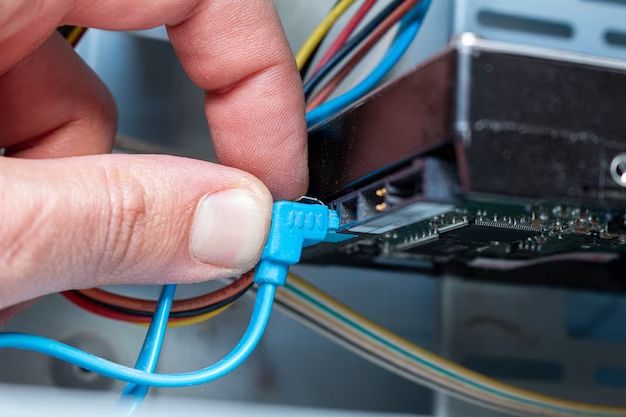
4. Connect SATA Cable
Plug one end of a SATA data cable into the back of the hard drive. Make sure the connection is snug but be gentle.
5. Connect Power Cable
Attach a free SATA power cable from the computer’s power supply unit to the hard drive. This provides the drive with electrical power.
6. Organize Cables
Neatly tuck away and organize the connected data and power cables with zip ties or Velcro straps. This aids airflow and reduces interior clutter.
Double check that the drive is securely fastened and all cables are properly connected. If using a drive brace or adapter, ensure it is firmly attached as well.
Configure Hard Drive in BIOS
The new drive will need to be recognized by the computer before it can be used. This requires configuring it in the system BIOS:
1. Access BIOS Setup Utility
Power on the computer and press the BIOS key (F2, F10, Del, etc.) to enter the setup utility. Consult the motherboard manual for the proper key.
2. Locate SATA Settings
Navigate to the “Advanced” or “Storage” sections and locate the SATA configuration options. This is where the new drive will be recognized.
3. Enable SATA Port
Make sure the specific SATA port you connected the new hard drive to is enabled. Disable any ports without drives attached.
4. Adjust Storage Options
Change any storage options like AHCI/RAID mode or hot-swapping as needed. Most users will use standard AHCI mode.
5. Save Changes and Exit
Save changes and exit the BIOS utility to allow detected changes to take effect. The new hard drive should now be recognized and ready for operation.
Initialize, Partition, and Format Drive in Windows
With the physical installation complete, the hard drive now needs to be configured within Windows:
1. Initialize Disk
Open Disk Management, right-click the new disk, and choose “Initialize Disk”. Select a partition table like GPT or MBR depending on your setup.
2. Create Volume Partitions
Right-click the “Unallocated” space on the disk and select “New Simple Volume”. Follow the wizard to create the necessary partitions.
3. Assign Drive Letter
Right-click the volume and choose “Change Drive Letter and Paths” to assign an unused letter like F: or G:
4. Format Partitions
Right-click each volume and choose “Format” to format them for use. Select NTFS as the file system and give each a unique volume label.
5. Initialize Disk in Diskpart
An alternative to using Disk Management is to initialize and format the disk using the command line tool Diskpart:
| diskpart | Opens the Diskpart command line utility |
| list disk | Displays available disks to initialize |
| select disk # | Selects the new disk (using its disk number) |
| clean | Clears any previous configurations on the disk |
| create partition primary | Creates a new primary partition filling the disk |
| format quick fs=ntfs label=”DriveName” | Quick formats partition to NTFS |
| assign letter=F | Assigns the F: drive letter |
| exit | Exits the Diskpart utility |
The new hard drive should now appear in File Explorer, ready for storage use.
Conclusion
Installing a new SATA hard drive is a great way to upgrade your desktop computer’s storage for better speed and capacity. By following this guide’s steps for the physical installation, BIOS setup, and drive formatting, you can have your new SATA hard drive up and running smoothly in no time.
Be sure to take appropriate anti-static measures, properly connect all cabling, and configure partitions and formatting within Windows. Utilizing available drive bays, installing a secondary SATA hard drive is an affordable and straightforward process for most desktop PC users.
With your data backed up and new SATA drive installed, you can migrate files over and immediately start taking advantage of the expanded storage. Enjoy your upgraded computer!
