Partitioning an external hard drive refers to dividing the drive into multiple logical drives or partitions. This allows you to organize your data and files more efficiently, keep your operating system separate from programs and files, or use the drive for backup.
Partitioning an external hard drive has several key benefits:
- Keeps data separate and organized – You can separate operating system files from personal documents, or organize data by type, project, user etc.
- Allows for multiple operating systems – Partitioning lets you install different operating systems on separate partitions.
- Better performance – Operations like defragmenting and disk error checking are faster on smaller partitions.
- Easier backups – Backing up smaller partitions is quicker and simpler.
- Enables dual booting – You can boot different operating systems by selecting the correct partition.
This guide will cover the steps for partitioning an external hard drive on both Mac and Windows computers to create multiple volumes.
Prepare the External Drive
Before partitioning your external hard drive, it’s important to reformat it and check for errors to ensure the partitioning process goes smoothly. Reformatting will wipe all existing data, so be sure to back up anything you want to keep first.
On Mac, open Disk Utility and select the external drive on the left. Click “Erase” at the top, choose a format like “Mac OS Extended (Journaled)” and name the drive if desired. Then click “Erase” to reformat the drive. On Windows, right-click the drive in Explorer, choose “Format…” and select “NTFS” as the file system. Name it if desired and click “Start” to reformat.
Once reformatted, it’s wise to check for errors. On Mac, click “First Aid” in Disk Utility and then “Run” to scan the drive. On Windows, right-click the drive, choose “Properties”, click the “Tools” tab and click “Check” in the Error-Checking area. Let the scan run to verify the drive’s health.
Now the external drive is prepped and ready to be partitioned without issue. Be sure any important data is backed up before proceeding, as partitioning will erase the drive.
Using Disk Utility on Mac
The easiest way to partition an external hard drive on a Mac is by using the built-in Disk Utility app. Disk Utility allows you to modify partitions on the drive without losing any data (Source: Apple Support).
To use Disk Utility to partition your external drive:
- Connect the external drive to your Mac and launch Disk Utility.
- Select the external drive volume from the sidebar in Disk Utility.
- Click the Partition button at the top of the Disk Utility window.
- Resize existing partitions or click the + button to add new partitions.
- Choose a name, format, and size for each partition.
- Click Apply to create the new partition layout.
Disk Utility allows you to create multiple partition formats on one drive, including Mac OS Extended for Mac, ExFAT for cross-platform use, and more. You can easily resize and modify partitions without erasing data.
Using Disk Management on Windows
On Windows 10 and 11, the built-in Disk Management utility provides an easy way to partition an external hard drive. Disk Management allows you to shrink, create, delete, and format partitions on the drive without losing data.
To open Disk Management, type “diskmgmt.msc” in the Windows search bar and hit Enter. Alternatively, you can right-click the Start menu and select Disk Management.
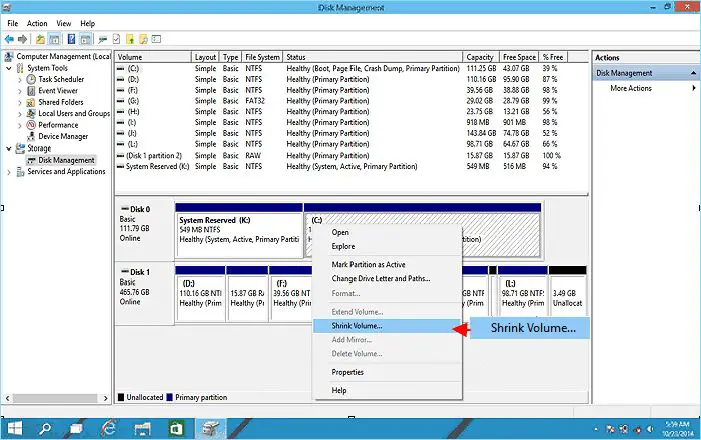
In Disk Management, the external drive will be listed along with its existing partitions. To partition the drive, right-click on the existing partition you want to divide and select “Shrink Volume.” Enter the desired size in MB for the new partition and click “Shrink.” This will create unallocated space on the drive.
Right-click the unallocated space and select “New Simple Volume.” Follow the prompts to initialize the new partition. You’ll be able to enter the size, drive letter, and file system for the new partition.
Be sure to format the new partition after creating it. Right-click the partition and select “Format.” Choose your desired file system, give it a volume label, and start the formatting process.
The Android Authority and EaseUS provide additional step-by-step instructions for using Disk Management to partition a drive on Windows.
Choosing a Partition Table
The two main options for partition tables on an external hard drive are Master Boot Record (MBR) and GUID Partition Table (GPT). MBR is the older standard that was common for hard drives under 2TB. GPT is newer and has advantages for larger drives over 2TB. There are some key differences to consider when choosing between MBR and GPT for an external hard drive:
Partition size limits – MBR has a maximum partition size of 2TB. With GPT there is practically no partition size limit. For large external hard drives, GPT allows you to have partitions larger than 2TB.
Number of partitions – MBR is limited to 4 primary partitions. GPT allows for a virtually unlimited number of partitions.
UEFI booting – GPT works better for systems using UEFI boot. For older BIOS systems, MBR is required for bootability.
Drive size – MBR has a drive size limit of 2TB. GPT allows much larger drive sizes. For drives over 2TB, GPT must be used.
Checksum and backups – GPT stores cyclic redundancy check data to help prevent data corruption. It also keeps backup copies of the partitioning information.
For most users today, GPT offers advantages over MBR, especially for external drives over 2TB. However, there are a few cases where MBR may be preferred, such as creating bootable external drives for BIOS/legacy systems. When choosing between MBR and GPT, consider the partition sizes needed, total drive size, boot environment, and redundancy features.
Creating the Partitions
After choosing the partition table, you are ready to divide up the external drive into partitions. Here is the step-by-step process:
On Mac:
- In Disk Utility, click the Partition tab.
- Click the + button to add a new partition.
- Adjust the partition size by dragging the divider line.
- Assign a name, format, and scheme to the partition.
- Click Apply to create the new partition.
On Windows:
- In Disk Management, right-click the unallocated space on the external drive and select New Simple Volume.
- Follow the prompts to specify the size, drive letter, file system, etc.
- Click Next/OK until the wizard completes.
- Repeat to create additional partitions as needed.
The partition process divides up the total storage capacity into separate volumes. Be sure to allocate enough space for each partition based on expected storage needs. You can create multiple partitions on the same drive with different formats.
Formatting the Partitions
Once the partitions are created, the next step is to format them. There are a few main formatting options to choose from:
FAT32 – This is an older file system that has some limitations but works with both Mac and Windows. The main limitations are a maximum individual file size of 4GB and maximum partition size of 2TB.1
exFAT – This is a good option if you want compatibility between Mac and Windows. It supports large partition and file sizes. The only downside is it lacks some of the more advanced features of NTFS and APFS.
NTFS – This is the default format for Windows. It has lots of great features for Windows users but limited compatibility with Mac. Mac can read NTFS drives but cannot write to them natively.
APFS – This is the newer Mac format that replaces HFS+. It has advanced features but Windows does not support APFS natively.
In general, exFAT is a good choice if you need to share the drive between Windows and Mac. NTFS is best for Windows-only use, while APFS is ideal for Mac-only. FAT32 can work for smaller drives shared between operating systems but has limitations.
Installing Drivers
Once the partitions are created and formatted, you may need to install drivers for the operating system to properly access the new partitions on the external drive. This is especially important for Windows.
On Windows, the external hard drive will show up in File Explorer but the partitions may be inaccessible. To fix this, you need to install the driver for the external hard drive. The manufacturer of the external drive should provide the necessary drivers on their website. Download and install these drivers and Windows should then detect the partitions. For more details, refer to the manufacturer’s instructions.
Here are some tips for installing drivers on Windows:
- Open Device Manager and look under Disk Drives for any devices with a yellow exclamation icon – this indicates a driver issue.
- Right click the device and select Update Driver Software.
- Browse your computer for the driver file you downloaded from the manufacturer’s website.
- Restart your computer after installing the driver.
With the proper drivers installed, Windows will be able to detect and access all partitions on the external drive. You can then begin using the partitions as desired.
On Mac, additional drivers are typically not required. Once the partitions are created in Disk Utility and formatted, macOS will automatically detect and mount the partitions when the drive is connected. You can access and use the partitions right away.
Using the New Partitions
Once the partitions are set up and formatted, using them is straightforward on both Mac and Windows.
On Mac, the new partitions will show up in the Finder like any other drive. You can access and manage the files just like you would on your regular hard drive. Simply click on the drive icon to open it and get started.
On Windows, you’ll see the new partition drives show up in File Explorer under This PC just like an internal drive. You can click on each drive partition to view the contents and start saving files.
The main thing to remember is that your data will be split up between the partitions. So if you are organizing files, you’ll want to designate certain file types or projects to specific partitions to keep things separated.
Other than that, you interact with the partitions just as you would a regular external drive. You can create folders, copy files back and forth, organize and access your data. It essentially gives you multiple separate drives and storage spaces to work with on a single physical external hard drive.
Potential Issues
Partitioning an external hard drive can sometimes lead to problems accessing the drive or data on it. Here are some potential issues and troubleshooting tips:
External hard drive shows wrong capacity: This can happen if there are bad sectors on the drive. Run disk checking utilities like CHKDSK on Windows or First Aid on Mac to detect and repair bad sectors (1). If the problem persists, it’s best to replace the faulty external drive.
Partition not accessible or access denied: This is often due to connection issues. Make sure the external drive is connected properly via the USB port. Try connecting it to a different USB port or computer. Also check if the drive needs external power supply (2).
External hard drive corrupted: If partitions on the external drive become corrupted or unreadable, use data recovery software like EaseUS Data Recovery Wizard to repair and recover data from the corrupted drive (3). Avoid formatting the corrupted drive as it can overwrite original data.
Driver issues: Outdated, corrupted or missing drivers can prevent partitions on the external drive from being accessed. Update drivers for the external drive and USB ports. Reinstall drivers if necessary.
To summarize, partition issues can arise from bad sectors, connection problems, corruption or driver errors. Follow the troubleshooting tips above to diagnose and fix common partition problems on external drives. Handle corrupted drives carefully to avoid permanent data loss.
- (1) https://www.easeus.com/partition-manager-software/hard-drive-shows-wrong-capacity.html
- (2) https://www.stellardatarecovery.co.uk/hard-drive-error-partition-not-accessible.htm
- (3) https://www.easeus.com/storage-media-recovery/repair-corrupted-external-hard-drive.html
