Partitioning allows you to divide a large external SSD into multiple smaller logical drives on Windows 10 and 11. This can help organize your data and files more efficiently by separating them onto different partitions. For example, you may want to create separate partitions for the operating system, programs, data files, backups, etc. Partitioning provides flexibility to isolate different types of data and control the maximum drive space allowed for each partition. It also helps enhance security, stability and improves performance especially for external SSDs by aligning partitions to erase blocks. While not absolutely necessary, partitioning an external SSD can provide some benefits compared to using the full drive as a single volume. This guide will walk through the steps to partition an external SSD in Windows 10.
Prerequisites
Before partitioning your external SSD, make sure your computer meets the minimum system requirements for Windows 10. At a minimum, you’ll need the following:
- Processor: 1 GHz or faster compatible CPU or System on a Chip (SoC) 1
- RAM: 1 GB for 32-bit or 2 GB for 64-bit 1
- Hard disk space: 16 GB for 32-bit OS or 20 GB for 64-bit OS 2
For the external SSD, the minimum size should be around 60 GB 3. However, 120 GB or 240 GB would provide more flexibility. Make sure the SSD is compatible with your computer and meets the physical interface requirements (e.g. USB, Thunderbolt).
Back Up Your Data
It’s critical to back up your data before partitioning an external SSD in Windows 10. Partitioning will erase all existing data on the drive, so you’ll lose anything that isn’t backed up.
To back up your data, you have a few options:
You can use Windows 10’s built-in backup tools like File History or Backup and Restore to copy your files to an external drive or network location.
You can use the partition backup feature in EaseUS Todo Backup to create an image backup of your partition.
Third-party backup software like Macrium Reflect also allows disk and partition backups.
Once you’ve backed up your important data, you can safely proceed with partitioning the external SSD without worrying about data loss.
Access Disk Management
To open Disk Management in Windows 10 or Windows 11, there are a few different methods you can use:
- Open the Start menu and search for “Create and format hard disk partitions”. Select this to open the Disk Management utility.
- Right-click the Start button and select “Disk Management”.
- Open File Explorer, right-click on This PC, and select “Manage”. Then go to Storage > Disk Management.
- Go to Control Panel > System and Security > Administrative Tools > Computer Management > Storage > Disk Management.
- Type “diskmgmt.msc” in the Run command or Command Prompt and hit Enter.
Disk Management allows you to view all the hard disks and removable storage connected to your computer. Here you can create, resize, delete, and format partitions on your drives. It’s an essential tool for managing storage in Windows.
For more details, refer to the Microsoft support article: https://support.microsoft.com/en-us/windows/help-in-disk-management-ad88ba19-f0d3-0809-7889-830f63e94405
Initialize the SSD
Before the SSD can be formatted and partitioned, it needs to be initialized using Disk Management. Initializing prepares the drive by defining the partition style that will be used. For most users, it’s best to initialize the SSD using the GPT (GUID Partition Table) partition style rather than MBR (Master Boot Record). GPT supports larger partition sizes and works better with UEFI systems.
To initialize the SSD in Windows 10:
- Open Disk Management by right-clicking the Start menu and selecting Disk Management.
- The new SSD should appear as an unknown drive with unallocated space.
- Right-click the SSD and select Initialize Disk.
- In the Initialize Disk dialog box, select GPT and click OK.
The SSD is now initialized and ready to be partitioned and formatted. Initializing with GPT allows the full capacity to be used and enables advanced partition features.[1]
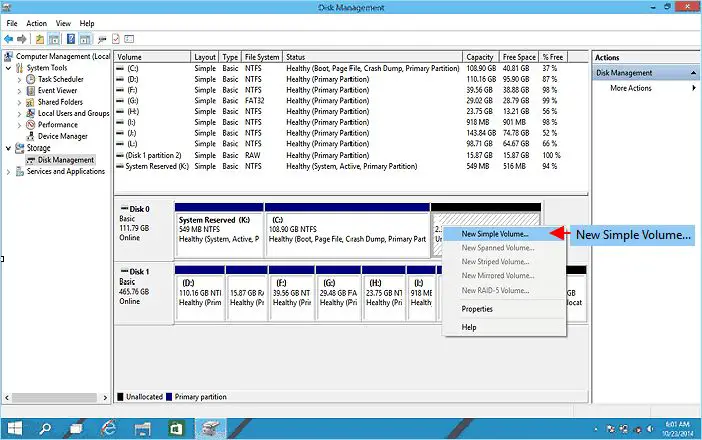
Create a New Simple Volume
To create a new simple volume on the unallocated space of the disk, right-click on the unallocated space and select New Simple Volume from the context menu.
This will launch the New Simple Volume Wizard. Click Next to proceed.
Specify the size of the new volume. You can accept the default maximum size or manually enter a custom size. Click Next.
Assign a drive letter to the volume. The wizard will suggest the next available drive letter. You can change this if needed. Click Next.
Select the file system for the partition. NTFS is recommended for Windows 10. Click Next.
You can give the volume a name and click Next. Or leave it blank to accept the default name.
Verify the volume details and click Finish to create the new simple volume.
The new volume will now appear in Disk Management with the drive letter and file system specified.
Format the Partition
After creating a new simple volume for your SSD, the next step is to format the partition. Formatting will prepare the partition for data storage by creating a file system. The two most common file systems for SSDs are NTFS and exFAT.
NTFS (New Technology File System) is the default file system for Windows 10. It supports advanced features like file compression, encryption, permissions, and storage of files larger than 4GB. NTFS is best for internal drives.
exFAT (Extended File Allocation Table) is optimized for flash drives like SSDs. It works across both Windows and macOS. The downside is exFAT lacks some of the advanced NTFS features like file compression and permissions. But it’s a good option if you need portability between operating systems.[1]
To format the partition, right-click on it in Disk Management and select “Format”. Pick your desired file system – NTFS is recommended for most people. Make sure to backup your data first as formatting will erase all data on the partition.
Assign a Drive Letter
In the Disk Management window, right-click the new partition you created. Then select “Change Drive Letter and Paths” (source). This will open the Change Drive Letter and Paths menu. Click “Add” to assign a new drive letter to the partition. The next available letter will be selected automatically, but you can choose a different letter from the dropdown if desired. Click “OK” to confirm the drive letter assignment.
You can also right-click the partition and select “Change Drive Letter and Paths”, then click “Change” to modify an existing drive letter (source). This will allow you to pick a new letter to replace the current one.
The new drive letter should now be visible next to the partition in Disk Management, and the SSD will be accessible in File Explorer with that letter. You may need to reboot your PC for the change to fully take effect.
Check the Partition
After creating the new partition on your external SSD, it’s important to verify that it shows up correctly in File Explorer. Here are the steps to check the new partition:
1. Open File Explorer by pressing Windows key + E on your keyboard or selecting the folder icon in the taskbar.
2. In the left pane, you should see your external SSD listed under “Devices and drives” with the new partition shown below it.
3. Click on the partition to open it and verify you can access the drive.
4. Right-click on the partition and select “Properties.” Confirm the correct drive letter, file system, and used/free space are shown.
If the new partition is not showing up in File Explorer, you may need to reboot your computer or rescan drives in Disk Management. If it is still not visible, there may have been an error creating the partition that needs troubleshooting.[1]
Conclusion
In summary, partitioning an external SSD in Windows 10 involves several key steps. First, back up your data to prevent data loss. Then access Disk Management and initialize the disk if it is brand new. Create a simple volume on the unallocated space, choosing the desired size. Format the new partition to NTFS or exFAT as needed. Assign a drive letter so you can access the volume. Finally, check in File Explorer to confirm the new partition is visible and accessible.
To maintain your SSD partitions and optimize performance, follow these tips:
- Enable TRIM support to allow the operating system to proactively erase deleted data blocks and prepare them for rewrite.
- Keep at least 10-20% free space available to allow wear leveling algorithms to work effectively.
- Avoid fully filling the drive, as SSDs slow down significantly as they approach full capacity.
- Run the Optimize Drives utility periodically to consolidate any fragmented files.
- Update to the latest SSD firmware for your device to take advantage of performance improvements.
By partitioning your SSD thoughtfully and applying best practices, you can maximize the speed, lifespan, and reliability of your high-performance external storage.