Partitioning a hard disk in Windows 10 allows you to divide a hard drive into multiple logical drives. This can help organize your files better, have multiple operating systems on one computer, separate operating system files from program files, and various other benefits. In this comprehensive guide, we will discuss everything you need to know about disk partitioning in Windows 10.
Quick Overview
Here is a quick overview of partitioning a disk in Windows 10:
- Open Disk Management utility by right-clicking Start menu and selecting “Disk Management”
- Right-click the disk you want to partition and select “Shrink Volume”
- Enter the amount of space to shrink the volume by
- Right-click the unallocated space and select “New Simple Volume”
- Go through the wizard to setup the new volume
What is Disk Partitioning?
Disk partitioning is the act of dividing a hard disk drive into multiple logical storage units called partitions. Partitions behave like physically separate disks, with their own file systems and drive letters.
Some key benefits of partitioning include:
- Organize files better – Store different types of files on different partitions. For example, one for Windows system files, one for documents, one for media etc.
- Dual-booting – Install different operating systems on different partitions of one hard disk.
- Isolation – Isolate potentially unstable software on separate partitions to prevent any damage.
- Dedicated partitions – Improves performance by dedicating partitions for swap files or database storage.
- Data separation – Keep operating system files separate from user files for backup or reinstallation.
Types of Partitions
There are three main types of partitions in Windows – Primary, Extended and Logical. Here is an overview:
Primary Partition
- Basic partition that can be active (bootable) or non-active.
- Limited to 4 primary partitions per disk.
- Can be formatted with any file system like NTFS, FAT32 etc.
- Acts as a physical disk with a drive letter.
Extended Partition
- Special type of primary partition used to create logical drives.
- Only one extended partition allowed per disk.
- Does not get a drive letter and cannot store data directly.
- Used as a container for logical partitions.
Logical Partition
- Created inside an extended partition.
- No limit on number of logical drives.
- Gets a drive letter and stores data directly.
- Behaves like a physical disk but is contained in extended partition.
Basic Disk vs Dynamic Disk
Windows supports two types of disks – Basic and Dynamic. The type of disk determines the partitioning schemes available.
Basic Disk
- Default disk type in Windows with MBR or GPT partitioning.
- Supports primary partitions and extended partitions with logical drives.
- Ideal for simple disk configurations and single operating system.
- Compatible with all versions of Windows.
Dynamic Disk
- Enables advanced disk management features.
- Supports LDM (Logical Disk Manager) partitioning.
- Allows an unlimited number of volumes without extended partitions.
- Volumes can span multiple disks.
- Only for advanced users and complex storage needs.
MBR vs GPT Partition Tables
Disks contain a partition table that defines the partitions on that disk. Windows supports two types of partition tables.
MBR (Master Boot Record)
- Traditional partition table for BIOS/MBR disks.
- Allows up to 4 primary partitions.
- Primary partitions can be active or passive.
- Limited to 2 TB partition sizes.
- Older style BIOS booting.
GPT (GUID Partition Table)
- Modern partition table for UEFI/GPT disks.
- Allows unlimited number of primary partitions.
- No active/passive distinctions.
- Supports huge partition sizes.
- Required for disks larger than 2 TB.
- Supports UEFI booting.
BIOS vs UEFI Booting
The device firmware determines how the operating system gets booted on a computer. Windows supports both BIOS and UEFI firmware booting.
BIOS Booting
- Legacy method supported on older computers.
- Used by Windows boot loader to access an active primary partition.
- Marks a partition as active to make it bootable.
- Limited to booting from MBR partitions.
UEFI Booting
- Modern boot method supported on newer computers.
- No concept of active partition since all partitions are accessible.
- Can boot from GPT partitions.
- Supports features like Secure Boot.
Requirements for Partitioning
Here are some requirements to keep in mind before partitioning a hard disk:
- Back up important data first
- Check minimum space required for each partition
- Defragment the disk to free up unused space
- Decide between basic disk or dynamic disk
- Choose between MBR or GPT partitioning
- Understand BIOS vs UEFI boot configuration
- Consider future partition resize needs
Partitioning Tools in Windows
The following built-in tools in Windows allow you to configure partitions.
Disk Management
- Main interface for managing disks and volumes.
- Can shrink, extend, delete partitions.
- Format volumes with NTFS, FAT32, exFAT.
- Change drive letters and paths.
- Mark partitions as active.
- Convert between basic disk and dynamic disk.
- Accessible via Control Panel > Administrative Tools or Windows Search.
DiskPart
- Command line disk partitioning tool.
- Powerful and gives access to advanced options.
- Can script partitioning tasks.
- Must be run as Administrator.
- Type diskpart in Command Prompt or PowerShell.
Windows Setup
- The Windows installation wizard contains disk options to delete, create, format partitions.
- Useful when configuring disks during OS installation.
- Careful since deleting partitions will erase data.
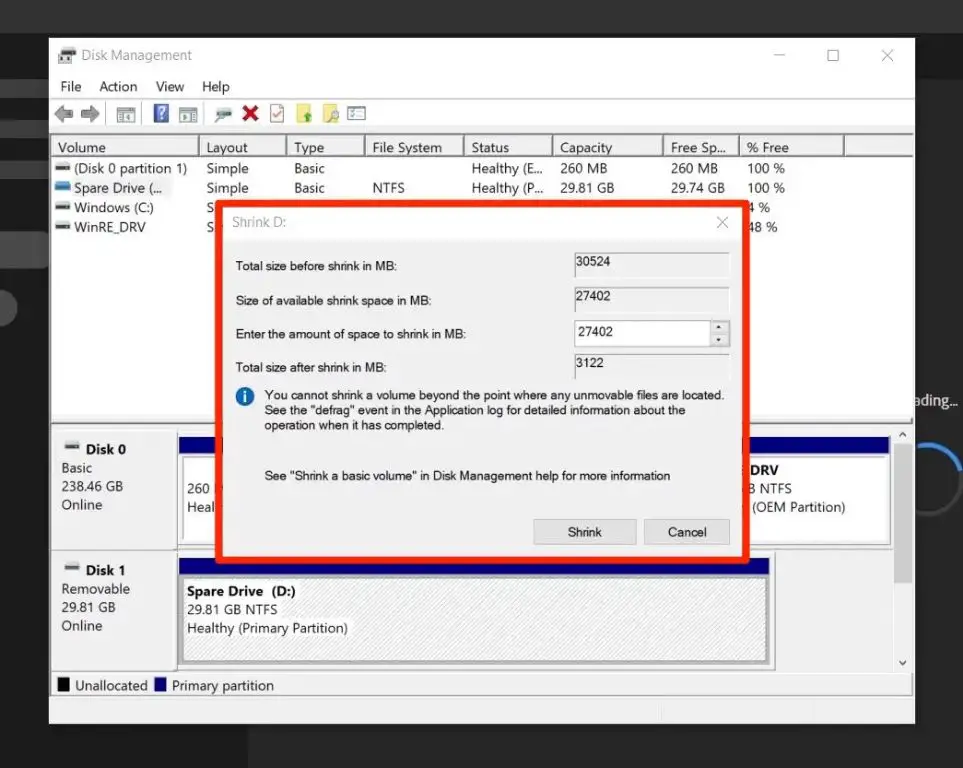
Shrinking a Partition
Shrinking a partition reduces its size to create unallocated space for new partitions. Here is how to shrink C drive in Windows 10:
- Open Disk Management utility.
- Right click on C drive partition and select “Shrink Volume”
- Enter the amount of space to shrink by.
- Click Shrink. This creates new unallocated space.
- The unallocated space can now be used to create new partitions.
Important tips when shrinking C drive:
- Remove unused files and apps to free up maximum possible space.
- Defragment the volume before shrinking to consolidate used space.
- Do not shrink beyond recommended size. Leave room for future growth.
- Do not shrink C drive below Windows minimum space requirement.
- Shrink in smaller increments instead of all at once.
Extending a Partition
Extending a partition increases its size by utilizing adjacent unallocated space. Here is how to extend C drive:
- Ensure there is unallocated space next to the C drive partition.
- Open Disk Management utility.
- Right click on C drive partition and select “Extend Volume”
- Go through the wizard and add all or part of the unallocated space.
- The C drive partition size increases.
Tips when extending C drive:
- Only unallocated space on the same disk can be used to extend.
- Always keep 10-15% of disk free after extending.
- Extending a partition is quicker than shrinking.
- May require defragmentation after extending for maximum space usage.
Creating a New Partition
A new partition can be created from unallocated disk space. Here are steps to create a new partition:
- Shrink existing partition or have unallocated space.
- Open Disk Management utility.
- Right click unallocated space and select “New Simple Volume”
- Go through the wizard selecting size, drive letter, file system.
- The new partition is now usable for storing data.
Tips when creating a new partition:
- Determine the correct size needed for the partition.
- Choose between primary partition or logical partition.
- Select file system – NTFS or FAT32 or exFAT depending on usage.
- Decide drive letter or mount point.
Deleting a Partition
Deleting a partition permanently erases all data on that volume. Here is how to delete a partition:
- Backup data on the partition to be deleted.
- Open Disk Management utility.
- Right click on partition and select “Delete Volume”
- Check warning and click “Delete”
- The partition space is now shown as unallocated.
Important points when deleting a partition:
- Double check partition letter to avoid accidentally deleting wrong volume.
- Deleted partition space can be used to create new partitions.
- Only delete a partition when absolutely needed.
- Do not delete Windows system reserved partition.
Formatting a Partition
Formatting permanently erases existing data on a partition and prepares it for use with a new file system. Here is how to format a partition:
- Backup data on the partition before formatting.
- Open Disk Management utility.
- Right click partition and select “Format…”
- Select desired file system – NTFS, FAT32, exFAT.
- Check Quick Format option for faster formatting.
- Click OK to begin formatting the partition.
Tips when formatting a partition:
- Quick format cleans the partition table but does not zero out data.
- Full format takes longer but zeroes the entire partition.
- NTFS is optimal for Windows system partitions.
- FAT32 limits individual file size to 4 GB.
- exFAT has no file size limits but less reliability.
Dual Booting with Multiple Partitions
Dual or multi booting allows booting into different operating systems installed on separate disk partitions. Here is a sample setup:
| Partition | Type | File System | Description |
|---|---|---|---|
| Partition 1 | Primary Active | NTFS | Windows 10 OS |
| Partition 2 | Primary | ext4 | Ubuntu Linux |
| Partition 3 | Primary | HFS+ | macOS |
| Partition 4 | Logical | NTFS | Shared data |
Key steps for dual booting:
- Create separate partitions for each OS with sufficient space.
- Install operating systems leaving boot partitions empty.
- Mark appropriate partition as active for bootloader.
- Configure bootloader like GRUB with menu entries.
- Select OS to boot during startup.
Tips for Dual Booting
- Install Windows first, then other OS to avoid boot issues.
- Use bootable USB drive to install additional operating systems.
- Always backup critical data before partitioning.
- Unplug extra disks before installing OS to prevent errors.
- Adjust boot order in BIOS if needed.
FAQ
Why partition a disk vs using the whole space?
Partitioning divides the disk into multiple isolated sections with different purposes. This allows better organization of files, ability to install multiple OS, prevent data loss from system crashes, optimize drives for specific data types and purposes.
What partition style is best for Windows 10?
For most home users, MBR partition style with a simple primary C drive partition for Windows is the easiest option. But GPT style or dynamic partitioning can be useful for advanced setups.
Can data be recovered after deleting a partition?
As long as new partitions or data have not overwritten the space, recovery software can attempt to restore deleted files by scanning the drive. But there is no guarantee of recovering all data.
How big should Windows C drive partition be?
Microsoft recommends a minimum of 32 GB for the C drive partition, but allocate at least 50-100 GB for Windows updates, software and future growth. The remaining space can go to other partitions.
Can C drive be converted from basic to dynamic without losing data?
Yes, C drive can be converted from basic to dynamic non-destructively using Disk Management. But it is recommended to backup data before converting partitions.
Conclusion
Partitioning a disk in Windows 10 helps organize data better, isolate the operating system, keep personal files separate, and enable dual booting. Carefully plan your partition layout and types. Shrink, extend or create partitions using Disk Management. Be careful when deleting or formatting partitions to avoid losing data. With some basic knowledge, you can successfully partition a hard disk in Windows 10 for enhanced functionality.