Deleting files on your Mac can be a nightmare if you accidentally send an important file to the trash bin. Thankfully, macOS offers several ways to recover deleted files even after emptying the trash, and you can do so without any third-party software.
Check the trash bin
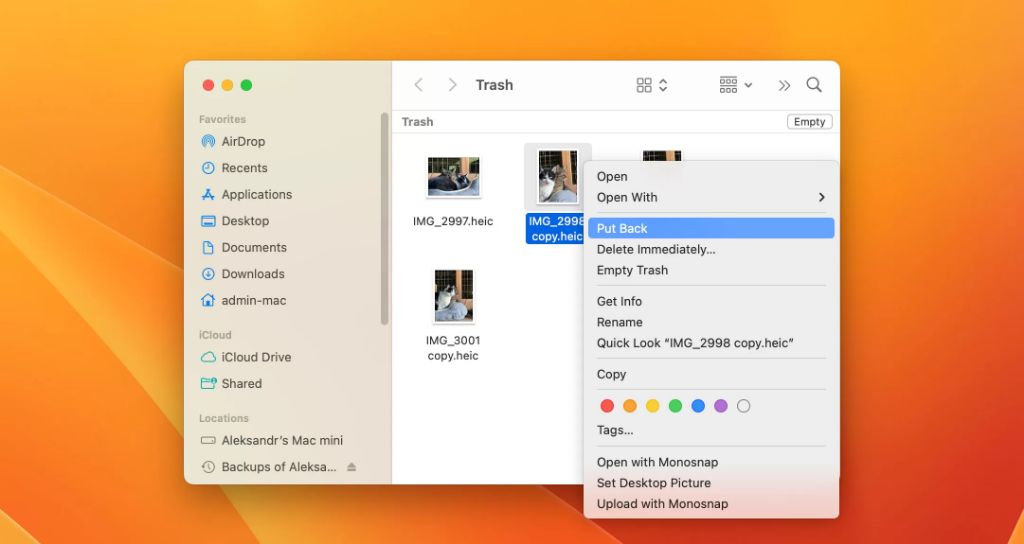
The first place to check when looking for deleted files on Mac is the trash bin. When you delete files on Mac, they are moved to the trash bin before being permanently erased. The trash icon is located at the end of the dock on your Mac desktop.
To view the contents of the trash bin, simply click on the trash icon. This will open a Finder window showing all deleted files. Look through the files here to see if the file you need is still in the trash.
If you find the deleted file, you can right-click on it and select “Put Back” to restore it to its original location. This retrieves the file from the trash bin and puts it back where it was before deletion.
Emptying the trash bin
If you have emptied the trash bin, the files will no longer be visible there. On Mac, emptying the trash bin does not permanently delete files right away. Instead, it flags them to be overwritten in the future when storage space is needed.
Therefore, there is still a chance of recovering files for some time after emptying the trash, as long as they have not yet been overwritten.
Use Time Machine
If the file is no longer in the trash bin, your next option is to use Time Machine to recover it. Time Machine is the built-in backup software in macOS that can help you restore lost or deleted files.
Here are the steps to recover deleted files using Time Machine:
- Open Finder and click on the Time Machine icon in the menu bar or the dock. This will open Time Machine in full screen.
- Browse through your previous backups by navigating back in time using the timeline on the right side.
- Look for the deleted file in your previous backups. You may need to go back to the last backup before you deleted the file.
- Once you find the file, click the Restore button to retrieve it.
This will restore the deleted file to its original location as it was when backed up. Time Machine makes it easy to recover deleted files on Mac, as long as regular backups were being taken.
Setting up Time Machine
If you don’t already have Time Machine set up on your Mac, here is how to do it:
- Open Time Machine preferences from System Preferences.
- Click Select Backup Disk and choose an external drive to use for backups.
- Enable the Time Machine switch.
- Time Machine will now regularly back up your Mac to the selected drive.
Be sure to maintain regular backups with Time Machine to protect your files.
Recover from a backup
If the file was deleted a long time ago and is not in your Time Machine backups either, you may need to recover it from an older backup.
Here are some ways to retrieve deleted files from various backup sources on Mac:
- Time Machine drive: Connect your Time Machine backup drive to the Mac. Use Finder to browse and search for the deleted file in the Backups.backupdb folder.
- Cloud backup: Services like iCloud, Dropbox and Google Drive retain earlier versions of files. You can browse through their history and restore deleted files.
- Bootable clone: Boot your Mac from a clone drive and browse for the deleted file in your user folder.
- Archive backup: Access archived backups from an external drive. Unzip the archive and search for the deleted file.
As long as you can find the deleted file in one of your backups, you can retrieve it by simply copying it back to your Mac.
Use data recovery software
If all else fails, you may need dedicated data recovery software to attempt recovering the deleted file. Here are some Mac data recovery options:
Disk Drill
Disk Drill can scan your Mac’s hard drive and reconstruct lost files from residual data. It has an easy-to-use interface and powerful scanning features.
Simply install Disk Drill, select your Mac’s drive and run a “Deep Scan” to find recoverable data. You can preview files before recovering them.
Data Rescue
Data Rescue is another data recovery app for Mac with advanced scanning. It can retrieve files lost due to logical damage or accidental deletion.
Select a drive to scan, choose a scan type, and preview found files. Data Rescue has a high recovery rate but costs more than other software.
PhotoRec
For recovering photos, audios and videos, PhotoRec is a good free option. While the interface is dated, PhotoRec can extract media files from hard drives based on signature scanning.
Overall, data recovery software provides an additional avenue to rescue deleted files. But avoid installing them on the drive you want to recover from, as this can overwrite deleted file data.
Retrieve from file versions
Some Mac applications such as Apple’s iWork suite and Microsoft Office for Mac have a Versions feature that retains earlier states of documents.
You can use Versions to restore a deleted document in these apps. Here are the steps:
- Open a new document in the app.
- Click File > Revert To > Browse All Versions.
- Select a version of the document created before deletion.
- Click Restore to retrieve the older version.
Versions are enabled by default for these apps. This provides an easy way to recover documents deleted from the apps.
Restore from Auto Save versions
The Auto Save feature in macOS can also help you undo accidental file deletion. Auto Save periodically saves versions of documents you’re working on in the background.
To recover a deleted document using Auto Save:
- Open the app you were using to edit that document.
- Look for an option like “Browse All Versions” or “Show History”.
- Pick an Auto Save version created before you deleted the file.
- Click Restore to get the older version back.
Auto Save is turned on for most apps. You can find its settings under General in System Preferences.
Check the Downloads folder
If you accidentally deleted a downloaded file, it may still be in your Downloads folder. The Downloads folder retains copies of downloaded files for some time after deletion.
To check for recently deleted downloads on Mac:
- Go to Finder > Go > Go to Folder
- Enter the path:
~/Library/Containers/com.apple.Downloads - Browse this hidden Downloads folder for your deleted files.
- Copy any recovered downloads back to your visible Downloads folder.
This trick can help get back downloads deleted from your Mac within the last few days. Older downloads get removed from the hidden folder as well.
Restore from Snapshots
Snapshots are low-level disk images that get created before system updates on Mac with APFS formatting. They can save you when you accidentally delete files after a system update.
To recover deleted files using Snapshots:
- Reboot your Mac into Recovery mode by holding Command+R on startup.
- Select Disk Utility > Your drive > Snapshots.
- Browse through available snapshots and pick one before deletion.
- Click the restore icon to retrieve the files.
Snapshots provide a safety net but are not created reliably. So don’t depend on them alone for recovering deleted files on Mac.
Use file carving recovery
File carving is a technique data recovery tools use that can help when all else fails. It scans the hard drive sectors looking for traces of files matching specific formats.
By reconstructing parts of files from residual data, it can recover files after heavy data loss. However, portions of the files may be corrupted.
Photorec mentioned above uses file carving. Some paid software like Disk Drill also include file carving recovery capabilities, which can pickup more formats than Photorec.
File carving should be used as a last resort since overwritten data cannot be recovered. But in cases of data loss due to formatting, corruption or similar errors, file carving may help salvage remnants of deleted files when other techniques fail.
Avoid file recovery pitfalls
When trying to recover deleted files from your Mac, there are some important pitfalls to avoid:
- Don’t save new files to the drive you want to recover from, as this can overwrite deleted data.
- Don’t reinstall or upgrade your OS if files were just deleted, as this also overwrites data.
- Don’t relaunch apps that were open when deleting files as they may create temp files.
- Stop using the Mac immediately after deleting an important file for the best chance of recovery.
Following these tips will help prevent deleted files from being overwritten so recovery has a better chance of success.
Secure erase deleted files
On the flip side, if you want to make sure deleted files are completely erased and unrecoverable, macOS has a feature just for that.
To permanently delete files beyond recovery:
- Empty the Trash bin.
- Go to Finder > Secure Empty Trash.
- Select the disk you want to securely erase trash from.
- Click OK and enter your user password.
This overwrites the storage space used by the deleted files multiple times to prevent recovery. Use this when permanently deleting sensitive files on your Mac.
Conclusion
While accidental file deletion can be frustrating, there are many ways to recover recently deleted files on Mac. The key is to act quickly before the files get overwritten. Check the trash bin, leverage Time Machine and backups, and use data recovery software if needed. With some effort, you have an excellent chance of getting back even your emptied trash on Mac.