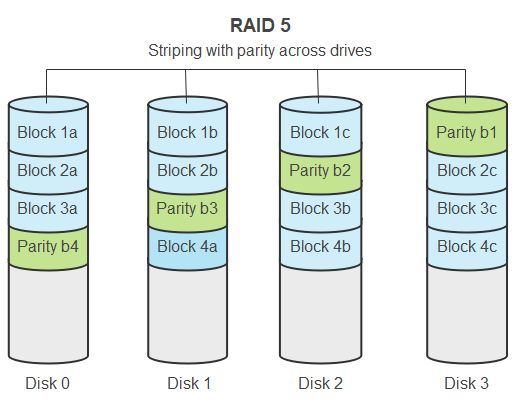
RAID 5 is a popular RAID configuration that provides redundancy and fault tolerance by striping data and parity information across multiple drives. This allows the array to withstand the failure of a single drive without data loss. However, recovering a failed RAID 5 array can be challenging, especially for those without extensive technical expertise.
This guide will walk you through the RAID 5 recovery process step-by-step. We’ll cover how to diagnose the failure, rebuild the array, recover data from degraded mode, and prevent failures in the future. With the right preparation and tools, you can get your RAID 5 back online and restore access to your important data.
Quick Steps to Recover RAID 5
Here is a quick overview of the steps involved in recovering a failed RAID 5 array:
- Diagnose the disk failure and identify the faulty drive.
- Replace the failed drive with a new, identical disk.
- Rebuild the array to recompute parity and restore redundancy.
- If the array is degraded but rebuild fails, attempt data recovery using a RAID recovery tool.
- Repair any file system errors and check for data consistency.
- Restore from backups if data loss occurred during the failure.
- Monitor the health of the array to detect problems early.
- Consider switching to RAID 6 for added redundancy against dual disk failures.
While the basic process is straightforward, the implementation details can be more complex. The rest of this guide will expand on each step to help you successfully recover your failed RAID 5.
Diagnosing RAID 5 Disk Failures
The first step is always to diagnose the underlying problem that caused the failure. With RAID 5, most failures will be caused by a single disk failure. However, other components like controllers, cables, power supplies, etc. can also cause issues.
Common symptoms of a failed disk include:
- I/O errors referring to a particular disk or disk port
- Missing disk alerts for a specific drive
- Failed read/write operations on one disk
- Performance degradation
- RAID controller showing a failed or offline drive
- OS/filesystem errors related to missing devices/volumes
To confirm it is a failed drive, check indicator lights on the drive enclosures and run the RAID controller management software. This will clearly show any disk errors and drive status. Match up the IDs of failed disks to the corresponding slots/drive bays.
Ruling out other issues first is also important. Reseat connectors and swap cables to see if connection problems are causing I/O errors. Try restarting the RAID controller and server to clear any software glitches. Update firmware and drivers as well to fix potential bugs.
Identifying the Faulty Drive
Once a disk failure is confirmed, the key is identifying exactly which drive failed. This depends on how the RAID 5 array is configured.
For hardware RAID cards, the management software will indicate the drive ID and slot location. Make note of this.
With software RAID, the disk identifiers will depend on the operating system. In Linux, the /dev/sdX names correspond to each drive. In Windows, disk numbers or volume letters are used. Consult documentation for the specific software RAID implementation to determine how drives are identified.
Make absolutely certain you have the correct failed drive identified before attempting any removal or replacement. Data loss can result if the wrong healthy drive is replaced.
Replacing the Failed RAID 5 Drive
The next step is to replace the failed drive with a new disk to permit rebuilding the array. It is important to follow best practices here:
- Always replace with an identical make/model drive to avoid rebuild issues.
- Follow proper ESD procedures when handling drives to prevent static damage.
- Gently remove the failed drive from the enclosure or server and insert the replacement.
- Verify the replacement drive is securely seated and recognized by the system.
- Updating firmware on the new drive to match existing drives may be necessary.
With hot-swap SATA/SAS RAID arrays, drive replacement is tool-less and straightforward. Simply release the latch and pull out the bad drive, then insert the identical new drive into the same slot. The process can be slightly more involved on arrays using proprietary enclosures.
For software RAID, the OS will continue seeing the failed drive until the swap is made. Shut down the system fully, replace the drive, then reboot. The RAID management software will detect the new drive and prompt to add it to the array.
Verifying Drive Replacements
It’s critical to verify that the correct failed drive was replaced, the new drive is properly recognized, and no other issues are present before rebuilding. Rushing into a rebuild with the wrong drive replaced or unresolved problems present can corrupt data.
Check the management software to confirm the new drive is showing in place of the failed drive. The status should indicate it is ready to be added or rebuilt. Run basic diagnostic tests on the drive as well if possible.
On Linux software RAID, running mdadm --examine /dev/sdX will verify if the expected array components are seen on the new drive. Only proceed once full confirmation of a successful drive replacement is made.
Rebuilding the Degraded RAID 5 Array
With the new drive installed, the next critical step is rebuilding the degraded RAID 5 array. This reconstructs the data and parity to restore fault tolerance. The rebuild process involves:
- Initiating the rebuild process using the RAID management software.
- The controller reads all data blocks and recalculates parity, writing it to the new drive.
- This can take hours to complete for large arrays. Disk activity will be high during rebuild.
- When finished, the new drive will be synchronized and fully integrated into the array.
Most RAID management tools provide an easy wizard to start the rebuild. Monitor the progress, as errors or stalled rebuilding could indicate additional problems.
For Linux software RAID, use mdadm --add /dev/sdX followed by mdadm --run /dev/mdY to add the new drive and start the rebuild. Watch /proc/mdstat to track progress.
Recovery Time with Degraded Performance
Expect degraded performance during the rebuild process. With only a single disk failure, RAID 5 will remain functional, but at reduced I/O speeds. Prioritize critical tasks first and avoid unnecessary disk activity.
On average rebuilds take 2-4 hours per TB depending on the controller and drive speeds. Larger arrays can take half a day or longer to fully rebuild.
The system remains vulnerable to a second drive failure during this time. Take precautions to avoid an uncontrolled shutdown or disruption during the rebuild.
Recovering Data from Failed Rebuilds
In some cases, the RAID 5 array may be in a degraded state, but rebuilding fails to complete successfully. This leaves the array still inoperable without redundancy. Scenarios where this can occur include:
- Undetected bad sectors or defects on the replacement drive.
- A second drive fails during rebuild, causing complete failure.
- Other faults like cabling issues, controller errors, etc.
When rebuild fails, recovery becomes more complex. It requires using advanced tools to extract data from the degraded array. Software applications like ReclaiMe Free RAID Recovery or Runtime Software’s Raid Reconstructor can help recover and repair RAID 5 arrays in this state.
The basic process involves:
- Attaching the degraded array to a recovery system.
- Scanning the disks and assembling a virtual RAID 5 layout.
- Reading data from disks using redundancy to reconstruct missing stripes.
- Writing recovered data to a separate healthy array or disks as images.
This allows extraction of data from an array that is otherwise unrecoverable through normal means. Advanced RAID recovery tools automate most of the complex digestion tasks. The recovered data can then be used to restore files once the RAID 5 array is rebuilt or replaced.
Safely Imaging Degraded Disks
When directly accessing degraded disks for recovery, it is essential to use read-only disk imaging. Attempting to write data to the degraded array can corrupt parity and data. Disk imaging safely duplicates disks sector-by-sector while avoiding any writes.
Popular tools like Guymager and DC3DD are helpful for creating full forensic images of the disks on Linux. These images can then be analyzed and reconstructed safely using the RAID recovery tools without risk of data corruption.
File System Repair and Data Integrity
Once redundancy is restored by rebuild or recovery, the next step is checking and repairing the file system prior to use. File system metadata can become corrupted or out of sync during a RAID failure. Always run a full check and repair such as:
fsckfor EXT2/EXT3/EXT4 on Linuxchkdskon NTFS volumes in WindowsZpool scrubon ZFS RAIDZ arrays
Many RAID recovery tools also include the option to check file system integrity and repair issues like invalid metadata. This ensures any corruption is fixed before accessing the recovered data.
Comparing the repaired data to backups can also validate full restoration. Spot checking documents or generating checksums on key files provides confirmation. Only once data integrity is verified should the array and data be placed back into production use.
Restoring Backups After Data Loss
In worst case scenarios, the RAID failure may result in irrecoverable data loss or corruption. Issues like multiple concurrent failures can cause this. In these cases, restoring from backups becomes necessary.
To recover after data loss:
- Repair or rebuild the RAID 5 array to re-enable redundancy.
- Restore data from the most recent reliable backup set.
- Play back transaction logs from apps like databases or VMs to reapply changes since the backup.
- Validate that restore was successful and data is intact.
Always maintain good backups that follow best practices like the 3-2-1 rule (3 copies, 2 media types, 1 offsite copy). Test restores periodically to verify backups are usable.
Prioritizing recent business-critical data helps streamline disaster recovery after significant data loss. With usable backups, the array can be rebuilt while data is restored to resume operations.
Avoiding Data Loss with Hot Spares
Configuring hot spare drives can help avoid data loss when rebuilding degraded arrays. The hot spare automatically kicks in when a disk fails, allowing rebuilding using the spare. This avoids the vulnerable degraded state as the array remains redundant.
However, hot spares do not protect against concurrent drive failures or other faults. Maintain good backups as well as redundancy via hot spares for maximum data protection.
Monitoring and Preventing Repeated RAID 5 Failures
After recovering from a failure, be sure to address the root cause to prevent recurrence. Analyze failure trends to determine if particular disks, batches, or models are prone to faults. Expand monitoring and alerts to enable early warnings.
Proactive steps to avoid future RAID 5 failures include:
- Updating firmware/drivers to fix bugs.
- Improving airflow and cooling in the server room.
- Replacing questionable disks before they fail completely.
- Migrating arrays from problematic hardware.
- Enabling email/SMS alerts for disk warnings.
- Monitoring disk SMART attributes to identify failures ahead of time.
Regularly test and practice the recovery process on non-production arrays. This improves preparedness and understanding of the rebuild steps.
Ultimately, moving beyond RAID 5 to more advanced RAID 6 configurations prevents the risk of data loss from second drive failures during rebuild. Consider this upgrade for critical data or aging arrays.
Conclusion
Recovering failed RAID 5 arrays requires careful diagnosis, replacement of faulty disks, and rebuilding to restore redundancy. Successfully pursuing data recovery when things go wrong also relies on advanced tools and techniques.
By understanding the full recovery process, applying best practices, and utilizing the right technologies, failed RAID 5 arrays can be restored and returned to reliable production use.
Consistently monitoring health, preventing failures proactively, and maintaining good backups also helps minimize downtime and data loss when issues do occur. With proper preparation and procedures, even the most severe RAID 5 failure states are recoverable.