SD cards have a write protection switch to prevent accidental erasure of data. This locks the card and prevents writing new data to it. While write protection is useful for archiving data, sometimes you may need to remove this protection to edit files or reformat the card.
In this guide we’ll cover how to remove write protection from an SD card using the command prompt in Windows. We’ll go over checking the status of the card, selecting the disk, removing write protection, confirming it’s removed, testing writing to the card, and troubleshooting tips. By the end, you’ll be able to freely write to your SD card again.
Prerequisites
Before attempting to remove write protection from an SD card, you’ll need the following:
- Administrative access to the computer you’ll be using. This ensures you have the necessary permissions to run the diskpart command and alter the SD card’s status.
- An SD card reader or adapter. You’ll need to physically connect the SD card to the computer to remove write protection.
- An SD card that is currently write protected. This is indicated by the lock switch on the side of the card being slid into the “lock” position.
With administrative computer access, an SD card reader, and a locked SD card, you’ll have the prerequisites in place to move forward with removing write protection using the command prompt.
Check SD Card Status
To check the status of the SD card, we first need to open the Command Prompt application in Windows. This can be done by pressing Windows + R keys to open the Run dialog box. Then type “cmd” and press enter to launch Command Prompt.
Once in Command Prompt, type the command “diskpart” and press enter. This will start the DiskPart utility. Next, type “list disk” and press enter again. This will show all the disks connected to your computer, along with their disk numbers.
Look through the list of disks and identify the disk number for your SD card. The SD card will likely show a size matching the capacity of your card. Be sure to make note of the disk number, as we will need it in the next step when removing write protection.
Using the diskpart command in this manner allows us to easily view details on the SD card and confirm its status before proceeding.
Select SD Card Disk
To remove write protection from the SD card, you first need to identify and select the correct disk that represents the SD card. This can be done using the ‘select disk’ command in Diskpart.
To find the disk number for your SD card:
- Open the Command Prompt as Administrator.
- Type ‘diskpart’ and press Enter to launch the Diskpart utility.
- Type ‘list disk’ and press Enter. This will display all disks connected to your PC.
- Identify the disk that matches the size of your SD card. Make note of the disk number.
Once you have identified the disk number for your SD card, type ‘select disk x’ where x is the disk number. For example:
select disk 2
This will select the SD card disk for the next steps to remove write protection.
For more details, refer to this Digital Citizen article that explains how to use the ‘select disk’ command.
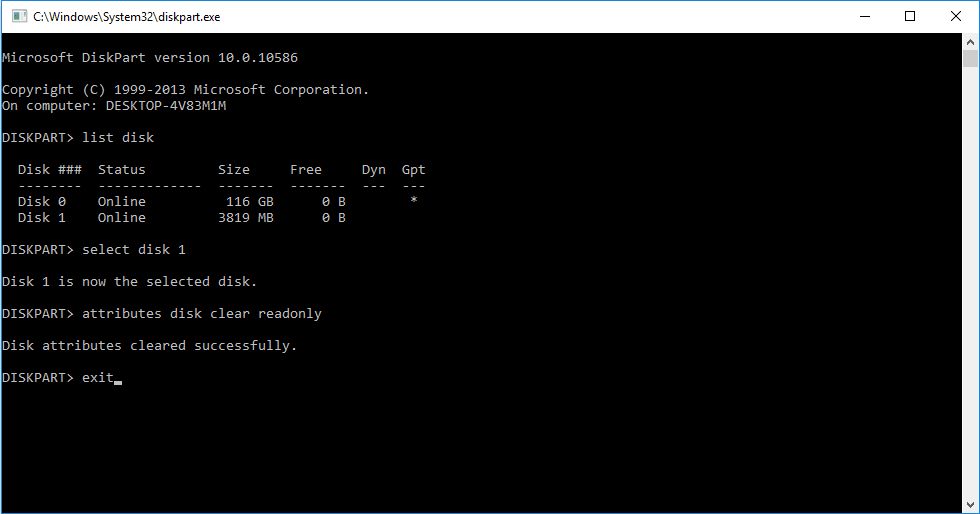
Remove Write Protection
Once you have selected the SD card disk, you can remove the write protection by using the ‘attributes disk clear readonly’ command in DiskPart. As explained by DiskPart.com, this command will remove the read-only attribute from the SD card, allowing you to write data to it again. https://www.diskpart.com/articles/how-to-remove-read-only-from-sd-card-using-cmd-4125.html
Specifically, after selecting the SD card disk, type ‘attributes disk clear readonly’ and hit enter. This will remove the read-only status, allowing you to freely write to the SD card again through File Explorer like normal.
Confirm Removal of Protection
Once you have removed the write protection attributes from the SD card, it’s important to confirm that the protection is actually gone before trying to write data to the card. Here are the steps to verify the removal of write protection:
1. Return to the Command Prompt window where you typed the ‘attributes disk clear readonly’ command.
2. Type ‘list disk’ again and hit Enter.
3. Check the information displayed for your SD card disk. It should no longer say ‘Read-only’ next to the status.
If your SD card is now listed as a ‘Writable’ disk, then the write protection has been successfully removed via the command prompt steps. You can now safely attempt to write new data to the card without getting errors about the disk being write protected.[1]
However, if your SD card still shows as ‘Read-only’ after trying to remove the protection attributes, you may need to repeat the steps or try an alternative method to reset the write protection.
Test Writing to SD Card
After removing write protection, it’s important to test that you can now write data to the SD card. The easiest way is to copy a test file to the card to confirm writing works properly. The steps are:
- Create a simple text file on your computer and save it to your desktop. Name it something like “test.txt”.
- Open File Explorer and navigate to the SD card drive letter.
- Drag and drop the test.txt file from your desktop to the SD card drive. The file should copy over.
- Eject the SD card properly and insert it back into your device like a camera.
- Check if test.txt is now present on the SD card, confirming you can write data to it.
If the test file copies over and shows up on the SD card, you have successfully removed write protection and enabled full read/write access. The card should now work as expected for saving photos, videos, documents and more. If the file fails to copy, further troubleshooting may be needed.
Troubleshooting Tips
If write protection persists after removing the physical lock and using the diskpart commands, try reformatting the SD card. You can use Windows’ built-in disk management utility to reformat the drive. Just right-click on the drive in Disk Management and choose “Format” to reformat it. This should wipe the drive and remove any residual write protection.
You may encounter error messages like “The volume is write protected” or “Access is denied” when trying to write to the SD card in Windows Explorer or Command Prompt. This indicates the write protection is still active. Double check that the physical lock slider is in the unlocked position if your card has one. Also verify the attributes are cleared in diskpart by typing “attributes disk” again after using the “attributes disk clear readonly” command.
If the physical lock is unlocked and diskpart shows no attributes set but you still cannot write to the drive, reformatting it should resolve the issue. Just be aware this will erase all data on the card, so back up anything you need first.
In rare cases, the SD card itself may be damaged or corrupted, preventing reformatting or removal of write protection. If you still cannot write to the card after trying all troubleshooting steps, it’s likely the SD card itself is faulty and needs to be replaced.
Closing Thoughts
In summary, removing write protection from an SD card using Command Prompt involves just a few simple steps. First, you’ll need to check the status of the SD card to identify it. Next, select the SD card disk in DiskPart. Then, use the “attributes disk clear readonly” command to remove the read-only attribute that is causing the write protection. Finally, confirm that write protection is gone by trying to format the disk or create a file. The SD card should now allow writing again.
After removing write protection, it is highly recommended to safely eject the SD card before physically removing it. This ensures any cached writes are flushed to the card to prevent corruption. Simply head to the “Safely Remove Hardware” icon in the system tray, choose your SD card, and wait for confirmation that it’s safe to disconnect. Taking this important last step will enable you to reliably reuse your SD card again.
Summary
In summary, the key steps to remove write protection from an SD card using command prompt in Windows are:
- Insert the SD card into your computer.
- Open Command Prompt as administrator.
- Type
diskpartand press enter to open Diskpart utility. - Type
list diskto list all disks. - Select the SD card disk by typing
select disk x(replace x with disk number). - Type
attributes disk clear readonlyto remove write protection. - Type
exitto close Diskpart. - Test writing to the SD card to confirm write protection removal.
Following these steps in Command Prompt will allow you to remove write protection from your SD card quickly.