The master database is a critical system database in SQL Server that stores all the system-level information required to operate the server. This includes metadata like logins, credentials, server configuration settings, linked servers, etc. Corruption of the master database can have a devastating impact and bring down the entire SQL Server instance.
Once corruption is detected in the master database, it is important to repair it as soon as possible to restore normal operations. The high-level steps involved in repairing a corrupted master database are:
- Take the master database offline to prevent further damage.
- Restore the master database from a known clean backup.
- If no backup exists, rebuild the master database from scratch.
- Run DBCC CheckDB to validate the database.
- Bring the master database back online.
- Reconfigure SQL Server settings as needed.
- Test thoroughly to ensure normal functioning.
This content provides a step-by-step guide to repairing a corrupted SQL Server master database and restoring full functionality.
Identify and Diagnose the Corruption
The first step is to identify that the master database is corrupted and diagnose the extent of the corruption. This usually becomes apparent when trying to access or modify data in the master database and getting errors referencing the master database itself.
Some common errors that indicate master database corruption include:
- Error 902 – System table missing
- Error 913 – System table corrupted
- Error 601 – Could not continue scan with NOLOCK due to data movement
To further diagnose, run DBCC CHECKDB on the master database and inspect the results (Source). If it shows consistency errors, allocation errors or corruption in system tables, then there is definitely corruption present.
It is important to fully understand the nature and extent of corruption before attempting repairs.
Take Database Offline
The first step in repairing a corrupted SQL Server master database is to take it offline. This prevents any further writes or access to the database while repairs are underway.
To take the master database offline, first set it to single user mode using the following T-SQL command (Devart):
ALTER DATABASE master SET SINGLE_USER WITH ROLLBACK IMMEDIATE;
This will end any open connections and transactions, rolling them back. Then, stop the SQL Server service so no new connections can be opened. The database can now be safely taken offline without impacting operations.
Once offline, repairs and restores can be performed without risk of data loss or corruption from ongoing writes and access.
Restore Master from Backup
To restore the master database from a backup, you first need to locate the most recent clean backup. This is crucial, as restoring an outdated or corrupted backup will not resolve the issue.
Here are the steps to restore the master database from a clean backup (cite https://www.mssqltips.com/sqlservertip/6226/restore-sql-server-master-database-options/):
- Start SQL Server in single-user mode using the -m parameter.
- Identify the most recent clean backup of master and verify it is not corrupted.
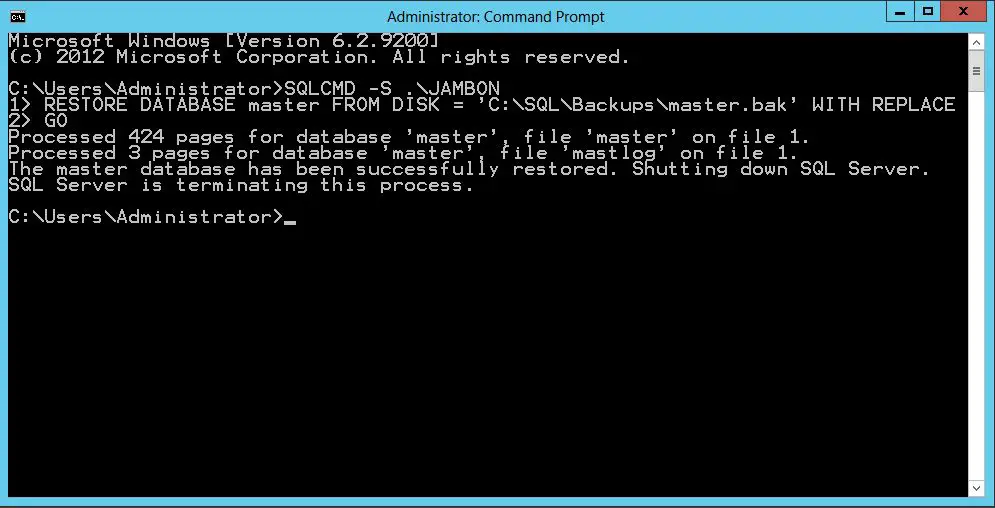
- Restore the master database from the clean backup using Transact-SQL commands like RESTORE DATABASE master FROM DISK.
- If successful, the restore will overwrite the existing master database.
- Run DBCC CheckDB to validate the database was restored properly.
Taking care to restore a clean, non-corrupted backup of master is critical for recovering the database. Following these steps will overwrite master with the backup copy.
Reconstruct Master DB
To reconstruct the master database, first you’ll need to script out any logins, jobs, and other objects you want to preserve. Here are the steps:
- Start SQL Server in single user mode using the -m parameter.
- Connect to the instance using SQLCMD and execute the following scripts to script out logins and jobs:
SELECT Name, Script = CREATE LOGIN FROM SYS.SERVER_PRINCIPALS WHERE type NOT IN ('G', 'R') AND Name NOT LIKE 'NT %'
SELECT Name, Script = CREATE_JOB FROM MSDB.DBO.SYSJOBS - Save the login and job scripts to a separate file.
- Rebuild the master database from scratch using the following steps:
- Delete the master.mdf and mastlog.ldf files.
- Run the SQL Server setup and select the option to Rebuild the master database.
- After the master database is rebuilt, reconnect and run the saved login and job scripts to add them back.
Reconstructing the master database requires removing and rebuilding it from scratch. Be sure to script out any logins, jobs, or other objects you want to keep before deleting the database files. Follow the steps here to completely rebuild the master database.
Run DBCC CheckDB
Once the master database has been restored, the next step is to run DBCC CHECKDB to validate the integrity of the restored database and fix any corruption or inconsistencies. The DBCC CHECKDB command performs several checks on the database to verify the following:
- All data pages are correctly linked in the allocation chain
- Indexes are in proper sorted order
- Tables and views conform to the rules for filegroup consistency
- Referential integrity defined in the database is intact
- All allocated pages are readable and contain reasonable values
To run DBCC CHECKDB on the restored master database:
DBCC CHECKDB ('master') WITH NO_INFOMSGS, ALL_ERRORMSGS
It’s recommended to include NO_INFOMSGS to avoid non-essential messages being printed. ALL_ERRORMSGS ensures any errors encountered are printed.
If DBCC CHECKDB detects corruption or inconsistencies in the database, the WITH REPAIR_ALLOW_DATA_LOSS option can be specified to allow CHECKDB to repair any found errors. However, this may result in loss of some data. It’s recommended to consult with a database administrator before using this option.
Once DBCC CHECKDB runs successfully with no errors reported, the restored master database’s integrity is validated and ready for use. Any issues should now be resolved.
Sources:
https://learn.microsoft.com/en-us/sql/t-sql/database-console-commands/dbcc-checkdb-transact-sql?view=sql-server-ver16
https://www.brentozar.com/archive/2014/05/dbcc-checkdb-faq/
Bring Database Online
Once the master database has been restored, the next step is to bring it back online. Here are the steps to bring the master database online after a restore:
1. Use the ALTER DATABASE command to take the master database offline. For example:
ALTER DATABASE master SET OFFLINE
2. Issue the restore database command to restore master from your backup. For example:
RESTORE DATABASE master FROM DISK = ‘C:\backup\master.bak’
3. Bring the master database online using the ALTER DATABASE command. For example:
ALTER DATABASE master SET ONLINE
4. Test connectivity to ensure SQL Server is accessible and the master database is online. For example, try logging in through SQL Server Management Studio.
Once these steps are complete, the master database should be online and accessible again after the restore. Be sure to test thoroughly and validate full functionality.
Configure SQL Server
Once the master database is restored and rebuilt, you may need to reconfigure some SQL Server settings and objects that were lost. Here are some steps to take:
Reconfigure server settings – After rebuilding master, many instance-level settings like memory allocation or default file locations may be reset to defaults. Review configuration options using SP_CONFIGURE and reapply customized settings as needed. Document any settings changed from defaults for future reference.
Recreate logins and jobs – Logins and SQL Agent jobs will need to be recreated, as they are stored in the master database. Use scripts, documentation or a backup of master prior to corruption to recreate logins and mappings to databases. Also recreate any important SQL Agent jobs that run maintenance tasks.
For more details on reconfiguring SQL Server after a master database restore, see this reference: [Microsoft Docs](
Validate and Test
After restoring the master database, it is crucial to thoroughly test it to ensure proper functionality before putting it into production. Some key steps include:
Test core functionality by running sample queries, creating test logins, and executing typical maintenance tasks. Ensure basic operations complete successfully without errors. Refer to this guide for best practices on validation testing.
Monitor the restored master database closely once put into production. Watch for any unusual behavior, performance issues, or errors in the logs. Set up alerts for critical events. Be prepared to take the database offline quickly if problems emerge.
Run DBCC CHECKDB regularly on the master database to check for corruption or inconsistencies. This Microsoft article provides more detail on using CHECKDB.
Execute test restores and check integrity of backups on a regular schedule. Use RESTORE VERIFYONLY to validate backup sets without restoring data. Refer to this guide on verifying master database backups.
Conclusion
In summary, the steps to repair a corrupted SQL Server master database are:
- Take the database offline
- Restore the master database from a recent backup
- If no backup exists, reconstruct the master database
- Run DBCC CHECKDB to validate the database
- Bring the database back online
- Reconfigure SQL Server settings
- Validate and test functionality
Regularly backing up the master database is critical to avoid prolonged downtime and difficult recovery procedures. Without accessible backups, rebuilding the master database is a complex process. Follow backup best practices and test restores periodically.
Helpful resources:
