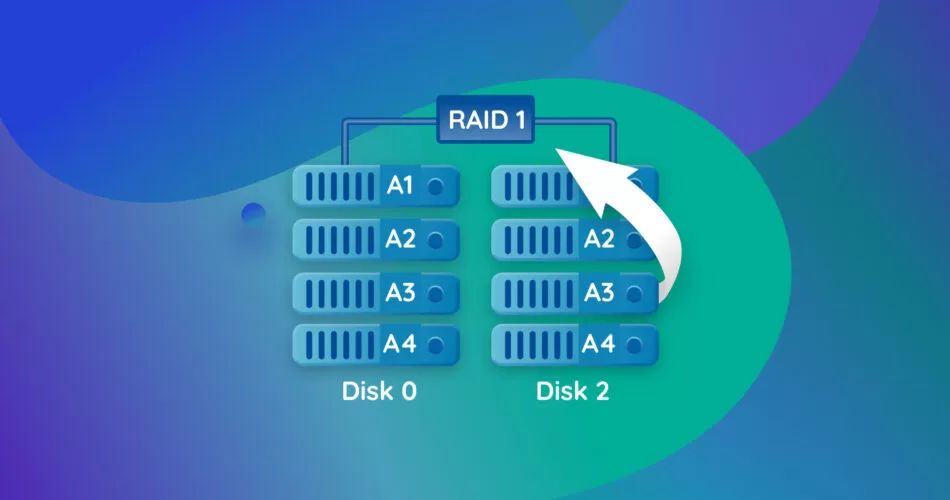
RAID 1, also known as disk mirroring, is a RAID configuration that provides data redundancy by writing identical copies of data to two or more separate drives simultaneously (1). This mirrored set of drives forms a single logical drive that duplicates and stores duplicate copies of all data written to it. The benefit of RAID 1 is that it provides data redundancy in case one of the mirrored drives fails. The array can continue operating using the unaffected drive as all data is copied to both drives. This provides high availability and fault tolerance. RAID 1 also provides improved read performance since data can be read in parallel from both mirrored drives at the same time. However, a drawback of RAID 1 is reduced storage efficiency as the available capacity is equal to that of one drive. For example, two 1 TB drives configured as a RAID 1 array provide 1 TB of usable space, not 2 TB. Overall, RAID 1 is best suited for use cases that require high availability and fault tolerance over maximizing drive capacity (1).
What is RAID 1?
(1) https://www.techtarget.com/searchstorage/definition/disk-mirroring
When to restore RAID 1
There are a few key situations when you may need to restore a RAID 1 array:
Disk failure – If one of the disks in the RAID 1 fails or becomes corrupted, the data will need to be restored from the remaining disk or a backup. RAID 1 provides fault tolerance through disk mirroring, but does not protect against total failure of both disks. Restoring from a backup after disk failure is recommended.
Accidental data deletion – If files are accidentally deleted from a RAID 1 array, you may need to restore from a backup. Both mirrored disks will show the deletion, so the backup provides the only way to recover the lost data.
Corrupted data – If data corruption occurs, restoring from a backup is the best option for RAID 1. Mirroring will replicate the corrupted data to both disks. A backup made prior to corruption provides the only reliable restore point.
Operating system crash – A crashed operating system can make it difficult or impossible to access the RAID 1 array. In this case, the system may need reinstalled and data restored from backup. The RAID 1 disks alone are not bootable without a restored operating system.
In summary, while RAID 1 provides redundancy through mirroring, it is not a substitute for regular backups. Restoring from a backup is often needed in the event of disk failure, accidental deletion, data corruption, or operating system failure. Backups give you the ability to restore to a previous known-good point in time.
Preparation
Before restoring a RAID 1 array, it is important to prepare by assembling the necessary tools and backing up your data. According to EaseUS, you should have your RAID controller installation media ready in case you need to reinstall the RAID drivers. You should also back up your data by copying important files to an external drive.
In addition, you’ll want to check that your RAID controller is still functioning properly. The controller is what manages the RAID configuration, so verifying it works ahead of time is crucial for successful restoration. Run the configuration utility for your controller and look for any errors or issues reported. Address any controller problems before attempting to rebuild your RAID 1 array.
Locate and replace failed disk
The first step is to identify which disk has failed in the RAID 1 array. This can usually be determined using the RAID management software on the server or in the BIOS. The software will indicate a degraded or failed state for the RAID 1 array and specify which physical disk needs to be replaced (1).
To replace the failed disk:
1. Shut down the server and remove the failed disk from the system. Make note of the model, capacity, interface, and bay location of the failed drive.
2. Insert a new disk that matches the model and capacity into the same bay. The new disk must be the same size or larger than the failed disk in order to rebuild the RAID 1 array.
3. Boot the server and allow the RAID controller to detect the new drive. Initialize and format the disk if prompted by the controller BIOS or software.
Once the replacement disk is inserted and detected, the RAID 1 rebuild process can begin to mirror data onto the new drive (2).
Rebuild RAID 1 array
Once the failed disk has been replaced in the RAID 1 array, use RAID management software to rebuild the array. This copies data from the healthy disk to the replacement disk to synchronize the data across both disks again.
Most RAID controllers include management software that can handle the rebuild process automatically after detecting the disk replacement. For hardware RAID, this may involve accessing a configuration utility in the BIOS or UEFI settings during boot. Software RAID solutions also include rebuild tools. Follow the instructions provided for your specific RAID setup.
The rebuild process can take substantial time depending on the size of the RAID array. Expect it to run for hours or days with large multi-terabyte arrays. Monitor the rebuild progress to ensure it completes successfully without any errors or stalling.
Once finished, verify that data on both disks is identical. The RAID software should indicate the rebuild completed and synchronization was successful. However, it’s wise to spot check files on both disks to validate they contain the same data.
With the synchronized data across disks, the RAID 1 array has been fully rebuilt and redundancy restored. The server can continue operating normally.
Restore from backup
If you have a recent backup of your RAID 1 array, restoring from the backup can be the quickest way to get your system back up and running. Here are the steps to restore RAID 1 from a backup:
1. Connect the backup media that contains your backup. This could be an external hard drive, NAS device, tape drive, or cloud storage. Make sure the backup device is connected and accessible from your computer.
2. Locate the backup files or image you want to restore from. Backup software usually organizes backup data in its own folder structure on the backup device or media.
3. Restore the backup to your RAID 1 array. Use the backup software to select the backup version you want to restore and start the restoration process. The software will restore the backup image or files to the RAID 1 array.
Make sure to restore to the same RAID 1 array and file structure as the original backup. Restoring to different hardware or locations may cause issues. The restoration process may take some time depending on the amount of data being restored.
Once complete, your RAID 1 array should be restored to the state it was in when you created the backup you restored from 1. At that point, you can start using it again as normal.
Check file system
After restoring the RAID 1 array, it is important to check the file system for errors and repair any corruption. The CHKDSK utility can scan the volume and fix common issues. To check and repair the file system on the RAID 1 array, run the command CHKDSK /F from an elevated command prompt. The /F parameter tells CHKDSK to fix any errors found during the scan Source.
CHKDSK will check the file system structure and scan the disk surface for bad sectors or corruption. It can recover readable data from bad sectors and repair common file system problems like cross-linked files, bad file record segments, and directory errors. Allow CHKDSK to run fully so it can attempt to recover files and repair all issues found.
Restore boot loader
After replacing the failed disk and rebuilding the RAID 1 array, you may need to restore the boot loader to boot back into your system. Here are the steps:
Access system recovery tools like a rescue CD or USB drive. Boot your system from the rescue media instead of the hard drive. This will provide access to tools for rebuilding the boot configuration without relying on the hard drive.
Use a tool like Boot-Repair in Linux to automatically rebuild the bootloader: https://serverfault.com/questions/211478/raid-1-on-boot-disk-recovery. Boot-Repair can detect your Linux distribution and reinstall GRUB or another bootloader. Follow the prompts to restore boot files and configuration.
In FreeBSD, you may need to reinstall the bootloader manually using gpart bootcode. See instructions here: https://forums.freebsd.org/threads/restore-raid-1-after-changing-a-disc.61319/. This will write a new bootcode to the RAID 1 disk.
With Windows, you can access the recovery tools from your installation media to rebuild the BCD store and boot files. Follow the steps to get to the Command Prompt and use bootrec commands like bootrec /fixmbr to write the Windows bootloader.
Once finished, reboot and verify the system can boot from the RAID 1 array as expected.
Recover deleted files
If individual files were accidentally deleted from the RAID 1 array, you may be able to recover them using data recovery software designed for RAID configurations. Some options to try include:
EaseUS Data Recovery Wizard https://www.easeus.com/data-recovery/free-raid1-recovery-software.html – This software allows you to scan the RAID disks to find deleted files. You can preview found files before choosing to recover them.
Disk Drill https://www.handyrecovery.com/raid-1-recovery/ – Disk Drill can read both RAID 1 disks and reconstruct the array. You can then scan and recover deleted files from within the software.
The basic process involves installing the data recovery software, selecting the RAID 1 disks to scan, and letting the deep scan run to find deleted files. Many software options allow you to preview found files before recovering them. Be sure to recover the files to another disk or drive, not back to the RAID array.
Verify restoration
After restoring the RAID 1 array, it is crucial to verify that the restoration was successful before putting the system back into production. Here are some tips for verifying the restoration:
Check the file and folder structure to make sure directories, files, and permissions are intact. Navigate through the directory structure and spot check files at all levels to ensure they open properly.
Open random files to check data integrity. Look for signs of corruption like garbled text, missing data, or errors when opening files. Pay particular attention to critical system files and databases.
Monitor system stability over an extended period. Look for any crashes, freezes, or odd behaviors after restoring the array. Stress test the system with normal workloads and check logs for anomalies.
Running data verification utilities can also help validate the restoration. Tools like Intel’s RAID volume verification can scan the array for inconsistencies.
Taking time to thoroughly verify the restoration identifies any potential issues before the system is relied upon again. It also provides peace of mind that business-critical data is intact after recovery.