RAID 0, also known as disk striping, is a type of RAID (Redundant Array of Independent Disks) configuration that spreads data across multiple hard drives or solid state drives (SSDs) (Source: https://www.techtarget.com/searchstorage/definition/RAID-0-disk-striping). It involves dividing data into blocks and writing stripes of data across the drives in an array.
The main advantage of RAID 0 is improved performance and speed. By spreading data across multiple drives, RAID 0 can increase read and write speeds significantly compared to a single drive. This makes it well-suited for applications that demand high throughput like video editing or gaming (https://www.pcmag.com/encyclopedia/term/raid-0).
However, RAID 0 provides no redundancy or fault tolerance. If one drive in the array fails, all data will be lost. For this reason, RAID 0 is generally considered more suitable for non-critical data. The increased risk of failure makes RAID 0 inappropriate for important or sensitive data that requires strong protection.
When to Use RAID 0
RAID 0 improves disk performance by dividing data across multiple disks. This allows for faster read and write speeds compared to a single disk (Source). Therefore, RAID 0 is best suited for applications where high disk performance is critical, such as:
- Video editing – RAID 0 provides the fast disk access needed for working with high resolution video files.
- 3D modeling and rendering – The improved read/write speeds help when working with large 3D models and raw render files.
- Scientific computing – Applications like genomic sequencing, fluid dynamics simulations, etc. involve processing large datasets and benefit greatly from RAID 0.
- Gaming – Games load faster and perform better with the enhanced disk performance of RAID 0.
RAID 0 comes with the risk of total data loss if any disk fails, as there is no redundancy (Source). Hence, it should only be used in scenarios where the risk of disk failure and data loss is acceptable, for example:
- Storing temporary data that can be recreated if lost.
- Non-critical applications where backups mitigate the risk of data loss.
- Testing environments where preservation of data is not required.
RAID 0 Requirements
Setting up RAID 0 requires a minimum of two identical hard drives. All of the drives must be the same size and ideally the same model for optimal performance. This allows the data to be evenly distributed in stripes across both drives for faster reads and writes.
In addition to at least two hard drives, you’ll also need either a RAID-enabled motherboard or a RAID controller card. Most modern motherboards have built-in RAID support through the chipset. Refer to your motherboard manual to confirm RAID support. If your motherboard does not support RAID, you’ll need to install a hardware RAID controller card to enable RAID 0.
The hard drives must be connected to the RAID controller, either directly to the motherboard ports or the ports on the RAID card. This allows the controller to manage the RAID array.
Entering BIOS
The BIOS (Basic Input/Output System) is the firmware used to initialize hardware components at boot and provide runtime services for your computer’s operating system. To configure RAID in BIOS, you’ll first need to access the BIOS setup utility during your computer’s boot process. This is done by pressing a specific key or key combination as the computer boots up.
On most PCs, the BIOS key needs to be pressed after the initial boot screen but before the operating system starts loading. Common BIOS access keys include:[1][2]
- F2 for Acer, Dell, and Gateway systems
- DEL for Asus systems
- F10 for HP and Samsung systems
- F12 for some Lenovo systems
The exact BIOS key can vary between computer manufacturers and models. If you’re unsure of the correct key, check your system or motherboard manual for details. Some systems may briefly display the BIOS access key on bootup as well. Pressing the key continuously after rebooting may help catch the prompt in time before the operating system loads.
Once the BIOS setup utility loads, you’ll be able to configure RAID and other firmware settings. Be sure to save changes before exiting the BIOS.
Enabling RAID in BIOS
To enable RAID mode in the BIOS, you first need to access the BIOS settings when your computer boots up. Typically, you can access the BIOS by pressing the Del, F2, or F10 key during the initial boot process. The key varies by motherboard manufacturer.
Once in the BIOS, you need to locate the settings related to SATA or onboard storage. There may be a separate menu for RAID configuration. Refer to your motherboard manual if you are unsure where to find these options.
Look for an option to change the SATA mode or onboard storage controller mode to RAID. Some motherboards may label this as RAID, RAID Mode, or RAID Supported. Enable this option to activate RAID functionality.
You may also need to enable any individual SATA ports you want to include in the RAID array at this point. Ports not enabled may be unavailable when configuring the array.
Finally, save your BIOS settings and exit. The computer will reboot, and you should now be able to configure RAID arrays.
Refer to your motherboard manual for the exact steps to enable RAID in the BIOS, as they can vary. Key things to look for are changing the SATA Operation Mode to RAID and enabling any SATA ports you want to use for RAID.
Creating a RAID 0 Array
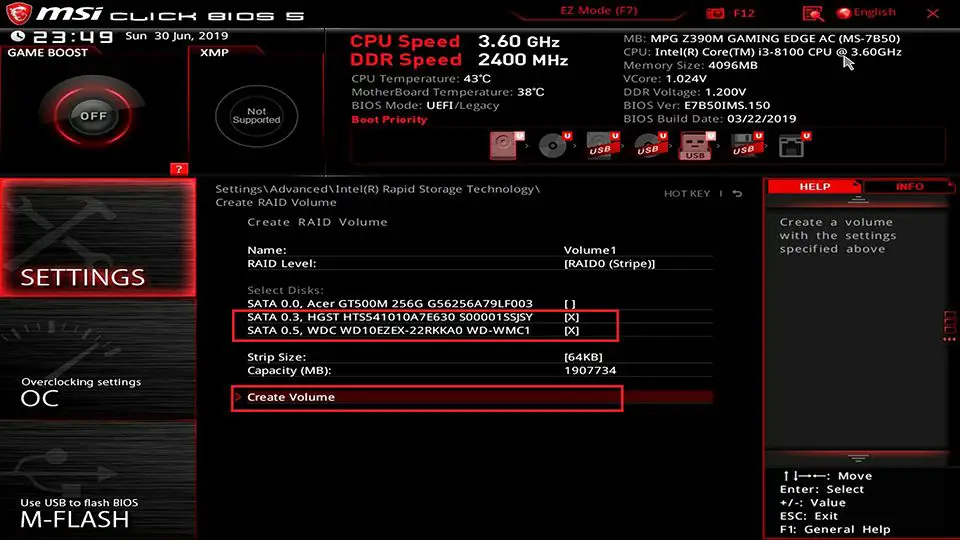
Once you have entered the RAID configuration utility in the BIOS, you can create a RAID 0 array. The first step is to select the drives you want to include in the array. Most configuration utilities will show all detected drives, allowing you to select two or more to add to the RAID 0 array. It’s important to only select blank drives with no existing data, as creating the array will erase them.
After selecting the drives, you will need to set the stripe size. This determines how data will be split and distributed among the drives. A smaller stripe size like 64KB means data is divided into smaller chunks, allowing for faster reads and writes but less sequential throughput. A larger stripe size like 128KB or 256KB provides better sequential performance but slower random access (see this article for more details). For most uses, 128KB is a good starting point.
Once you’ve selected the stripe size, the utility will initialize and create the RAID 0 array. The selected drives will appear as a single unified volume that spans their combined capacities.
Installing OS on RAID 0 Array
Once the RAID 0 array has been created in the BIOS, the next step is to install the operating system onto the array. This involves partitioning and formatting the array properly to prepare it for the OS installation.
First, boot to the OS installation media, whether that is a DVD, USB drive, or network boot environment. When you arrive at the disk selection screen, the RAID 0 array should appear as one single large drive. Select that drive to begin the partitioning process.
Use the disk management tools provided by the OS installer to create partitions on the RAID 0 array. For most home installations, a common setup is to create a single large partition spanning the full capacity of the array. This will be formatted with a filesystem like NTFS or EXT4. Refer to your OS documentation for specific partitioning recommendations.
With the array partitioned and formatted, proceed through the rest of the OS installation as normal, ensuring you are installing to the RAID 0 array partition. The installation should proceed the same as it would on a regular single disk, with the benefit that read/write operations will be spread across multiple disks for increased performance.
According to this Microsoft Answers post, when installing Windows on a RAID 0 array, you can “Run the installation through normal means so the with the Media Creation Tool onto the RAID 0 array.”
Verifying RAID 0 Setup
Once you have finished setting up RAID 0 in the BIOS and installed your operating system, it is important to verify that the array is working correctly and delivering the performance benefits you expect. There are two main ways to check that RAID 0 is set up properly:
First, open Disk Management in Windows (press Windows Key + R and type “diskmgmt.msc”). Here you should see your RAID 0 array listed as a single drive volume. If you had two 500GB drives, your array would be listed as a single 1TB volume for example. This confirms the drives are working together in the array.
Second, run some disk benchmarking software to test the read/write performance of your RAID 0 array and compare to a single drive. Popular benchmark tools include CrystalDiskMark [1] and ATTO Disk Benchmark. RAID 0 can provide a significant performance boost, with some tests showing 2x-3x higher read/write speeds compared to a single drive [2]. If you are not seeing improved performance, it may indicate an issue with the RAID setup.
Checking these two aspects will verify your RAID 0 array is configured correctly and delivering faster disk performance for improved system speed.
Maintaining a RAID 0 Array
Since RAID 0 provides no redundancy, maintaining the RAID array is crucial to avoid data loss. There are two key aspects of maintaining a RAID 0 array:
Monitoring Disk Health
Closely monitor the health of the disks in the RAID 0 array using disk utility software like CrystalDiskInfo. Check for signs of disk failure like reallocated sectors and seek errors. Replace any potentially failing disks immediately to avoid data loss across the array.
Planning Backups
Because of the lack of redundancy, it is absolutely vital to maintain recent backups of your RAID 0 array. Back up your data regularly to an external drive or cloud storage. This will allow you to recover data in case of disk failure. Some recommend daily or weekly backups for RAID 0 arrays depending on their size and importance of data.[1]
Maintaining backups is crucial, as rebuilding a RAID 0 array after failure will result in total data loss without a backup.
Conclusion
Setting up RAID 0 in BIOS can provide increased disk performance, but requires careful setup and maintenance. We walked through the full process from entering BIOS, enabling RAID, creating the array, installing the OS, and verifying the setup.
A few final tips: always back up your data before creating a RAID 0 array, since data will be lost if any part of the array fails. Regularly monitor the disk health and immediately replace any failed drives to avoid data loss. RAID 0 improves disk performance but does not provide fault tolerance like RAID 1 or 5. Use RAID 0 for fast scratch disks but not for storing irreplaceable data.
With proper configuration and maintenance, RAID 0 can safely provide a speed boost for the right workloads. But the lack of redundancy means you must be vigilant against disk failures. Overall, RAID 0 is best suited for non-critical data where high performance is the priority.