Network attached storage (NAS) devices are extremely useful for keeping all of your data safely backed up and accessible from anywhere. Seagate’s 4-bay NAS systems provide ample storage space and powerful features in a compact desktop form factor. Setting up a Seagate 4-bay NAS is straightforward, especially if you follow some key steps.
What is a NAS?
A NAS or network attached storage device is a dedicated file storage server that connects to your network, often via an Ethernet cable or WiFi. This allows you to access and share files from anywhere through the network instead of being restricted to the computer the drive is physically plugged into.
Key benefits of a NAS include:
- Centralized storage and backup of files
- Access files from any device on the network
- Share files and folders with multiple users
- RAID configurations provide redundancy to protect against drive failures
- Remote access allows you to access files when away from home
Seagate’s 4-bay NAS systems come equipped with powerful hardware and extensive features to get the most out of your high capacity storage needs.
Setting Up Your Seagate 4-Bay NAS
Once you have unpacked your Seagate 4-bay NAS, follow these steps to get it up and running:
- Install the hard drives – Open the drive bays and securely slide in 3.5″ SATA hard drives. Make sure the drives are pushed in all the way until they click into place.
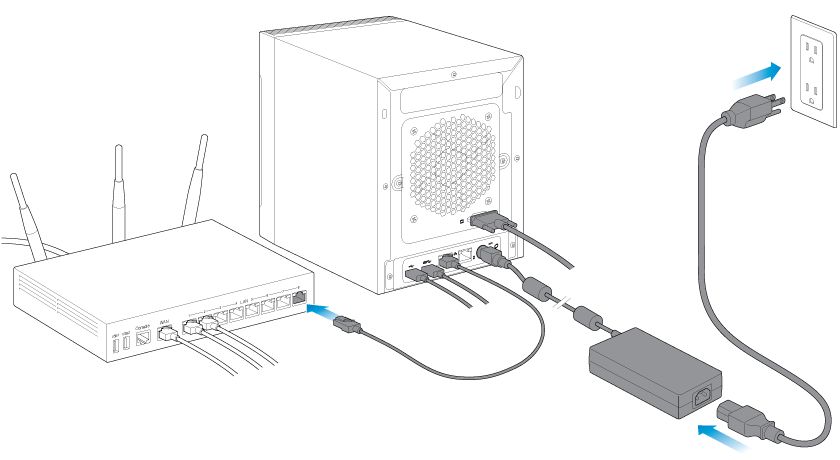
- Connect the NAS – Use an Ethernet cable to connect the NAS to your router for the best speeds. Alternatively, you can use WiFi if preferred.
- Power on the device – Connect the power supply and turn on the NAS. It will boot up and you should hear some beeping sounds.
- Install the software – On a computer on the same network, download and install the Seagate NAS dashboard software. This will detect the NAS and allow you to manage settings.
- Run the setup wizard – Open the dashboard software and run the setup wizard. Follow the on-screen instructions to configure basic settings and create your first user account.
- Add hard drives – Use the dashboard to add your installed hard drives to a volume. You can select RAID configurations and partition sizes.
- Access the NAS – Once setup is complete, access your NAS by opening a file explorer and typing the NAS IP address into the address bar.
That covers the basics of getting your Seagate 4-bay NAS operational! There are many additional configuration options available through the dashboard software to take full advantage of your advanced NAS features.
Understanding 4-Bay NAS Capabilities
Seagate offers 4-bay NAS systems to suit a range of storage needs and budgets. However, they share some common key capabilities:
- Hard drive bays – 4 hard drive bays allow for capacities up to 40TB depending on the drives used.
- Processor – Quad core CPUs provide good performance for simultaneous users and tasks.
- Memory – At least 4GB of DDR4 RAM enables smooth system performance.
- Connectivity – Gigabit ethernet and USB ports allow flexible wired/wireless connections.
- RAID support – Optional RAID gives redundancy to protect data in case of drive failures.
- Media streaming – Built-in media server streams videos, photos and music to connected devices.
- Remote access – Secure remote connections allow you to access the NAS outside of home.
With support for up to 40TB of storage, RAID data protection, media streaming, remote access and more, Seagate’s 4-bay NAS devices provide an ideal centralized storage solution for homes and small offices.
Choosing Your Drives
One of the first decisions when setting up your Seagate 4-bay NAS is choosing the right hard drives. Here are some tips:
- Use 3.5″ SATA drives designed for NAS systems. Seagate IronWolf or WD Red NAS drives are recommended.
- Larger capacity drives (e.g. 10TB vs 2TB) give you more total storage from fewer drives.
- Match the drive capacities in each bay or use drives of different sizes combined.
- 7,200 RPM drives offer better performance while 5,400 RPM save energy/money.
- For RAID, use the same model drive in each bay for optimal compatibility.
In many cases, using high capacity Seagate IronWolf NAS drives will provide the best performance and long term reliability for your 4-bay NAS.
Recommended HDD Configurations
| Drives | Total Capacity | Use Case |
|---|---|---|
| 4 x 10TB IronWolf | 40TB | Max capacity for large media libraries |
| 4 x 4TB IronWolf | 16TB | Good capacity for general home/office use |
| 4 x 2TB BarraCuda | 8TB | Entry level NAS setup |
How to Configure RAID on Your NAS
One of the advantages of a 4-bay NAS is the ability to use RAID for enhanced performance and/or data protection. Here is an overview of RAID options for Seagate NAS devices:
RAID 0
RAID 0 stripes data across the drives for increased performance. However, it does not provide data protection if a drive fails.
RAID 1
RAID 1 mirrors data on two drives for redundancy. If one fails, data is still available on the remaining drive.
RAID 5
RAID 5 stripes data across drives with distributed parity information. It can withstand a single drive failure without data loss.
RAID 10
RAID 10 is a combo of RAID 1 mirroring and RAID 0 striping. It provides fast speeds along with redundancy.
The Seagate NAS OS makes it easy to configure your preferred RAID right from the dashboard. Simply go to Storage > Volumes and select your RAID type during setup.
Networking Basics for NAS Devices
Connecting your NAS to your home or office network is an important part of the setup:
- Wired connection – Use an Ethernet cable for the fastest and most stable connection to your router.
- Wireless – Connect via WiFi if your NAS model supports it. Speeds may be slower.
- Get IP address – Your NAS will request an IP address automatically from the router via DHCP.
- Port forwarding – Forward ports on your router to allow remote access to your NAS.
- Jumbo frames – Enable jumbo Ethernet frames on your NAS and network for faster transfers.
Test transfer speeds to and from your NAS across the network to ensure you are getting optimal performance. Wired gigabit Ethernet will provide the fastest file access.
Backing Up Your NAS
While a NAS provides centralized storage and backup capabilities for all connected devices on your network, it is also important to have a backup strategy for the NAS itself in case of drive failures or disasters:
- Use cloud backup services like IDrive or Backblaze to backup NAS data securely offsite.
- Backup critical NAS data to external USB drives periodically.
- Enable versioning on shared folders. This saves previous versions of files if accidentally deleted or changed.
- Leverage RAID data protection if available to recover from a failed drive.
- Consider a secondary NAS at another location for offsite backups of your main NAS.
Following the 3-2-1 backup rule is recommended – 3 copies of your data, on 2 different media types, with 1 copy offsite.
Accessing Your NAS Remotely
One of the perks of network attached storage devices like Seagate’s NAS lineup is the ability to access your files remotely from anywhere. There are a few methods to enable remote NAS access:
VPN
Connecting to your home VPN allows you to access devices on your home network remotely, including the NAS.
Cloud Portal
Seagate provides a cloud portal to log in and manage your NAS from any web browser.
FTP
Enable FTP access on your NAS to connect via FTP client software for file transfers.
Web File Browser
Some NAS models provide a web file browser to view and manage files directly through a web portal.
Using a combination of VPN connections and Seagate’s consumer NAS portal provides the most seamless remote NAS access on the go.
Must Have NAS Apps and Add-Ons
Maximize the capabilities of your Seagate NAS by installing valuable apps and add-on software:
Plex
Plex Media Server allows streaming your media library to all your devices.
Sonarr
Automatically downloads TV shows and episodes as they become available.
Radarr
Downloads movies automatically based on your watchlist.
Downloader
Flexible download manager for HTTP/FTP/BitTorrent downloading.
CloudSync
Syncs NAS folders with cloud services like Dropbox, Google Drive, etc.
WordPress
Hosts websites and blogs directly on your NAS.
The Seagate NAS app store hosts a wide range of helpful apps to expand the functionality of your device beyond just file storage.
General NAS Security Tips
When storing your valuable data on a NAS, security is crucial. Follow these best practices:
- Use strong passwords – use random complex passwords for all user accounts.
- Enable firewall protection – block unused ports and allow only trusted IP ranges.
- VPN access – use a VPN for the most secure remote NAS connectivity.
- Folder permissions – properly configure share and folder user permissions.
- Disable guest accounts – only named users should have NAS access.
- Automated scanning – scan regularly for malware or suspicious activity.
- Updates – keep the NAS firmware and apps updated for the latest security patches.
Keeping your NAS firmware updated, using strong unique passwords, limiting remote access and properly configuring share permissions will help keep your data safe from unauthorized access.
Power Tips for Advanced NAS Management
Beyond just file storage, advanced users can get the most out of a Seagate NAS with extra customization and optimizations:
- Scripting and automation – write scripts to automatically run tasks and workflows.
- Backups – configure backup jobs to external drives or cloud services.
- Virtualization – use your NAS to run virtual machines.
- Docker – host custom Docker containers such as databases.
- Access logs – enable logging to monitor NAS activity.
- Task scheduler – schedule scripts and tasks to run automatically at set times.
- Real-time remote replication – mirror NAS data to another NAS.
- SSD cache – add flash SSDs to boost performance.
While not required, power users can enable more advanced management and automation through scripting, task scheduling, virtualization and more.
Troubleshooting Common NAS Issues
In rare cases, a few issues may arise with your new NAS. Try the following troubleshooting tips:
Can’t Connect to the NAS
First verify the network connection to your router and try rebooting the NAS. Check the dashboard software to find the IP address and ping it to confirm connectivity.
Slow Transfer Speeds
Try a wired Ethernet connection instead of WiFi, enable jumbo frames, check drive health using disk utilities, or optimize drive formats.
Dashboard Won’t Launch
Download and reinstall the latest dashboard software, check firewall settings, allow the app through software security, and reboot the NAS.
Drives Not Detected
Push drives in firmly until they click into place, check drive seating and cables, scan for new disks on the NAS, or try removing and reinserting the drives.
Running diagnostics through the dashboard software should point you towards any NAS problems. Contact Seagate customer support for further assistance if needed.
Conclusion
With robust storage capabilities, built-in data protection, and user friendly management, Seagate 4-bay NAS devices provide an excellent centralized storage hub for homes and offices alike. Follow the setup steps outlined to get your new NAS up and running smoothly. Enable additional features for remote access, streaming, backups, security and automation to get the most out of this powerful storage solution.
