Testing a hard drive in BIOS is an important diagnostic step when troubleshooting computer problems. The BIOS provides low-level access to hardware devices before the operating system loads. This allows you to rule out potential hard drive failures as the cause of issues like boot failures or data corruption.
What is the BIOS?
BIOS stands for Basic Input/Output System. It is firmware embedded on the motherboard that initializes and tests hardware components as the computer boots up. The BIOS provides a basic interface to configure settings before launching the operating system.
When you first turn on a computer, the BIOS runs a power-on self-test (POST) to check core hardware like the CPU, RAM, motherboard, and boot drive. If devices pass these initial tests, the BIOS loads startup files from the boot drive and then the operating system.
Accessing the BIOS setup utility allows you to view more detailed information about connected storage devices. You can inspect attributes like model name, firmware version, storage capacity, and SMART status.
Why test a hard drive in BIOS?
Testing a hard drive in BIOS can help identify potential hardware faults that prevent booting to the operating system. Some key scenarios where it is useful include:
- Boot failures or freezing during startup
- Operating system not found errors
- Hard drive not detected messages
- File system corruption or bad sectors
- Hard drive noises like clicks or beeps
- Slow boot times and system performance
By isolating hard drive errors in BIOS, you can rule out software faults and other factors. BIOS hard drive diagnostics provide low-level results before third-party tools become available after loading the operating system.
How to enter BIOS setup on different PCs
Accessing the BIOS generally requires pressing a BIOS key during the boot process. The exact key varies between computer manufacturers but is typically one of the following:
- F1
- F2
- F10
- F12
- DEL
Here are some common ways to enter BIOS setup across different brands:
| PC Manufacturer | BIOS Key |
|---|---|
| Acer | F2 or DEL |
| Asus | F2 or DEL |
| Dell | F2 or F12 |
| HP | F10 or ESC |
| Lenovo | F1 or F2 |
| MSI | DEL |
The brief BIOS startup screen will indicate the correct key to press. You may need to press it continuously after turning on the computer to enter setup before the operating system boot sequence starts.
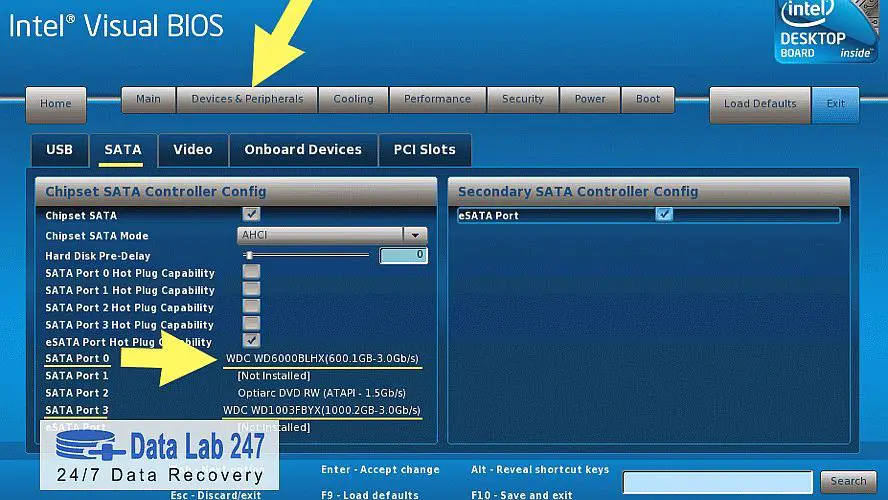
How to test a SATA or IDE hard drive in BIOS
Once you access the BIOS setup utility, you can navigate to options to view and test connected hard drives. The process varies slightly depending on whether the computer uses legacy IDE or newer SATA drives.
Testing a SATA hard drive
For SATA drives, look for a “Boot” or “Boot Order” menu in the BIOS. This displays a list of available boot devices, including any connected SATA hard drives. The drive details typically include model name and storage capacity.
Select the SATA drive you want to test and choose the “Hard Drive Diagnostics” option (or something similar). This runs SMART checks on the drive and can detect bad sectors or mechanical faults.
The BIOS hard drive tests may take several minutes to complete. Reboot the computer afterwards and check if the SATA drive is now detected correctly without errors.
Testing an IDE hard drive
IDE drives use a legacy parallel ATA interface instead of SATA. In the BIOS, navigate to options like “Standard CMOS Features” or “Advanced BIOS Features”. This should display details on any installed IDE hard drives.
Select “HDD Auto Detection” to scan for IDE drives present. Then choose “HDD Test” or a similar utility to run low-level diagnostics on the hard drive.
Allow the test to complete fully, which can take up to 30 minutes for large IDE hard drives. This checks the physical drive integrity down to the sector level.
What S.M.A.R.T. hard drive tests check
The hard drive diagnostics within the BIOS setup utility rely on the SMART (Self-Monitoring, Analysis and Reporting Technology) standard. All modern hard drives contain onboard SMART chips that monitor drive health parameters.
SMART attributes that can indicate potential hard drive issues include:
- Reallocated sectors count – Number of bad sectors that have been replaced.
- Spin retry count – Number of retries to spin up the drive platter.
- Current pending sector count – Unstable sectors waiting to be remapped.
- Read error rate – Rate of unrecoverable read errors.
- Seek error rate – Number of mechanical seek errors.
- Hardware ECC recovered – Number of errors corrected via ECC.
Running SMART tests in the BIOS provides raw values for these parameters from the hard drive itself. High counts for reallocated or pending sectors, errors, retries, and ECC corrections can reveal problematic drives.
How to interpret BIOS hard drive test results
The outcome of SMART tests on a hard drive in BIOS will be one of the following results:
- No errors detected – The test completed with no SMART attributes exceeding threshold. Indicates a healthy drive.
- Error code detected – The test failed and uncovered faulty SMART attributes. Sign of potential hardware failure.
- Hard drive not detected – No hard drive detected when running the test. Could be a dead drive or loose connection.
If the BIOS hard drive test passes with no SMART errors found, the issue likely lies with another component like memory, CPU, motherboard etc. Failing results pinpoint the hard drive as faulty.
Specific SMART metrics like reallocated sector counts over 100 indicate an unreliable drive nearing the end of its lifespan. High ECC or error rates also reflect unstable drive hardware.
How to fix issues after testing hard drive in BIOS
If BIOS diagnostics uncover SMART errors or hardware faults on your boot hard drive, recommended steps include:
- Replace failing hard drive with a new SATA or IDE drive
- Attempt drive repairs using manufacturer HDD tools
- Update hard drive drivers and firmware
- Try adjusting BIOS settings related to hard drive
- Replace damaged SATA data or power cables
For minor SMART errors, utilities like HD Tune Pro or manufacturer diagnostic tools can rewrite unstable sectors. Updating drive firmware may also improve performance and reliability.
If the hard drive is not detected at all, reseating SATA cables or swapping ports can help rule out loose connections. Failing drives may also not spin up due to mechanical motor issues.
Advantages of testing hard drives via BIOS
Using BIOS diagnostics offers some key benefits for troubleshooting hard drive problems:
- Isolates hard drive faults – Pinpoints physical drive issues before loading OS.
- Checks SMART health data – Reports metrics directly from drive firmware.
- Tests boot drive – Diagnoses problems with OS drive that prevent booting.
- Requires no software – Runs via firmware before OS installed.
- Performs low-level tests – Checks physical read/write operations.
The BIOS hard drive utilities provide basic hardware validation before involving more advanced operating system tools. Both BIOS and OS-based hard drive diagnostics tests are recommended for comprehensive troubleshooting.
Disadvantages of BIOS hard drive testing
While the BIOS offers some useful tools, it also has limitations for testing hard drives:
- Limited error reporting – Provides minimal details on failures.
- Slow full scans – Can take 30min+ for exhaustive IDE drive tests.
- No repair options – Cannot fix bad sectors or firmware faults.
- No benchmarking – Does not measure drive speed performance.
- Text-based interface – No graphical test progress or results.
For more robust diagnostics and ability to repair hard drive errors, third-party tools like SeaTools, HD Tune, and MHDD are preferable. These provide detailed reporting, benchmarking, and rewrites of unstable sectors.
Common BIOS hard drive test error codes
If the BIOS hard drive test fails, it may return a numeric error code indicating the reason. Some common codes include:
| Error Code | Description |
|---|---|
| 301 | Keyboard error |
| 501 | Memory error |
| 1002 | IDE device configuration error |
| 1780 | SATA disk mechanical problem |
| 2000 | CPU voltage issue |
| 3000 | Hard drive RAM malfunction |
These codes provide general failure categories but lack specifics on the root cause. They act more as a high-level indicator if drives fail the BIOS hard drive test.
Conclusion
Testing hard drives through the BIOS offers a quick way to perform basic hardware diagnostics and rule out potential drive failures. While limited compared to third-party HDD tools, it provides a preliminary method to spot issues before Windows fully loads.
Rebooting and accessing the BIOS to analyze SMART drive data can isolate problems with the boot drive. Running intensive self-tests directly on IDE and SATA hard drives validates the low-level operation down to the sectors and mechanical components.
Checking hard drives in BIOS should be part of any PC troubleshooting workflow involving drive corruption, errors, or boot failures. While not fully featured, it delivers basic health checks without requiring a functioning operating system.