With the launch of Apple Music in 2015, Apple made it easier than ever to access a massive library of songs right on your iPhone, iPad, Mac, or PC. But if you have a large collection of music files stored locally on your computer, you may be wondering how to get them into Apple Music without having to use iTunes.
The good news is that there are a few different options for transferring music files into your Apple Music library. In this guide, we’ll walk through the different methods, from using third-party apps to utilizing AirDrop and Home Sharing.
Why Transfer Music to Apple Music?
Here are some of the key benefits of uploading your locally stored music files to Apple Music:
- Access your music anywhere – Once the files are in your Apple Music library, you can stream or download them on any device where you’re signed into your Apple ID.
- Back up your music collection – Having the files stored in Apple Music provides a cloud backup of your songs.
- Enjoy new features – You’ll be able to use Apple Music features like lyrics view, curated playlists, radio stations, and more.
- Free up local storage – By having the files stored in the cloud, you can delete them from your computer or external hard drive to free up space.
Requirements for Transferring Music to Apple Music
To transfer music files into your Apple Music library, you’ll need:
- An Apple Music subscription
- The Apple Music app installed on each device where you want access to your uploaded music
- The music files stored locally on your Mac or Windows PC
The music files can be stored anywhere on your computer. However, they need to be in a format supported by Apple Music. Supported formats include:
- MP3
- AAC
- WAV
- AIFF
- Apple Lossless
Method 1: Using a Third-Party App
One of the quickest ways to transfer music into Apple Music is by using a third-party Mac or Windows app. Here are some top options:
SongShift
SongShift is a free app available for iOS, Mac, and Windows. After installing it on your computer, here’s how to use SongShift to add local music files to Apple Music:
- Open the SongShift app and choose the “Import” option.
- Click “Files and Folders” and select the folder(s) containing your music files.
- Select “Apple Music” as the destination.
- Click “Import” and SongShift will transfer copies of all the music files to your Apple Music library.
Tunemover
Tunemover is available for Windows and Mac for around $15. Here are the steps to use it to transfer local music files to Apple Music:
- Download and launch Tunemover on your computer.
- Click the “Add” button and browse to the folder(s) with your music files to import them.
- Select “Apple Music” as the destination.
- Click “Transfer” and Tunemover will upload the music files to your Apple Music library.
MusConv
MusConv is a free music transfer tool for Windows. To move local music files to Apple Music:
- Run MusConv and use the “Add” button to select the files/folders to import.
- Choose “Apple Music” as the destination.
- Go to the “Jobs” tab and click “Start” to begin transferring the music files.
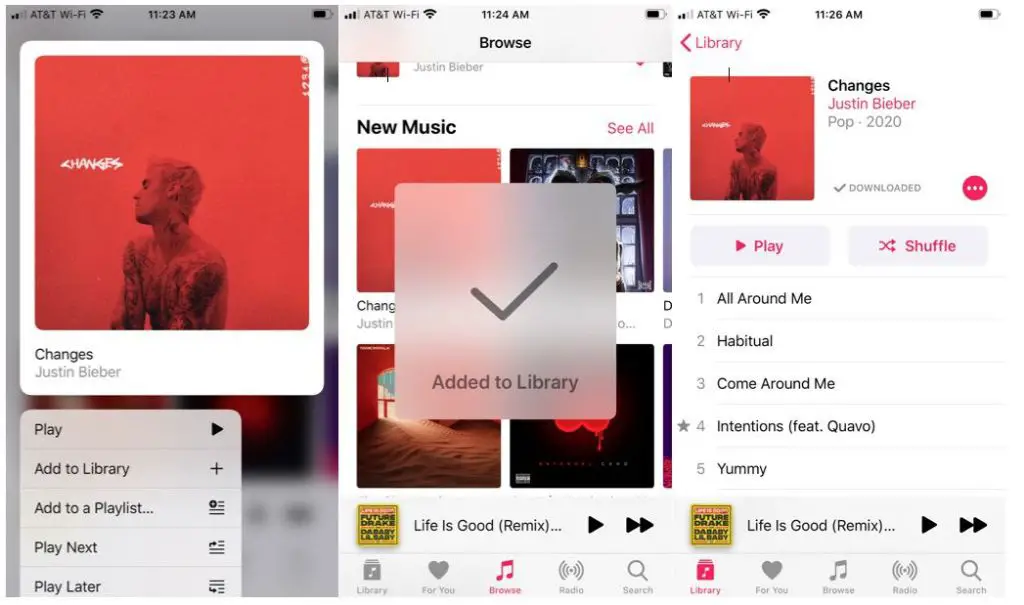
Method 2: Using AirDrop
If you’re transferring music between Apple devices, you can use AirDrop. Here’s how:
- On your Mac, select the music files you want to transfer.
- Click the AirDrop icon in the Finder window.
- Select your iPhone or iPad from the list of AirDrop recipients.
- Accept the file transfer on your iOS device.
- Open the Apple Music app on your iPhone or iPad.
- Tap “Library” > “Recently Added” to find the transferred files.
- Tap the ellipses menu next to each song and choose “Add to Library” to save them to Apple Music.
Method 3: Using Home Sharing
You can also transfer music between your Mac and iPhone/iPad by using Home Sharing. To set it up:
- On your Mac, open iTunes and turn on Home Sharing.
- On your iOS device, open Settings > Music and sign into Home Sharing with the same Apple ID.
Once Home Sharing is enabled, transfer music by:
- On your Mac, select the music files you want to transfer.
- Right click and choose “Transfer to Home Sharing”.
- Open the Music app on your iPhone/iPad.
- Tap “Library” and select “Home Sharing” to find the transferred songs.
- Tap the ellipses menu next to each song and select “Add to Library” to save them to Apple Music.
Where to Find Your Uploaded Music in Apple Music
Once your local music files have transferred to Apple Music by one of the methods above, there are a couple places you can access them:
- Recently Added – Open the Music app and tap “Library” > “Recently Added”. You’ll see your imported songs here.
- Uploads – Tap “Library” > “Uploads” to see all the music you’ve transferred.
The uploaded songs will also appear mixed in with the rest of your Apple Music library for you to stream or download.
How to Edit Metadata for Uploaded Music
When you transfer local music files to Apple Music, the songs may not have proper metadata like track title, artist name, album, cover art, etc. Here’s how to edit the metadata in Apple Music:
- Find the uploaded song(s) you want to edit.
- Tap the ellipses menu next to a song title.
- Select “Song Info” to view and edit the metadata tags.
- Tap each text field to update the info for Title, Artist, Album, and more.
- Tap “Save” to apply the metadata changes.
Updating the metadata will make your uploaded music appear more organized in your library and playlists.
How to Download Uploaded Music for Offline Playback
One of the benefits of having your personal music collection in Apple Music is the ability to download songs for offline listening when you don’t have an internet connection. Here’s how to download uploaded music on your iPhone, iPad, or iPod Touch:
- Open the Music app and tap “Library”.
- Browse to find the uploaded songs you want to download.
- Tap the “download” icon (a downward pointing arrow) next to each song title.
- Return to the “Library” tab to see a new “Downloaded Music” section with your songs.
You can redownload uploaded music as needed. Just look for the “cloud” icon next to a song and tap it to save that song offline again.
How to Add Uploaded Music to Playlists
A great way to organize your uploaded music in Apple Music is by saving songs to playlists tailored to your taste. To add uploaded music to playlists:
- Find the song(s) you want to add to a playlist.
- Tap the ellipses menu next to the song title.
- Select “Add to Playlist”.
- Choose an existing playlist or tap “New Playlist” to create one.
You can add both uploaded songs and Apple Music catalog songs to your playlists. Get creative and make playlists for workout music, favorites, throwback hits, or any themes you like!
How to Share Uploaded Music
The songs you’ve uploaded to Apple Music are accessible only by you – they can’t be streamed by other people. However, you can still share your uploaded music by sending the actual audio files using AirDrop, email, or messaging.
To share an uploaded song from an iPhone, iPad, or iPod Touch:
- Find the uploaded song you want to share.
- Tap the ellipses menu next to the title.
- Choose “Share Song”.
- Pick an app to send the music file through.
On a Mac, right-click the uploaded song and choose “Share” > “Song File” to send the file.
Uploaded Music Limit
Apple Music allows you to upload up to 100,000 of your own songs. This is in addition to the over 100 million songs available to stream from the Apple Music catalog.
If you try to transfer more than 100,000 tracks, you’ll get an error that you’ve reached the upload limit. You’ll need to delete some previously uploaded music before adding new files.
To check how much of your upload limit you’ve used so far:
- iPhone/iPad – Go to Settings > Music > Uploaded Songs.
- Mac – Open Music Preferences from the Music app menu bar.
This will show the number of uploaded songs versus the 100,000 limit.
Troubleshooting Tips
If you run into issues getting your local music files into Apple Music, here are some troubleshooting tips:
- Make sure the files are in a supported format like MP3, AAC, WAV, etc.
- Check that the files aren’t DRM protected, which prevents uploading.
- Log out and back into Apple Music on all devices to refresh your library.
- Double check that the music files are successfully transferring from your computer or external drive.
- If uploading from a Windows PC, Apple Music Upload may need to be reinstalled.
Contact Apple Support for further troubleshooting if you still can’t get your music to upload properly.
Conclusion
Uploading your personal music collection to Apple Music is a convenient way to back up your files and stream them anywhere. By using AirDrop, Home Sharing, or third-party apps, you can transfer music without needing iTunes.
Once the songs are in Apple Music, you’ll have access on all your devices and can download tracks for offline listening. You can also edit metadata, add to playlists, and share the actual song files.
So give your locally stored tunes a new home in Apple Music where you can enjoy them seamlessly alongside over 100 million other songs!
