Transferring music from iTunes to your iPhone is easy when you know the steps. With a few clicks, you can sync your music library to your iPhone without needing an Apple Music subscription. In this 5000 word guide, we will walk through the entire process of transferring music from iTunes to your iPhone without Apple Music step-by-step.
Why Transfer Music from iTunes to iPhone?
There are a few key reasons you may want to transfer music from iTunes to your iPhone rather than using Apple Music:
- You have an extensive iTunes music library built up over the years that you want to access on your iPhone
- You prefer to own your music rather than stream it from Apple Music
- You want to save money by not paying for an Apple Music subscription
- You want full control and ownership of the music on your iPhone
The good news is you don’t need an Apple Music subscription to get music onto your iPhone. By syncing music from your iTunes library to your iPhone, you can access all your favorite songs, albums, artists and playlists on your iPhone even without an active Apple Music subscription.
Requirements for Transferring iTunes Music to iPhone
Before transferring music from iTunes to your iPhone, make sure you meet the following requirements:
- iPhone model with iOS 12.2 or later
- Computer with iTunes installed (Windows or Mac)
- iPhone USB cable to connect iPhone to computer
- Apple ID signed into iTunes and iPhone
- Sufficient storage space on iPhone for music library
As long as you meet these requirements, you are ready to transfer music from iTunes to your iPhone. The process works for both Windows and Mac computers so you can follow along on either operating system.
How to Transfer Music from iTunes to iPhone
Here is the step-by-step process to transfer music from iTunes to your iPhone:
1. Connect iPhone to Computer
First, connect your iPhone to your computer using the iPhone USB cable. Use a direct USB port on your computer rather than a USB hub to ensure a stable connection. Make sure your iPhone is unlocked and on the Home screen when connected to the computer.
2. Open iTunes
If iTunes does not open automatically when you connect the iPhone, launch iTunes manually on your computer. Sign in with your Apple ID if prompted.
3. Select Your iPhone in iTunes
In the upper left corner of iTunes, click the dropdown menu and select your iPhone. This connects the device to iTunes so you can sync music.
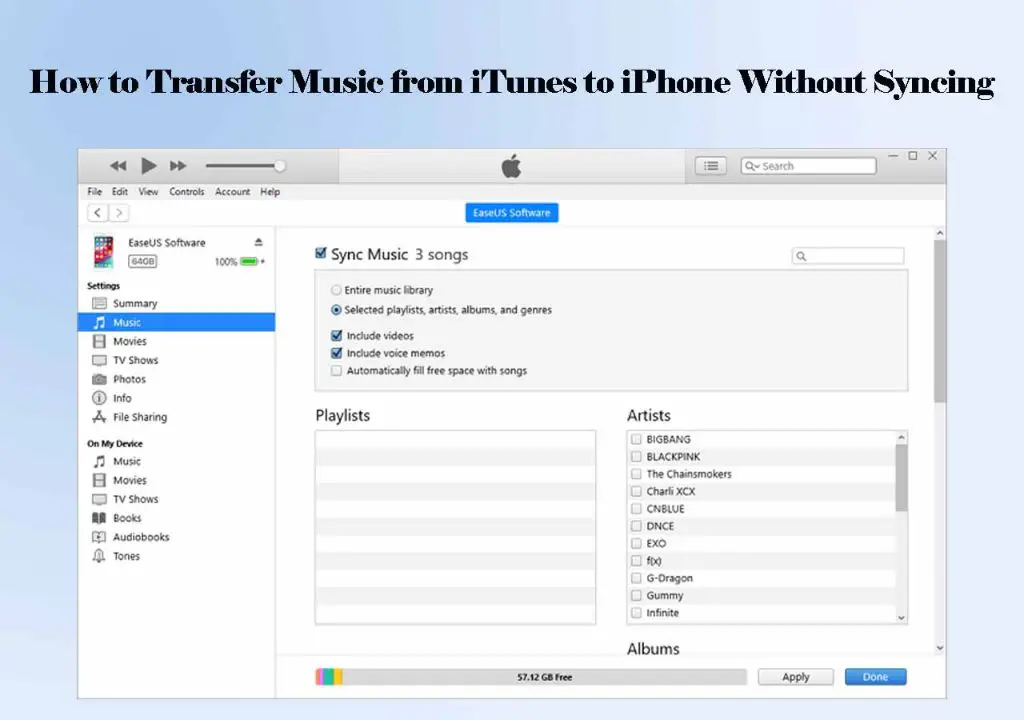
4. Choose Music Sync Options
In the left sidebar of iTunes, click on Music. Then check the “Sync Music” checkbox. You have a few options for syncing music:
- Entire music library: Check this option to sync your full iTunes music library to the iPhone. Be aware this requires enough free space on your iPhone for all songs, albums and artists.
- Selected playlists, artists, albums and genres: Check this option and then check the specific music you want to transfer. This lets you cherry pick only certain songs, albums or playlists to sync.
Select the music sync option you prefer based on your needs and iPhone storage space.
5. Sync iPhone with iTunes
With your music sync preference set, you are ready to transfer the music. Click the Sync or Apply button in the bottom right corner of iTunes. This will start the sync process and copy music from your iTunes library onto your iPhone.
Depending on how much music you are syncing, this process can take awhile. Let the sync fully complete before disconnecting your iPhone. You’ll see a sync progress bar along the top of the iTunes window.
6. Eject and Disconnect iPhone
Once syncing finishes, eject the iPhone before disconnecting. On Windows, click the eject icon next to the iPhone name. On Mac, right click the iPhone name and select Eject. It is now safe to unplug the USB cable and disconnect your iPhone from the computer.
Location of Synced Music on iPhone
The music transferred from iTunes will be accessible in the Music app on your iPhone. To view all music:
- Open the Music app on your iPhone
- Tap on Library at the bottom
- Select Songs to see all synced songs
- Tap Artists or Albums to view your music library organized that way
You can also access synced iTunes playlists by tapping Playlists in the Music app library.
Syncing Music Over Wi-Fi
Once you have synced music from iTunes to your iPhone using the USB cable initially, you can enable automatic wireless syncing. This lets you sync new iTunes music to your iPhone over Wi-Fi without needing to connect the USB cable.
To set up wireless iTunes syncing:
- Open iTunes and connect your iPhone via USB
- In the sidebar, click on your iPhone
- Check “Sync with this iPhone over Wi-Fi”
- Click Apply to confirm the setting
Now whenever your iPhone is connected to Wi-Fi and linked to your iTunes library, new music you add in iTunes will be automatically copied to your device over the air.
Syncing Music from Multiple Computers
If you use multiple computers with the same iTunes account, you can sync music from each computer to your iPhone without erasing songs. To do this:
- Authorize each computer with your Apple ID under iTunes > Account > Authorizations
- Sync your iPhone to the first computer to transfer music
- Eject iPhone from the first computer
- Connect iPhone to the second computer and sync
- Any new music on the second computer will be added to the iPhone
This prevents having to erase and replace music each time you switch computers. All the music from both libraries will be combined on your iPhone.
Solutions for Common iTunes Syncing Issues
In some cases, you may encounter issues when trying to sync iTunes music to your iPhone. Here are some common problems and solutions.
Issue: iPhone Not Recognized by iTunes
- Solutions:
- Reconnect the USB cable securely on both ends
- Change to a different USB port on your computer
- Restart your computer
- Update to the latest version of iTunes
- Reset the iPhone by holding Home and Lock buttons for 10 seconds
Issue: Music Will Not Sync From iTunes to iPhone
- Solutions:
- Open iTunes preferences and set Sync to manual mode
- Uncheck Sync only checked songs on the Music sync page
- Increase free space on iPhone if full
- Disable and re-enable Sync Music option
- Restart computer and iPhone
Issue: Song or Album Artwork Not Syncing
- Solutions:
- Check song file formats are supported types like AAC or MP3
- Readd artwork files missing from songs in iTunes
- Sync to retrieve artwork if Match is enabled in iCloud
- Disable iTunes Match to sync artwork from computer
If you encounter sync issues, running through these troubleshooting tips should help get music transferring properly again.
Managing Storage for Synced Music
One catch of transferring your full iTunes music library is it can quickly fill up your iPhone storage. Here are some tips for managing storage with synced music:
- Only sync your most played songs and playlists
- Enable iTunes Match so you can remove downloads and stream songs
- Set a storage limit for music in iTunes sync settings
- Use iCloud Photo Library to free up space used by photos
- Delete apps and large files you no longer need
- Upgrade to a higher capacity iPhone model
With a selective sync and some storage housekeeping, you can fit a lot of music on your iPhone without needing any paid Apple subscriptions.
Syncing Music from iTunes Without Erasing iPhone
A common concern is whether syncing music from iTunes will erase all existing content on your iPhone. The good news is you can sync to iTunes and add new music without affecting your existing iPhone apps, photos, or data.
Here’s what happens when you sync iPhone to iTunes:
- New music, playlists, artsists, etc. from iTunes is added to your iPhone.
- Any music already on your iPhone remains unless you specifically delete it.
- No apps, messages, settings, photos or other data is erased.
So you can safely sync music without worrying about erasing anything important on your iPhone.
Syncing Music Without Deleting from iPhone
Similarly, music already copied to your iPhone will not be automatically removed when you sync new iTunes content over. For example, any songs you manually added directly on your iPhone will stay put.
To selectively remove existing music from your iPhone to make space for new iTunes content, do the following:
- In iTunes, click on your iPhone icon
- Select the Music tab
- Check “Selected playlists, artists, albums, and genres”
- Uncheck any existing content you want to delete from the iPhone
- Sync the iPhone – the unchecked music will be removed
Leaving music checked will retain it when syncing in new iTunes content. This gives you full control of music management.
Syncing Music from Multiple Sources
In addition to syncing music from iTunes, you can also transfer music simultaneously from other sources:
- Purchase music directly on your iPhone – Buy songs or albums from the iTunes Store without impacting your iTunes sync.
- Apple Music subscription – Stream Apple Music and download songs for offline playback.
- Third-party apps – Import music from sources like Spotify or YouTube.
Music acquired from these other sources get added to your iPhone library separately without affecting your iTunes sync. This lets you aggregate music from both iTunes and non-iTunes sources.
Updating iOS Software Without Losing Synced Music
Whenever updating your iPhone to a new version of iOS, your synced iTunes music will remain intact after updating. Updating to the latest iOS version will not cause any music deletion or need to re-sync content.
However, it is still smart practice to run an iPhone backup to iTunes or iCloud before updating iOS, just as a precaution. This provides a fallback option to restore your music if anything gets corrupted or lost during the software update process.
Backing Up Synced Music to iTunes
To provide a safety net for the music synced to your iPhone, you should ensure it is backed up on iTunes. Even if you lose or need to restore your iPhone, the backup will retain your music collection.
To backup synced music on iTunes:
- Connect iPhone to computer via USB
- Open iTunes and select your iPhone
- Right click on iPhone name and choose Back Up
- iTunes will save a backup including your synced music
You can return to this backup to restore music if your library ever gets deleted or corrupted down the road.
Alternative iPhone Music Transfer Methods
While syncing to iTunes is the standard way to get music onto your iPhone, there are a few other transfer options to mention:
- Use a cloud storage service like Dropbox to upload music files you can then download on your iPhone
- Stream music from a home media server to your iPhone
- Connect iPhone to computer and manually transfer files via Finder or File Explorer
- Use a third-party app to transfer music between devices
These alternative methods give you more ways to get music onto your iPhone beyond just iTunes syncing. Use the option that best fits your music library setup.
Summary and Conclusion
In this comprehensive guide, we covered everything you need to know to successfully transfer music from iTunes to your iPhone. The key takeaways include:
- You don’t need an Apple Music subscription to get iTunes music on your iPhone
- Sync via USB cable initially then enable wireless iTunes syncing
- Sync does not erase any existing content on your iPhone
- Manage storage carefully when transferring large music libraries
- Always backup synced music to prevent losing your collection
Following the steps outlined in this guide, you will be able to seamlessly sync music from iTunes to your iPhone and enjoy your entire music library on the go. Just connect your iPhone, select your desired music to transfer, and iTunes will handle the rest.