Chkdsk (Check Disk) is a utility included with Microsoft Windows and other operating systems that allows users to scan, diagnose, and repair filesystem errors and bad sectors. It analyzes the filesystem for integrity issues, attempts to repair logical filesystem errors, and can mark bad sectors as unusable so that data is not stored on them. Chkdsk is especially useful for troubleshooting issues with external USB drives, as they can frequently become corrupted from improper ejection or physical damage. Running chkdsk on a malfunctioning USB drive can often resolve read/write errors, free up space, and restore access to files. It’s one of the first utilities that should be used for maintenance and repair of USB flash drives.
[https://learn.microsoft.com/en-us/windows-server/administration/windows-commands/chkdsk]
[https://en.wikipedia.org/wiki/CHKDSK]
When to Use chkdsk
There are several signs that indicate your USB drive may have errors or file system corruption. Here are some of the most common signs you should run chkdsk:
- You get error messages when trying to access files on the USB drive like “file not found” or “directory is corrupted.”
- Files seem to be missing from the USB drive.
- You cannot copy files to the USB drive or save files to it.
- The USB drive is very slow to read and write files.
- The amount of free space shown for the USB drive is incorrect.
- Programs crash or freeze when trying to access the USB drive.
- The USB drive is not recognized by your computer.
These types of issues indicate some kind of file system corruption or drive errors. Running chkdsk can attempt to repair the file system and fix these problems (Source).
How chkdsk Works
Chkdsk is a command line utility built into Windows and Mac operating systems that scans and repairs logical file system errors on a drive. When chkdsk runs, it goes through the following steps:
1. Scans the file system metadata on the drive looking for issues with the file tables, folders, and other logical structures on the disk. It identifies any errors in the file system so those can be repaired in later stages.
2. Goes through all existing files on the disk and scans the contents, looking for bad sectors, cross linked files, directory errors, invalid security descriptors, and other file-related problems. Any errors are logged.
3. Attempts to repair any errors found during the scan process. This may include recovering readable information from bad sectors, merging folders, fixing invalid file paths, and correcting other issues to make the file system consistent again.
The key benefit of chkdsk is that it can scan the logical file system structure and repair errors, allowing corrupted drives to be fixed without losing data. Running it regularly helps proactively identify any problems before they lead to bigger issues.
Prepare the USB Drive
Before running chkdsk on a USB drive, it’s important to properly eject and disconnect the drive first. This ensures any open files or processes are closed, reducing the chance of further corruption. On Windows, safely eject the USB drive by clicking the “Safely Remove Hardware” icon in the system tray and selecting the drive. On Mac, eject the drive by dragging it to the Trash or using the Eject option.
If the USB drive is severely corrupted, you may need to reformat it before chkdsk can run. This will wipe all data, so first try to back up any retrievable files. To reformat, open Disk Utility on Mac or Disk Management on Windows, select the USB drive, and choose the “Format” option. Quick format is fine for flash drives. Pick a file system like FAT32 or exFAT for wide compatibility.
Once ejected and optionally reformatted, the USB drive will be ready for chkdsk. Be sure to use the correct drive letter when entering chkdsk commands later.
Run chkdsk in Windows
To run chkdsk on a USB drive in Windows, follow these steps:
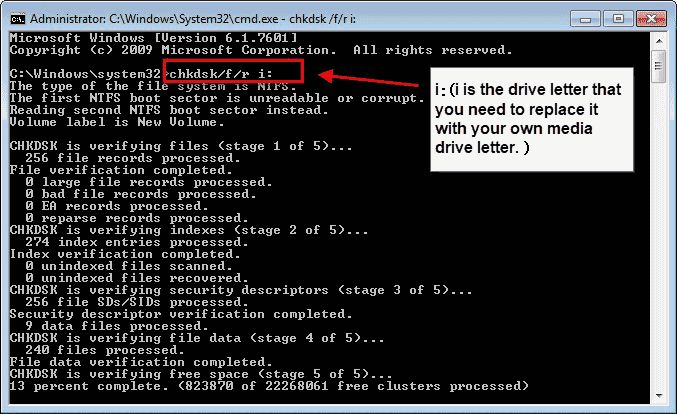
1. Open the Start menu and search for “Command Prompt”. Right-click on the Command Prompt app and select “Run as administrator”. This opens an elevated command prompt window with admin privileges.
2. Type the following command and hit Enter:
chkdsk X: /f
Replace “X” with the drive letter of your USB drive.
The /f parameter tells chkdsk to fix any errors it finds.
3. chkdsk will now run and display the status as it checks your drive. This may take some time depending on the size of the drive and amount of data.
4. Once complete, chkdsk will display a report of any errors found and if they were fixed. If no errors are found, it will simply display “Windows has checked the file system and found no problems.”
By running chkdsk from an elevated command prompt, it can check the drive more thoroughly and fix problems it encounters. Always safely eject the USB drive after chkdsk completes.
Run chkdsk on Mac
On Mac computers, the equivalent utility to chkdsk is called Disk Utility. Disk Utility can be used to verify and repair disk errors and filesystem corruption.
To run Disk Utility on your USB drive:
- Open Disk Utility, located in Applications > Utilities
- Select the USB drive in the left sidebar
- Click “First Aid” at the top
- Click “Run” to start the verification process
Disk Utility will scan the drive and attempt to repair any issues it finds. This is similar to using the “/f” parameter in chkdsk on Windows. If any errors are found that cannot be fixed, Disk Utility will report them to you.
For advanced Disk Utility usage and troubleshooting, refer to Apple’s Disk Utility documentation.
Understanding chkdsk Output
When chkdsk scans the drive, it will output the results of the scan. This will help you interpret any errors or issues found with the file system. The most important part of the chkdsk output is the line that says “X files, Y bytes successfully recovered.” This tells you that chkdsk was able to fix X number of files totaling Y bytes that were corrupted or unreadable.
Other important output to look for are lines that say:
- “Bad clusters found.” – This means chkdsk found clusters (sections of the disk) that contained errors and couldn’t be read.
- “Orphaned files found.” – These are files that are not linked to the file system and can’t be accessed normally.
- “Cross linked files found.” – Chkdsk found files that are incorrectly linked together.
Any of these errors indicate some type of file system corruption. If you see them, it means chkdsk was able to repair the issues since the files/clusters were recoverable. The more serious errors that can’t typically be repaired will say “Unable to recover file data” or “Unable to recover volume data.”
In summary, carefully looking through the chkdsk output can reveal information about errors found and repaired on the USB drive. Just focus on the “successfully recovered” line as well as any other errors reported to determine if corruption was found and fixed. See Microsoft’s chkdsk doc for more examples of chkdsk output.
Fixing Errors
chkdsk is useful for detecting and repairing certain file system errors and logical disk errors on your USB drive. Some of the key errors that chkdsk can fix include:
- Bad sectors – chkdsk can detect bad sectors on the disk surface and mark them as unusable.
- Cross-linked files – chkdsk can detect file fragments that are incorrectly linked and repair the file system.
- Directory errors – chkdsk can fix folder structures that have become corrupted.
- Invalid filenames – chkdsk can fix filenames that contain invalid characters.
- Orphaned file fragments – chkdsk can rejoin orphaned clusters to correct files.
However, there are some errors and issues that chkdsk cannot resolve. These include:
- Physically damaged USB drive components – chkdsk cannot fix hardware faults.
- Deleted files – chkdsk cannot recover data from deleted files.
- Drive formatting issues – chkdsk cannot fix low-level formatting problems.
- Electrical issues – chkdsk cannot correct problems caused by electrical shorts or surges.
- Firmware problems – chkdsk cannot update or restore corrupted firmware.
If chkdsk is unable to repair drive errors, you may need advanced data recovery software or professional help.
Preventing Corruption
There are a few key steps you can take to help prevent your USB drive from becoming corrupted:
Safely remove the drive: Always use the “Safely Remove Hardware” option in Windows or “Eject” in Mac OS before unplugging your USB drive. This ensures any writes are completed before disconnecting the drive. Removing the drive while it’s still writing data is one of the top causes of corruption (source).
Store and transport carefully: Avoid exposing your USB drive to extreme heat, cold, or moisture. Don’t bend the drive or subject it to physical shocks. Consider carrying it in a protective case. Physical damage can lead to corruption.
Scan for errors regularly: Occasionally scan your drive for errors using chkdsk even if there are no obvious issues. This can identify and repair some early stages of corruption before major damage occurs.
Replace older drives: USB flash drives can wear out after hundreds of rewrites. Consider replacing drives older than a few years to avoid data loss from degraded memory cells.
When to Seek Professional Help
While chkdsk can repair many issues with a USB drive, there are limits to what it can fix. Chkdsk mainly deals with file system errors and cannot repair physical issues with the drive hardware itself. If chkdsk cannot access the drive or complete repairs, the drive itself may be damaged or dead.
Signs that the USB drive may have physical damage rather than just file system errors include the drive not being detected at all, or making clicking or beeping noises. Chkdsk may display messages indicating it cannot access or repair the drive. In these cases, running chkdsk repeatedly is unlikely to help.
At that point, you will need professional data recovery services to attempt extracting data from the physically damaged drive. Reputable data recovery companies like Secure Data Recovery Services (https://www.securedatarecovery.com/services/flash-drive-data-recovery) and DriveSavers (https://drivesaversdatarecovery.com/data-recovery-services/devices-supported/removable-media-data-recovery/) offer USB flash drive repair and recovery, with high success rates and security. However, these professional services can be expensive.
Seeking professional help is recommended if chkdsk is unsuccessful and your drive appears dead or physically damaged. Data recovery services may be able to recover your valuable files and data even from an unresponsive USB flash drive.
