Installing a hard drive in a desktop PC is a fairly straightforward process that most users can accomplish themselves with some guidance. The difficulty level depends on your existing technical skills and comfort working inside a computer. For those who have never opened up a PC before, it may seem daunting. But with the right instructions and a little patience, anyone can add a new hard drive to increase their storage capacity.
What You Need
Before installing a new hard drive, you’ll need to make sure you have all the necessary equipment:
- New internal hard drive – Make sure it is compatible with your PC’s motherboard
- Power cable to connect the hard drive to the PSU
- Data cable – Usually SATA interface to connect the hard drive to the motherboard
- Screwdriver – Both a Phillips and flathead screwdriver for opening up the PC case
- Mounting screws to secure the hard drive
It’s also a good idea to have zip ties, velcro straps, or a mounting bracket to keep the new drive securely installed inside your case. Having an anti-static wrist strap can help prevent static discharge from damaging your components.
Preparing for Installation
Before you take your computer apart and start installing the new hard drive, it’s important to prepare properly:
- Ensure the computer is turned off and unplugged from power
- Choose a clean, open workspace with room to open up the PC
- Review the manual for your computer case and motherboard
- Refer to the installation guide that came with your hard drive
- Backup any important data so it’s protected during the hardware installation
- Have a magnetic screwdriver handy to retrieve any lost screws
Proper preparation helps avoid errors and ensures you don’t accidentally damage any components when installing the new hard drive.
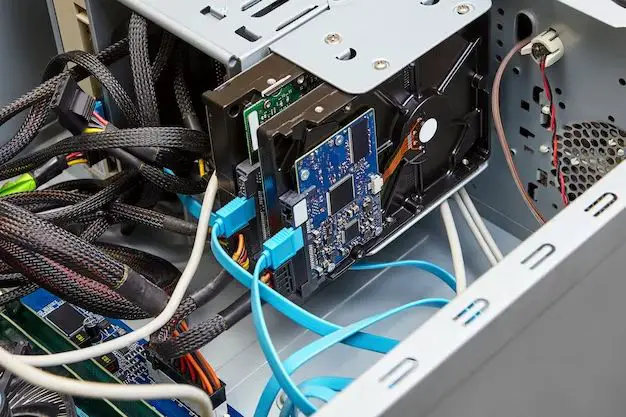
Opening the Case
The first step is gaining access inside your computer’s case so you can install the new hard drive.
- Remove the side panel: Locate and remove the screws, then carefully slide off the side panel
- Ground yourself: With the computer unplugged, touch any metal part of the case to discharge static
- Visually inspect the interior: Look for available drive bays and free power/data ports
- Locate obstacles: Check for cable management bars, drive racks, or anything obstructing access
When opening up your computer, be gentle and cautious to avoid accidentally detaching any wires or connectors. Also pay attention to the existing layout and overall interior space – this will help plan the installation.
Installing the Hard Drive
Once you’re inside the case, it’s time to physically install the new drive:
- Attach mounting brackets if needed: Most 3.5″ HDDs require mounting brackets
- Insert drive into open bay: Carefully slide the hard drive into position
- Align mounting holes: Line up holes on the sides of the drive with those in the bay
- Attach drive with screws: Use a screwdriver to insert and tighten mounting screws
- Connect data and power cables: Plug the SATA data cable into the drive and motherboard. Connect the drive power cable to the back of the unit.
- Manage cables: Use zip ties and anchors to tie down and route cables out of the way.
When installing, avoid excessive force and overtightening the mounting screws. The drive should be secure but not strained or warped. Handle components gently and be mindful of cable management for proper airflow and access.
Initializing and Partitioning
With the physical installation complete, most of the hard work is done. Next, you need to prepare the drive for use:
- Boot up computer and enter BIOS: Access the system BIOS menu on startup
- Verify drive is detected: Look for the new drive under storage info or drive settings
- Enable AHCI mode if needed: This allows proper communication with the hard drive
- Save changes and exit BIOS: Let your computer boot into Windows
- Open Disk Management: Right-click Start Menu and choose “Disk Management”
- Initialize Disk: Right-click on the new drive and select Initialize
- Create desired partitions: Right-click the Unallocated space and create volumes
- Assign drive letters: Give each volume a drive letter like C:, D: etc
Now your freshly installed hard drive will be prepared, partitioned, and ready for applications and data storage!
Installing Drivers
For your new hard drive to function optimally, the appropriate drivers need to be installed:
- Locate model-specific drivers: Consult documentation or manufacturer’s website
- Download SATA/AHCI drivers: System needs drivers for the SATA interface to communicate
- Install drivers during OS installation: If doing clean install, install at setup
- Alternatively, extract drivers to USB: Then install to already configured OS
- Reboot for changes to take effect: Power cycle once driver installation completes
With the drivers installed, Windows will have the files it needs to properly address and interact with your new storage drive.
Migrating Data
At this point, the new hard drive is installed, configured, and ready to use. Now you can migrate over data:
- Copy/paste files directly: Simply drag and drop folders and files to the new drive
- Use file management tools: Applications like File Explorer or Total Commander
- Clone existing drive: Use disk cloning software to replicate the old drive onto the new one
- Clean install OS and apps: Do a fresh Windows install on the new drive and reinstall apps
How you migrate data depends on your specific needs. Cloning is quick but can carry over undesirable data. A clean install ensures a smooth OS but requires reinstalling applications.
Performance Optimization
To get optimal performance from your freshly installed hard drive, some additional tweaks and checks are recommended:
- Enable write caching in the OS: Turn on write caching for faster write speeds
- Defragment drive for faster reads: Optimizing files for quicker access
- Update SATA drivers if needed: Keep SATA firmware updated for best compatibility
- Check firmware version: Make sure the drive firmware is up to date
- Tune OS for hard drive use: Adjust virtual memory, disk caching for HDD optimization
Optimizing your system for your specific drive can help it run as fast and efficiently as possible.
Troubleshooting
If you encounter issues after physically installing your new hard drive, there are some steps you can take to troubleshoot:
- Double check connections: Verify data and power cables are properly plugged in
- Try a different SATA port: Switch which motherboard SATA port it is connected to
- Reseat the drive: Remove it and gently reinsert the hard drive
- Check for drive damage: Look for any signs of physical damage on the drive
- Update BIOS/drivers: Outdated firmware can cause compatibility issues
- Clear CMOS: Reset BIOS to default settings to rectify conflicts
Carefully going over your installation can help identify any potential problems. If issues persist, you may need to replace the drive.
Conclusion
Installing a hard disk drive into a desktop PC is a straightforward process that anyone can tackle themselves. As long as you take proper anti-static precautions, have the necessary tools, follow each step carefully, and get the drivers properly installed – getting a new HDD up and running is fairly simple. Optimizing and migrating data may take more time, but getting the physical installation done is the biggest hurdle. With the right strategic preparation and steady hands, you can upgrade your computer’s storage capacity yourself. And once complete, you’ll have the satisfaction of knowing your system inside and out.