What is a Synology NAS?
A network-attached storage (NAS) device is a specialized computer used for storage and retrieval of data over a network. Synology is one of the leading brands in NAS systems, offering a wide range of solutions for home and business use.
A Synology NAS allows you to centralize your data storage and backups, stream media, sync files, and more. Key features include:
- Centralized file storage – Store all your files in one place and access them from anywhere
- Built-in RAID data protection – Safeguard against drive failure and data loss
- Media streaming – Stream videos, music, and photos to devices
- Automated file backups – Schedule backups for all connected devices
- File synchronization – Sync files between devices for easy access
- Remote access – Access files remotely from mobile devices or over the internet
Synology NAS devices run the DiskStation Manager (DSM) operating system, providing a web-based interface to manage the NAS and installed applications. Key DSM features include file management, user permissions, backup tools, media server, surveillance station, and more.
Understanding the Recycle Bin Feature
The recycle bin is a feature found on many computer operating systems and storage devices that provides a temporary holding place for files that have been deleted by the user. When a file is deleted, it is not immediately erased from the storage device, but rather moved to the recycle bin.
The main purpose of the recycle bin is to give users a chance to recover files they may have deleted accidentally or that they decide they want to keep after all. Rather than being permanently erased, deleted files remain in the recycle bin for a period of time before being removed from the system.
This provides a safety net for users to restore their files if they change their mind. Some key advantages of the recycle bin include:
- Ability to recover accidentally deleted files
- Avoid permanent data loss
- Review and restore files easily
- Undo mistakes
Overall, the recycle bin gives users a second chance before deleting their files permanently. It helps prevent accidental or premature data loss on computer systems and storage devices.
Recycle Bin on Synology DSM
Synology DSM is the operating system that runs on Synology NAS devices. It provides a desktop-like graphical user interface and many applications to extend the functionality of the NAS (Synology).
The Recycle Bin feature in DSM allows deleted files to be recovered. When enabled for a shared folder, deleted files are moved to the Recycle Bin instead of being permanently erased. Users can restore files from the Recycle Bin if they were accidentally deleted (Synology).
To enable the Recycle Bin, administrators go to Control Panel > Shared Folder, select a folder, and check the “Enable Recycle Bin” box. Deleted files will then be sent to the Recycle Bin for that folder. The Recycle Bin retains files up to a set storage quota and period of time.
Enabling and Configuring Recycle Bin
The Recycle Bin feature allows deleted files to be stored temporarily before being permanently erased. To enable Recycle Bin on a Synology NAS:
1. Go to Control Panel > Shared Folder in DSM.
2. Select the shared folder and click Edit.
3. Tick the “Enable Recycle Bin” checkbox.
There are several configuration options for Recycle Bin:
- Recycle Bin Cleaning Task – Automatically clean files older than X days.
- Versions – Keep multiple versions of files in the Recycle Bin.
- Reserved Size – Allocate storage capacity for the Recycle Bin.
By default, Recycle Bin is enabled with 30 days retention and 5 file versions. The storage quota is 5% of the volume size. These settings can be adjusted as needed for each shared folder.
According to Synology’s knowledge base, enabling Recycle Bin is highly recommended to protect against accidental file deletion.
Using the Recycle Bin
The Recycle Bin on Synology NAS provides a convenient way to restore accidentally deleted files and folders. When a file or folder is deleted from a shared folder with Recycle Bin enabled, it is moved to the Recycle Bin rather than being permanently erased.
To delete files or folders, simply right-click on them and select “Delete” or use the Delete key. This will move the deleted items into the Recycle Bin. To confirm, open the Recycle Bin application in DSM to view recently deleted items.
To recover deleted items, open the Recycle Bin application, browse to the file or folder you want to restore, right-click on it and select “Restore”. This will move the item back to its original location.
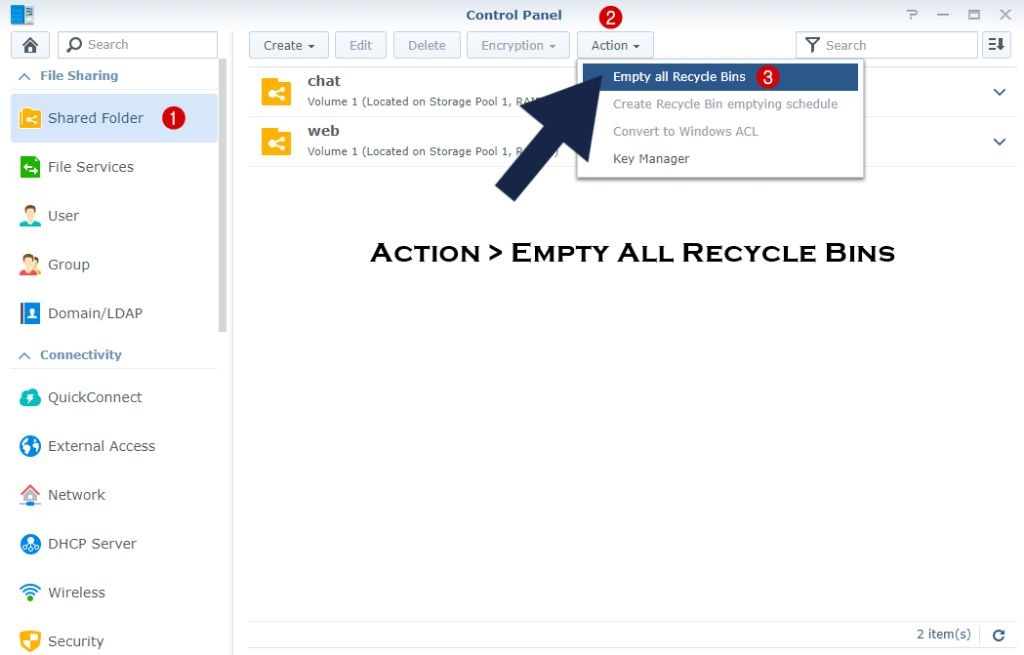
If you need to permanently remove items from the Recycle Bin, right-click and select “Permanently Delete”. You can also empty the entire Recycle Bin by clicking the “Empty Recycle Bin” button in the Recycle Bin application.
It’s important to monitor Recycle Bin storage usage and empty it periodically to free up space. The Recycle Bin size can be customized in DSM settings for each shared folder.
Recycle Bin File Versions
One of the most useful features of the Synology NAS Recycle Bin is the ability to retain previous versions of files. When a file is deleted, the Recycle Bin will store not just the most recently deleted version, but also older versions from a specified retention period.
For example, if a document has 3 previous versions stored over the last month, deleting that file will move all 3 historic versions to the Recycle Bin. This gives you powerful restore capabilities, allowing you to roll back to an older point-in-time snapshot of that file if needed.
File versioning retention policies can be customized under Recycle Bin settings. By default, the Recycle Bin keeps file versions for the past 32 days. However, this can be increased to store up to years worth of historic file snapshots before they are permanently deleted.
Overall, the file versioning and point-in-time restore capabilities of the Synology NAS Recycle Bin provides protection against accidental file modifications or deletions. Users can easily restore previous copies of their data if needed.[1]
Recycle Bin Storage Quotas
By default, the Recycle Bin is allocated 5% of the total storage on a Synology NAS as its maximum storage quota. This helps prevent the Recycle Bin from taking up too much space on the storage volumes.
If you need to increase the storage allocation for the Recycle Bin, you can do so in the control panel under Internal Storage > Storage Pool > Change Recycle Bin Maximum Size. Here you can set a custom quota percentage for the Recycle Bin. Most users recommend staying under 10-15% to maintain adequate usable space on the volume.
According to a Reddit discussion, Synology allows configuring up to 120 days of Recycle Bin retention before auto-deletion. However, the longer you retain deleted files, the more storage space gets consumed over time.
Setting appropriate Recycle Bin quotas and retention policies can help you recover accidentally deleted files, without allowing the Recycle Bin to monopolize storage capacity. Monitor its usage periodically and empty the Recycle Bin when needed to free up space.
Recycle Bin Best Practices
Here are some recommendations for configuring and utilizing the Recycle Bin feature on Synology NAS devices:
Enable Recycle Bin for shares where accidental deletion of files would be problematic. For shares containing temporary files that do not need recovery, disabling Recycle Bin can save storage space 1.
Set a Recycle Bin quota limit for each share to prevent filling up the storage volume. A good starting point is 5-10% of the share size. Adjust as needed based on usage 2.
Periodically review and clean out the Recycle Bin to free up space. Restoring accidentally deleted files should be done promptly.
Disable Recycle Bin before performing major file operations like mass deletions or reorganizations, then re-enable it afterwards.
Enable file versioning for mission critical data to preserve previous versions beyond the Recycle Bin retention period.
Back up important data and have a disaster recovery plan. Recycle Bin provides protection but should not be relied on as the sole backup.
Recycle Bin Alternatives
There are a couple alternatives to using the built-in Recycle Bin if you need to recover deleted files from your Synology NAS:
Other ways to recover deleted files include:
- Restoring from a previous backup – If you have backups enabled, you may be able to restore a deleted file from a previous backup version. This depends on your backup settings and how long ago the file was deleted.
- Using file versioning – If you have file versioning enabled on a shared folder, you may be able to restore a previous version of a deleted file.
Third party tools are also available that can scan your NAS storage and recover deleted files. Some examples include:
Reclaime File Recovery (https://www.reclaime.com/) – software designed to recover deleted files from NAS devices including Synology.
Wondershare Recoverit (https://recoverit.wondershare.com/harddrive-recovery/synology-recover-deleted-files.html) – comprehensive data recovery software with NAS recovery capabilities.
Using these tools requires temporarily connecting the NAS directly to a computer running the software so that the drives can be scanned and files recovered if found.
Summary
The recycle bin on Synology NAS provides a safety net against accidental deletion of files. By enabling the recycle bin, deleted files are moved to the recycle bin folder rather than being permanently erased. This allows you a chance to restore deleted files if needed.
Some key benefits of using the recycle bin include:
- Protection against accidental or unintended file deletion.
- Ability to easily restore deleted files.
- Configurable recycle bin quotas to manage storage space.
- File versioning so you can restore previous versions.
- More control over permanent file deletion.
Overall, the recycle bin gives Synology NAS users a powerful tool to recover from deletions and avoid permanent data loss. With proper configuration, it can work automatically in the background to provide a safety net for your important data.