What is AHCI?
AHCI stands for Advanced Host Controller Interface. It is a technical standard defined by Intel that specifies the low-level register interface of Serial ATA (SATA) host controllers[1]. In simple terms, AHCI allows software to communicate with SATA devices like hard drives and solid state drives.
With AHCI mode enabled in the BIOS, the SATA controller directly exposes the advanced SATA capabilities to the operating system. This allows advanced features like hot swapping and native command queuing to be used. The SATA controller handles those capabilities directly instead of going through intermediate translation steps.
Some key benefits of AHCI include:[2]
- Native Command Queuing (NCQ) – allows multiple commands to be queued up for a drive at once for better optimization.
- Hot swapping – ability to remove and add drives without rebooting.
- Link power management – helps optimize power usage of drives.
- Staggered spin-up – ability to individually spin up drives vs all at once.
Overall, AHCI allows much more advanced communication between operating systems and SATA devices compared to legacy IDE modes. Most modern operating systems have native support for AHCI, so it provides the best performance and capabilities for SATA storage.
[1] https://en.wikipedia.org/wiki/Advanced_Host_Controller_Interface
[2] https://www.dell.com/support/kbdoc/en-us/000127508/difference-between-ahci-and-sata
What is RAID?
RAID stands for “Redundant Array of Independent Disks” and refers to a data storage technology that combines multiple disk drives into a logical unit (Cambridge Dictionary, https://dictionary.cambridge.org/us/dictionary/english/raid). There are different RAID levels, each with specific features and tradeoffs:
RAID 0 – Disk striping without parity or mirroring. Provides improved performance but no redundancy. If one drive fails, all data is lost.
RAID 1 – Disk mirroring without parity or striping. Provides redundancy by writing identical data to paired drives. If one drive fails, the other contains an exact copy of the data.
RAID 5 – Disk striping with distributed parity. Provides fault tolerance by striping data and parity information across all drives. If one drive fails, the parity blocks can be used to reconstruct the missing data.
The key idea behind RAID is to combine multiple physical disk drives into a single logical drive to provide increased storage capacity, reliability, and/or performance compared to a single physical drive (Merriam-Webster, https://www.merriam-webster.com/dictionary/raid). The specific RAID level determines how data is distributed across the drives to balance these factors.
Differences Between AHCI and RAID
AHCI (Advanced Host Controller Interface) and RAID (Redundant Array of Independent Disks) differ in several key ways when it comes to setup, use, performance, and compatibility:
Setup: AHCI is enabled in the BIOS and handles communication between the operating system and a single SATA device. RAID requires configuring multiple drives in the BIOS to work together in an array for redundancy or performance.
Use: AHCI allows an operating system to access each SATA device independently. RAID combines drives so they are accessed as one logical volume, for protection or faster speeds.
Performance: AHCI provides full native command queuing for better optimization. But RAID 0 can double disk performance by striping data across two drives [1]. RAID 1 improves read speeds and redundancy.
Compatibility: AHCI is supported broadly beginning with Windows Vista, Linux kernels after 2.6.19, and Mac OS X 10.6. RAID often requires proprietary drivers and does not work for booting an OS drive without tweaks.
When to Use AHCI
AHCI offers several benefits for systems with a single drive that make it a good choice in many situations:
AHCI allows the SATA hard drive to utilize advanced Serial ATA features like Native Command Queuing and hot swapping. This can improve performance and make it easier to replace failed drives [1].
AHCI has wider compatibility with modern operating systems like Windows 10 and Windows 11 compared to IDE mode. Windows 7 and later have native AHCI drivers so no extra configuration is needed [2].
Older operating systems like Windows XP may require an additional driver during installation to work properly with AHCI. But most current mainstream OSes have out-of-the-box AHCI support.
AHCI allows hot-plugging support for connecting and removing drives without restarting the system. This isn’t possible using IDE mode.
When to Use RAID
RAID can provide significant benefits for systems with multiple drives, especially in terms of performance. By spreading data across multiple disks, RAID allows for parallelization of read and write operations, improving overall speed and throughput (RAID 0). The most common RAID setups like RAID 1, 5, and 10 also provide fault tolerance by introducing redundancy, ensuring continued operation in the event of single or multiple disk failures. This makes RAID well-suited for mission critical systems where uptime and data integrity are paramount
Specifically, RAID aims to solve two key issues – disk performance limitations and fault tolerance. By coordinating how data is physically stored and accessed across multiple disks, RAID can significantly boost performance beyond what a single disk could deliver. Tests have shown that a basic 4-drive RAID 0 configuration can achieve nearly 400% faster read speeds compared to a single drive. More complex implementations like RAID 10 can offer a blend of enhanced speed and redundancy. So for systems that demand speed, RAID presents an efficient solution to overcome hardware bottlenecks (https://www.snel.com/support/how-does-raid-work/).
The redundancy of RAID 1, 5, 6, 10 and 50 also ensures continued operation if a drive fails, which is crucial for critical data or infrastructure. The system can remain functional utilizing the remaining disks, while the failed drive is replaced. This fault tolerance provides an important safeguard that makes RAID well-suited for servers, network attached storage (NAS), infrastructure, and other deployments where downtime is unacceptable.
Setting up AHCI in BIOS
Here are the steps to set up AHCI mode in the BIOS:
- Restart your computer and enter the system BIOS, usually by pressing the Delete or F2 key during boot up.
- Navigate to the “Advanced” tab in the BIOS.
- Look for the SATA or Onboard Devices configuration menu.
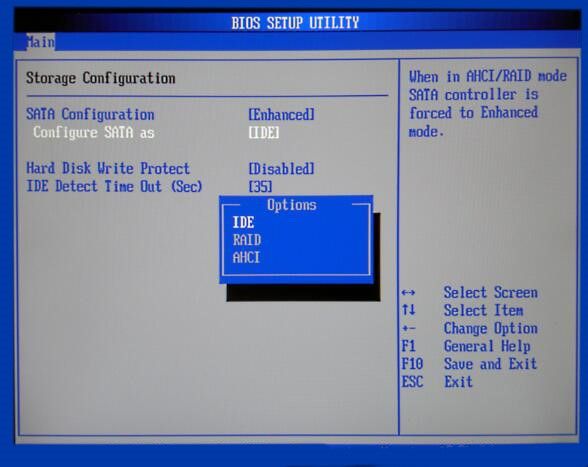
- Change the SATA mode from IDE or RAID to AHCI. This setting may be labeled “SATA Mode”, “SATA Configuration”, or “Onboard SATA Type.”
- Save changes and exit the BIOS.
The specific steps can vary depending on the system manufacturer, but generally you will need to change the SATA Operation mode to AHCI rather than IDE or RAID. The setting may be found under “Advanced” or “Integrated Peripherals” in the BIOS. Some systems may have the option for each SATA port individually.
Switching to AHCI enables features like hot swapping and native command queuing. It is recommended for peak SATA drive performance on newer hardware.
According to this guide, you may need to reconfigure Windows after switching from IDE/RAID to AHCI to avoid boot issues.
Setting up RAID in BIOS
To set up RAID in the BIOS, follow these steps:
- Restart your computer and enter the BIOS setup utility, usually by pressing the Delete key or F2 during boot.
- Navigate to the RAID configuration options, which may be under an “Advanced” or “Storage Configuration” menu.
- Enable RAID mode for your SATA controller. This setting may be called “RAID” or “Enabled.”
- Select which drives you want to include in the RAID array.
- Choose your desired RAID level:
- RAID 0 for striping/performance
- RAID 1 for mirroring/redundancy
- RAID 5 for distributed parity
- RAID 10 for mirroring + striping
- Configure any other RAID settings like stripe size.
- Save changes and exit the BIOS.
The specific steps and options can vary depending on your motherboard and RAID controller. Refer to your motherboard manual for details. Enabling RAID may require changing the SATA mode from IDE/AHCI to RAID. Some boards have a dedicated RAID configuration utility in the BIOS to handle setup.
After configuring RAID in the BIOS, you’ll need to install the RAID driver during your OS installation for the array to be accessible. The RAID BIOS settings allow the drives to be treated as a unified array before the OS loads.
Migrating to AHCI from IDE/RAID
Switching from IDE or RAID to AHCI mode can present some challenges, especially for Windows systems that were initially set up with one of those other modes. Windows configures its disk drivers based on the initial boot sequence, so changing modes later can cause BSODs or prevent Windows from loading properly.
Here are the general steps to safely migrate to AHCI on Windows:
- Boot into Windows
- Open an elevated command prompt as administrator
- Run the command “bcdedit /set safeboot minimal” to change boot settings[1]
- Reboot and enter BIOS settings
- Change SATA Operation mode to AHCI from IDE/RAID
- Save changes and reboot
- Windows will attempt to load storage drivers and configure for AHCI
- Once booted, install latest AHCI drivers if needed
The key safeguard is changing the boot mode to “minimal” first, which ensures Windows boots with basic drivers that can detect the disk change to AHCI. Some users may need to repair boot sectors or reinstall Windows if the migration causes startup issues.
Drawbacks of AHCI vs RAID
AHCI and RAID each have their own limitations and scenarios where they may not be the ideal choice:
– AHCI only supports a single drive and does not provide any redundancy or performance benefits of combining multiple drives. If you need to use multiple hard drives, RAID would be required (source).
– RAID can be more complex to set up and manage versus the simplicity of AHCI with a single drive. There is additional overhead to organize and sync multiple drives in an array (source).
– RAID performance advantages compared to AHCI are diminished when using SSDs, since they already provide very fast access times. The potential downside is the added complexity of RAID (source).
– RAID 1 and 10 modes provide redundancy but cut your total usable storage capacity in half compared to the full capacity with AHCI (source).
– RAID 5 can be risky and prone to failure during rebuilds if using large capacity hard drives. AHCI with a single large drive may be more reliable for large storage needs (source).
Recommendations
Generally, AHCI is recommended for systems with a single SATA SSD drive, while RAID is better suited for setups with multiple hard drives.
AHCI allows a SATA SSD drive to fully utilize its speed and performance capabilities. Since SSDs access data randomly, the queued and parallel operations of AHCI provide significant advantages over legacy IDE mode [1].
RAID is preferable when you have multiple traditional hard disk drives. By combining drives together, RAID can improve speed, capacity, or redundancy compared to a single drive. Some common RAID configurations are:
- RAID 0 for faster data access by striping data across drives.
- RAID 1 for redundancy by mirroring two drives.
- RAID 5 for both speed and redundancy by striping and distributing parity data.
When choosing between AHCI and RAID for multiple drives, consider your priority – best performance or best data protection. RAID 0 provides speed but no redundancy, while RAID 1 and 5 add redundancy at the cost of some speed [2].
If you need both high performance and redundancy, use an SSD for the operating system and applications with AHCI enabled, and use RAID on additional HDD storage drives. This balanced approach gets the benefits of both AHCI and RAID.