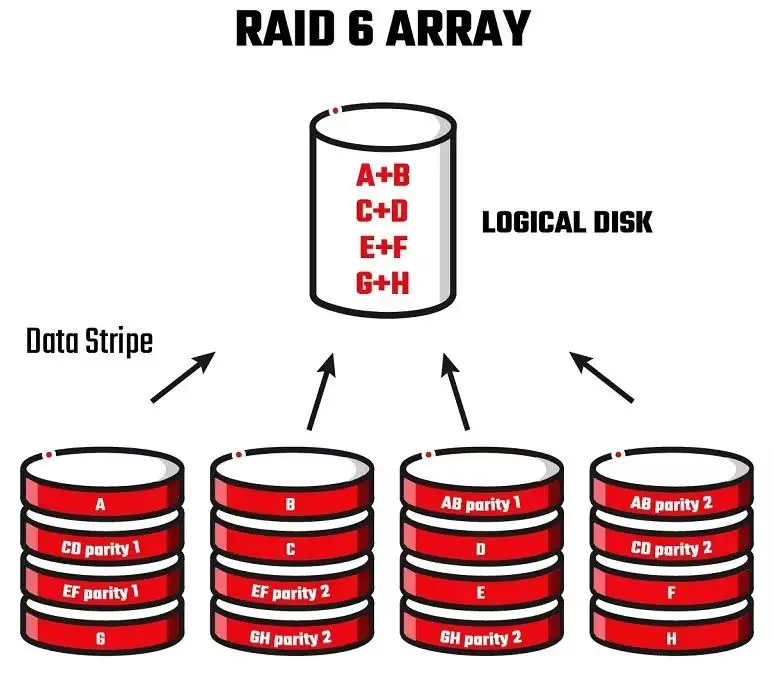
RAID 6 is a type of RAID configuration that uses block-level striping with double distributed parity. This means that data is striped across multiple drives, with two parity blocks distributed across different drives. The main advantage of RAID 6 is that it can sustain up to two drive failures without data loss. However, like any storage system, RAID 6 arrays can still experience drive failures that must be properly handled to avoid data loss.
What causes drive failures in RAID 6?
There are several potential causes of drive failures in a RAID 6 array:
- Mechanical failure – The mechanical components of a hard drive can fail over time due to wear and tear. This includes failures of the motor, heads, platters, etc.
- Electrical failure – Electrical components on the drive’s circuit boards can fail, disrupting operation.
- Firmware bugs – Bugs in a drive’s firmware can cause malfunctions or crashes.
- Overheating – Excessive drive temperatures can damage components or exceed operating tolerances.
- Physical damage – External shocks, vibrations, floods, fires etc. can damage drives.
- Manufacturing defects – Imperfections arising during manufacturing can make drives prone to early failure.
- Age-related wear – Older drives are more likely to fail as components degrade over time.
- High workload – Drives that are worked heavily are more prone to failure over time.
In large RAID 6 arrays, drive failures will occur regularly due simply to the likelihood of failure increasing with each additional drive. By using redundancy and replacing failed drives, RAID 6 can handle these inevitable failures.
How does RAID 6 handle single drive failures?
RAID 6 can handle a single drive failure without any data loss or downtime. Here is the process when a single drive fails in a RAID 6 array:
- The RAID controller detects that a drive has failed, either through S.M.A.R.T. diagnostics or when it ceases responding.
- The failed drive is marked as offline. All data on it is inaccessible from that point onward.
- A hot spare drive is automatically rebuilt if available. This involves reconstructing all data and parity on the new drive.
- If no hot spare is available, the array remains in a degraded state but fully operational until a new drive is manually replaced.
- The administrator replaces the failed drive with a new, blank one.
- The RAID controller adds the new drive to the array and rebuilds it by using parity data to reconstruct all data onto the drive.
- After rebuilding, the array is fully redundant again and operating as normal.
This process allows a RAID 6 array to tolerate a single drive loss transparently, without any downtime required. The array remains fully functional during the rebuild process.
How does RAID 6 handle two drive failures?
RAID 6 can withstand up to two failed drives without data loss. Here is what happens when two drives fail in a RAID 6 array:
- If a second drive fails before a rebuild from a previous drive failure completes, the rebuild process is aborted.
- The array enters a degraded state, operating in read-only mode. No data can be written until at least one failed drive is replaced.
- The administrator replaces the first failed drive with a new, blank one.
- A rebuild is started for the first replaced drive. Data and parity blocks are reconstructed onto it.
- After the first drive rebuild finishes, the administrator replaces the second failed drive.
- The second drive is rebuilt in the same manner, completing redundancy restoration.
- The array returns to normal read/write operation.
So in summary, the array can remain online and read-only accessible during two drive failures. But to regain full functionality, each failed drive must be replaced and rebuilt one at a time.
What happens with more than two drive failures in RAID 6?
If more than two drives fail before replacements rebuild the array, data loss will occur in traditional RAID 6. Here is the sequence of events:
- Once more than two drives fail, there is insufficient redundancy left to reconstruct the missing data.
- The volume enters a failed state and is no longer accessible. Data loss ensues.
- The only recovery option is to restore data from backups external to the array.
- After restoring data, failed drives can be replaced to bring the array back to normal operation.
Some advanced RAID implementations such as RAID 6 with triple parity protection can withstand three or more simultaneous drive failures. But standard dual-parity RAID 6 has a hard limit of two failed drives before irrevocable data loss.
How to monitor for drive failures
Carefully monitoring drive health and quickly responding to failures is crucial for minimizing the risk of data loss. Here are some best practices for monitoring drive health:
- Utilize S.M.A.R.T. diagnostics to detect issues before drives fully fail. Monitor S.M.A.R.T. parameters like reallocated sectors for early warning signs.
- Monitor array logs for any recorded drive errors. Look for signs like high CRC error rates.
- Configure email/SMS alerts for any detection of drive failures, degraded arrays, or other issues.
- Check the status of hot spare drives regularly. Verify that designated hot spares are present and operational.
- Monitor rebuild times. If rebuilds take significantly longer than expected, it can indicate issues.
- Keep spare drives on hand for prompt replacement of failed drives.
Using these monitoring practices and responding quickly helps avoid the risk of losing a second drive during rebuilds from the first failure.
How to perform preventative drive replacements
Drives can be proactively replaced before they fail to minimize downtime risk. Here are some best practices for preventative drive replacement:
- Monitor drive ages and replace older drives before failure likelihood increases.
- Review manufacturer specifications for drive lifespan to set optimal replacement cycles.
- Schedule replacements during maintenance windows to avoid unplanned downtime.
- Stagger drive replacements rather than replacing many simultaneously.
- Verify spare drives are readily available before starting preventative swaps.
- Use S.M.A.R.T. attributes like wear leveling count to identify drives nearing end of lifespan.
- Plan drive swaps around array topology to minimize rebuild times.
Preventative replacements do incur downtime and extra effort. But strategically swapping out older drives can prevent unplanned failures leading to production outages.
How hot spares protect against drive failures
Hot spare drives help protect RAID 6 arrays by allowing automatic rebuilds from failed drives. Here is how hot spare drives work and benefits they provide:
- Hot spares are standby drives installed in arrays but not used for active storage until needed.
- When a drive fails, the hot spare immediately takes over the failed drive’s role via an automatic rebuild process.
- This enables a faster rebuild as no human intervention is required to start it.
- Spares can reduce the chances of a second drive failure during long rebuilds.
- The array remains fully redundant if a hot spare is used after the first drive failure.
- Hot spares do come with extra upfront cost for unused extra drives.
Overall, hot spares provide faster recovery time after drive failures and can help avoid downtime. But they do add expense which must be weighed against the cost of potential downtime without them.
How parity protects against drive failures
Parity generation is central to how RAID 6 protects against up to two drive failures. Here is an overview of how parity works:
- With RAID 6, parity is generated and striped across drives in two distributed parity sets, P and Q.
- These parity sets are calculated values used to reconstruct missing data.
- P is the XOR parity value calculated across data strips on each drive.
- Q provides a second independent set of parity strips using a different mathematical formula.
- If up to two drives fail, the remaining data and parity strips on other drives can rebuild the missing data.
- The distribution of parity strips avoids data loss if multiple drives in the same parity sets fail.
In essence, the dual parity provides redundancy that enables recovery from up to two failed drives. This protects against data loss without having to duplicate all data like with mirroring.
Ideal RAID 6 rebuild time
To minimize exposure to data loss, failed drives in RAID 6 arrays should be rebuilt as quickly as possible. However, rebuild times are impacted by several factors:
- Drive capacity – Higher density drives take longer to rebuild.
- Partial drive failures – Damaged drives rebuild slower than new replacement drives.
- Array size – More drives in the array increase rebuild time.
- Drive speed – Slower RPM drives have lengthier rebuilds.
- Activity levels – Rebuilds compete with normal I/O activity.
- Read/write ratio – Write-heavy workloads slow rebuilds more than reads.
Given these influencing factors, here are some general rebuild time guidelines:
- Up to around 4-8 hours for small arrays with lower capacity drives
- Up to 24 hours for midsize arrays with moderate drive sizes
- 1-2 days or more for large arrays with high-density drives
If rebuild times consistently exceed norms, it may be a sign of issues needing investigation. Faster rebuilds also favor smaller arrays when feasible.
Impact of resilvering on performance
The rebuild process in RAID 6 is often referred to as a “resilvering” operation. Resilvering does impact performance of the array:
- Reads may be slightly faster since more drives are available to respond.
- Write performance suffers much more due to extra parity recalculation overhead.
- Response times for both reads and writes usually increase during reslivering.
- The controller is under heavier load managing parity calculations.
- Resilvering represents significant extra I/O load competing with normal workload.
In most cases, the performance impact is manageable. But heavy production workloads combined with very large arrays and dense drives can cause more severe degradations. Monitoring utilization and load levels during resilvering helps avoid bottlenecks.
How to speed up RAID 6 rebuilds
There are several options available for expediting RAID 6 rebuilds to minimize exposure to data loss:
- Reduce workload during rebuilds. Limiting I/O lets more resources go to the rebuild process.
- Use higher performing drives such as SSDs or faster RPM HDDs.
- Opt for smaller drive sizes to reduce per-drive rebuild times.
- Distribute rebuilds across as many channels as possible.
- Ensure firmware and drivers are up to date for maximum rebuild performance.
- Replace failed drives quickly to start rebuilds faster after failures.
- Use a battery-backup cache to allow rebuilds to continue during power loss.
Quick and efficient rebuilds are key to avoiding prolonged degraded operation. Choosing appropriate hardware and optimally configuring the array can achieve the fastest rebuild times.
RAID 6 recovery from unsupported configurations
If too many drives fail in RAID 6 leading to data loss, recovery options are limited. But some actions that can be taken include:
- Restore data from backups created before the failure occurred.
- Send failed drives for professional data recovery to retrieve some data remnants.
- Recreate just the metadata/structures of the RAID to make remaining data readable.
- Build a degraded RAID 10 from the functional remaining disks to read data.
- Combine remaining data across drives into a degraded RAID 5 or 0 array.
Without valid backups, chances of meaningful recovery are very low. This illustrates the importance of maintaining good backups externally for disaster scenarios. But in some cases, data remnants can be extracted using the methods above.
Typical causes of unsupported RAID 6 conditions:
- Exceeding two drive failures that parity cannot compensate for.
- Complete or extensive damage of drives from disaster or physical damage.
- Controller failure corrupting the array leading to drive errors.
- Malicious actions like ransomware that damage data across all drives.
- Buggy firmware or drivers corrupting RAID integrity.
While rare, recovery scenarios like these underscore the need for solid backups as well as protecting against disasters and malware.
Ideal RAID 6 array configuration
Some key guidelines for optimally configuring RAID 6 arrays include:
- At least 6 drives to have usable capacity after dual parity overhead.
- All drives the same model and capacity for predictable performance.
- HDDs for cost-efficiency or SSDs for higher performance.
- 1-2 hot spares to enable automatic rebuilds.
- Smaller drive capacities for quicker rebuilds.
- Group drives in RAID 1 or 0 subsets for more performance.
- Distribute drive subsets widely across channels, cages, controllers.
- Balance cost, capacity, redundancy, and performance requirements.
Properly designing RAID 6 arrays for the needed workload, capacity, and redundancy characteristics is key to delivering performance while maximizing fault tolerance.
Conclusion
RAID 6 provides excellent protection against up to two drive failures. Careful monitoring, quick replacement of failed drives, use of hot spares, and optimized array configuration enables RAID 6 to deliver high redundancy, performance, and recovery capabilities. Even with the dual parity protection of RAID 6, maintaining backups is still crucial for protection against catastrophic array failures.
