Backing up your iPhone is one of the most important things you can do to protect your data and ensure a smooth transition if you ever need to restore or get a new iPhone. While iCloud backups are convenient, backing up locally through iTunes provides more control and allows you to save full device backups instead of just app data, settings, and photos.
Luckily, backing up your iPhone in iTunes is quick and straightforward. Just follow these four simple steps:
1. Connect Your iPhone to Your Computer
The first step is to connect your iPhone to your computer using the USB cable that came with your device. If you’re using a Mac, plug the iPhone cable into a USB port on your Mac. For Windows, connect your iPhone to a USB port on your computer.
Once connected, iTunes should automatically detect your device and show it under the Devices section in the top left corner of the iTunes window. You can also click the iPhone icon to access info and controls for your device.
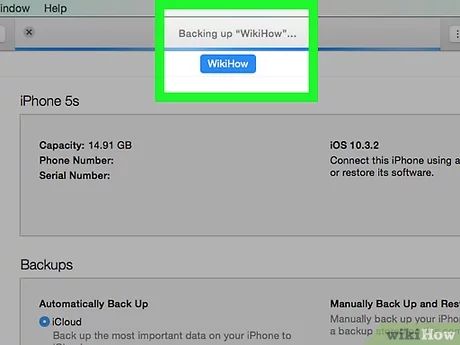
2. Back Up Your iPhone in iTunes
With your iPhone connected, you can now back up your device to iTunes. To do this:
- Open iTunes on your computer if it didn’t launch automatically
- Select your iPhone under Devices in iTunes
- Click Summary in the horizontal menu bar near the top of the iTunes window
- Click “Back Up Now” under the Backups section
iTunes will now create a backup of your iPhone. This includes backing up your photos, messages, contacts, device settings, app data, and other information. Depending on how much data you have, this process can take anywhere from a few minutes to over an hour for a full backup.
You’ll know the backup is complete when the progress bar fills across and the timestamp of “Latest Backup” changes to the current time. By default, iTunes backups up your iPhone to your computer’s internal drive. You can change this in your iTunes Preferences.
3. Encrypt Your iTunes Backup (Optional)
For extra security, you can choose to encrypt your iPhone backups in iTunes. Here’s how:
- In iTunes, make sure your connected iPhone is still selected
- Click Summary then click “Encrypt iPhone backup” under Backups
- Enter a password to encrypt your backups twice when prompted
Now iTunes will encrypt your iPhone backups as they’re created. You’ll need to enter your password to restore from encrypted backups. Encryption provides an additional level of security for sensitive data like passwords, health data, and other personal information.
4. Manage Your Backups
iTunes can store multiple backups of your iPhone. You have a few options for managing these backups:
- Set iTunes to automatically back up: Having iTunes automatically back up your iPhone periodically is the easiest way ensure you have regular backups. Enable this in Preferences > Devices.
- Create manual backups: You can manually back up your iPhone at any time by clicking “Back Up Now.” Manual backups give you more control.
- Delete old backups: iTunes will store multiple backups and keep filling storage space over time. You can delete old backups you no longer need by right-clicking on a backup date and selecting Delete Backup.
Keeping regular backups in iTunes ensures you always have a safety net. You can restore to a backup if you get a new iPhone, need to reset your device, or lose data somehow. Backups also make system transfers seamless if you’re upgrading to a new iPhone model.
Benefits of Backing Up Your iPhone in iTunes
Backing up your iPhone locally through iTunes has several advantages compared to iCloud backups:
- Full system backups: iTunes backs up your entire iPhone system, including photos, messages, contacts, app data, settings, and other information. iCloud only partially backs up data.
- Faster backup and restore: Backing up and restoring is generally much faster over a local USB connection versus over the Internet to iCloud.
- More backup storage space: You can save multiple large backups to your computer rather than relying on limited iCloud storage.
- Greater reliability: Local iTunes backups avoid relying on an Internet connection and remote servers.
- Better backup encryption: iTunes allows password encryption for your backups for enhanced security.
- Easier management: iTunes makes it simple to manage multiple backups versus iCloud account management.
For these reasons, regularly backing up your iPhone to iTunes is recommended over only using iCloud backups. Even if you do use iCloud for convenience, local iTunes backups provide important redundancy in case of any issues.
What Gets Backed Up in iTunes
iTunes backs up almost all your iPhone data, settings, and content when you back up to your computer. Specifically, an iTunes iPhone backup includes:
- Photos and videos
- Messages – iMessages, SMS, and MMS
- Contacts and contact favorites
- Call history
- Voicemails
- Apple Watch backups
- Health and activity data
- Keychain passwords and credit card information
- Home screen and app organization
- Ringtones
- Music, movies, TV shows, books, and apps
- Notes
- Notifications settings
- Messages settings
- Email accounts and settings
- Wi-Fi networks and passwords
- Bluetooth settings
- Safari bookmarks
- Calendars
- Reminders
This ensures that virtually all your personal data, content, and device settings are included in an iTunes backup of your iPhone.
What Does Not Get Backed Up in iTunes
While iTunes backs up most iPhone data, there are a few things that do not get included in a backup:
- Media content synced from iTunes – This can be redownloaded from iCloud or iTunes after restoring
- Touch ID and Face ID settings
- Apple Pay information
- Activity data synced to Apple Health
- Game scores and gameplay progress – Game data syncs through Game Center and iCloud
- Apple Mail data – Email accounts and messages sync over iCloud
- Temporary files and caches
So you will need to reconnect some accounts and services if restoring your iPhone from an iTunes backup. But all your personal data, content, and settings will transfer over.
How to Restore Your iPhone from a Backup
If you ever need to restore your iPhone due to issues, damage, or getting a new device, you can easily restore a backup during the device setup process. Here’s how to restore from an iTunes or iCloud backup:
- Turn on your new or reset iPhone and proceed through the initial screens
- On the Apps & Data screen, tap “Restore from iTunes backup” or “Restore from iCloud backup”
- Sign in with your Apple ID and select the backup you want to restore from
- Allow the restore process to complete – Your apps and data will transfer to your device
- Finish the setup steps and your iPhone will be restored to your backup!
Restoring from a recent iTunes or iCloud backup makes setup easy and ensures you have all your important data on your device. Make sure backups are current before restoring your iPhone.
How to Delete Old iPhone Backups from iTunes
Over time, stored iPhone backups can take up considerable storage space on your computer. Here’s how to delete old backups you no longer need from iTunes:
- Open iTunes and connect your iPhone if it isn’t already
- Select your iPhone under Devices in iTunes
- Click Summary and then Manage Backups under Backups
- Review the list of backups and delete any you want to remove
- Click Delete Backup to confirm deleting the selected set of backups
This will free up storage space taken up by old iPhone backups. You may want to keep your most recent 1-2 backups and delete any others over a year old.
Troubleshooting iTunes Backup Problems
Backing up your iPhone in iTunes is usually quick and seamless. But if you encounter issues, here are some troubleshooting tips:
| Problem | Solution |
|---|---|
| iPhone not showing up in iTunes |
|
| Error creating backup |
|
| Forgot backup password |
|
| Apps and data missing after restore |
|
For additional help, check for updated software, contact Apple support, or bring your device to an Apple store for troubleshooting assistance.
Frequently Asked Questions
Is my data safe when backing up iPhone to iTunes?
Yes, backing up your iPhone data locally via iTunes is very safe. The backups are stored securely on your computer, and iTunes allows you to encrypt backups for added security.
Does iTunes backup delete data from my iPhone?
No, creating an iTunes backup does not delete or remove any data from your iPhone. It simply makes a copy of your content and settings to store on your computer.
Do you need internet to backup iPhone on iTunes?
No internet connection is required to backup your iPhone to iTunes. The backup is created locally through the connection between your iPhone and computer using the USB cable.
How often should you backup iPhone on iTunes?
It’s best to backup your iPhone to iTunes regularly. Aim to create a new backup at least every 1-2 months. Backup more frequently if you often add new data or make major changes on your device.
How do I restore my iPhone without iTunes backup?
You can restore your iPhone using iCloud instead of iTunes. On setup, choose “Restore from iCloud backup” and sign in to iCloud to retrieve your most recent backup data.
Conclusion
Backing up your iPhone locally using iTunes provides an easy and reliable way to protect your important data. Follow the simple steps to regularly back up, encrypt backups for security, manage old backups, and successfully restore your device when needed. With an iTunes backup, you can have peace of mind knowing your iPhone data is safe.
