What Does ‘Hard Drive Not Initialized’ Mean?
An uninitialized hard drive is a drive that does not contain a partition table and file system, meaning it has not been prepared to store data. When you first get a new hard drive, it will be uninitialized until you format it and create partitions. An initialized drive contains a partition table that defines the partitions on the drive, and a file system format like NTFS or exFAT that organizes how data is stored.
There are a few reasons why a hard drive may become uninitialized and show up as not initialized in Disk Management or Disk Utility:
- Corrupted partition table – If the partition table becomes corrupted, the drive may lose its initialization and appear as an unallocated space.
- Drive formatting issues – Errors during formatting, partitioning, or repartitioning could cause the drive to be left uninitialized.
- Physical damage – Physical damage to the disk platters or electronics could lead to initialization issues.
- Virus infection – Some viruses target the partition table or boot sectors, which may result in an uninitialized drive.
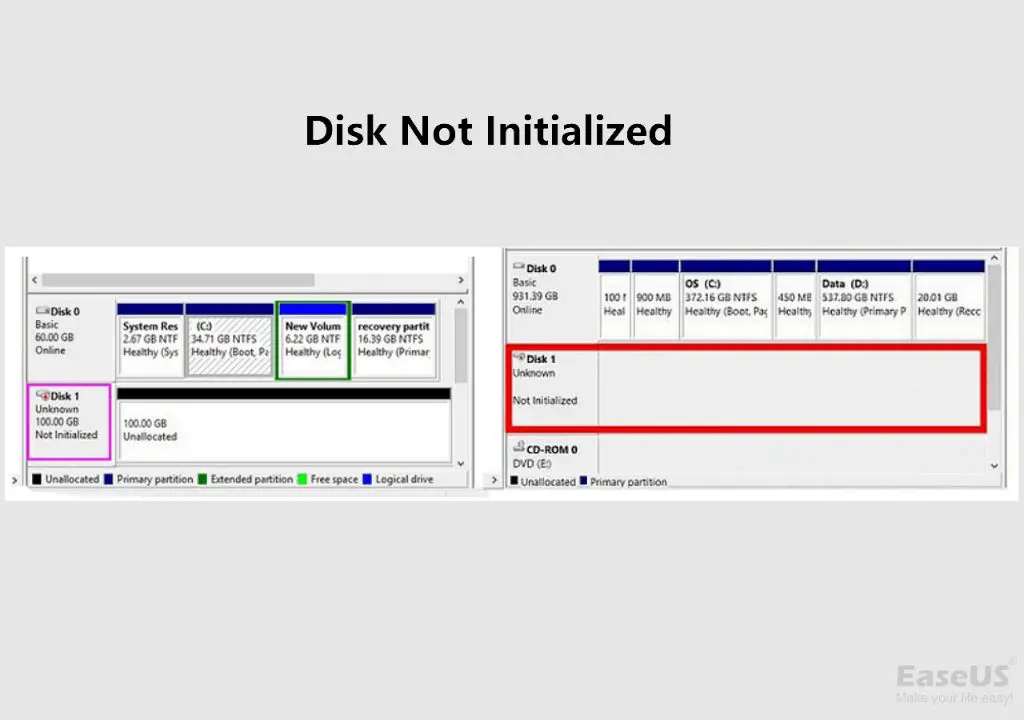
Common error messages associated with an uninitialized disk include: “Disk not initialized”, “You must initialize this disk before Logical Disk Manager can access it”, or “The disk you inserted was not readable by this computer.” These indicate the drive is present but Windows, macOS or your BIOS cannot access it properly to display partitions and files.
Causes of an Uninitialized Hard Drive
There are a few common causes that can lead to a hard drive not being initialized properly:
Brand new unpartitioned drive – When you first get a new hard drive, it will not have any partitions set up on it or a file system in place. The drive needs to be initialized before it can be used in Windows.
Disk corruption – Errors or corruption in the hard drive’s formatting structures can cause Windows to no longer recognize the disk. This prevents Windows from being able to access or initialize the drive.
Drive disconnected during partitioning – If the hard drive becomes disconnected or encounters errors while it is being partitioned and formatted, this can leave the disk in an unfinished uninitialized state. The initialization process needs to be completed or restarted to fix this.
Proper initialization writes partition structures and file system data to hard drives. Without this information being written correctly, Windows and your computer’s BIOS cannot recognize the existence of the drive and its available storage capacity. Understanding the root causes helps determine the appropriate solutions for getting the hard drive properly recognized again.
Sources:
https://www.easeus.com/resource/disk-unknown-not-initialized.html
https://www.diskpart.com/windows-10/disk-1-unknown-not-initialized-windows-10-4125.html
Fixing an Uninitialized Hard Drive
There are a few different methods that can be used to initialize an uninitialized hard drive in Windows:
Using Disk Management
Disk Management is a built-in Windows tool that can be used to initialize a drive. To use it, open the Disk Management utility by right-clicking on This PC (or My Computer) and selecting Manage. In the Computer Management window that opens, select Disk Management on the left side. All the drives connected to your system will be listed here.1
To initialize the unallocated drive, right-click on it and select Initialize Disk. This will launch the Initialize Disk wizard. Select the partition style you want (MBR or GPT) and click OK. The drive will now be initialized and show up as a basic volume that can be formatted.
Using the Diskpart Command
Diskpart is a command line tool built into Windows that can also initialize drives. To use it, open the Command Prompt as administrator. Type “diskpart” and hit enter to launch the tool. Next, type “list disk” to display all the connected disks and their details. Identify the disk you want to initialize from the disk number.
Type “select disk X” (replace X with the disk number). This will select the target disk. Now type “clean” to delete all existing partitions and format on the disk. Finally, type “create partition primary” to create a new primary partition and initialize the disk.
Third Party Tools
There are also third party disk management tools like MiniTool Partition Wizard, EaseUS Partition Master, AOMEI Partition Assistant that can be used to easily initialize a drive with a graphical interface. These tools are more user friendly than the command line diskpart utility.
Initializing a Hard Drive Using Disk Management
Disk Management is a built-in Windows tool that can be used to initialize a hard drive. Here are the steps to initialize a disk using Disk Management:
1. Open Disk Management. The easiest way is to type ‘diskmgmt.msc’ in the Windows search bar and select the Disk Management app.
2. Right-click on the disk you want to initialize and select ‘Initialize Disk’.
3. Select either MBR (Master Boot Record) or GPT (GUID Partition Table) partitioning. MBR is compatible with older operating systems while GPT supports larger disk sizes above 2TB. GPT is newer and recommended for most users.
4. The disk will now be initialized. Right-click on the disk again and select ‘New Simple Volume’ to create a formatted volume that can store files.
5. Walk through the prompts to specify volume size, drive letter, file system (NTFS is recommended), and volume label.
The disk should now show up in Windows File Explorer, initialized and ready to use.
Using the Diskpart Command
The diskpart command line utility can be used to initialize an uninitialized disk in Windows. Diskpart allows you to access advanced disk options that are not available in the Disk Management console.
To use diskpart to initialize a disk:
- Open the Command Prompt as an administrator.
- Type
diskpartand press Enter to launch the diskpart utility. - Type
list diskto display all disks connected to your PC. - Select the disk you want to initialize by typing
select disk X(where X is the disk number). - Type
cleanto remove any existing partitions on the disk. - Create a new partition by typing
create partition primary. - Format the partition by typing
format fs=ntfs quick(or format fs=fat32 for FAT32). - Type
exitto close diskpart.
The diskpart clean command erases any existing partitions or data on the disk. So make sure you select the correct disk before cleaning it. Initializing the disk with diskpart allows you to access it in Windows and store data on it.1
Third Party Tools
There are several third party disk management tools that provide easy ways to initialize hard drives on Windows. Three popular options include:
EaseUS Partition Master – This software allows initializing hard drives with just a few clicks through its intuitive interface. It supports MBR and GPT partitioning styles.
AOMEI Partition Assistant – Initializing a drive is straightforward with this tool’s wizard-style menus. It can initialize internal or external drives in MBR or GPT format.
MiniTool Partition Wizard – Free disk management features like drive initialization make this a popular choice. It converts between MBR and GPT without data loss.
Third party initialization tools offer user-friendly interfaces, compatibility with different drive types, and handy utilities beyond basic initialization. For hassle-free drive preparation, they provide a convenient alternative to Windows’ built-in Disk Management.
Initializing an External Hard Drive
Initializing an external hard drive follows similar steps to initializing an internal drive using Disk Management or Diskpart commands. However, there are a few additional things to keep in mind for external drives.
First, make sure the external drive is properly connected to the computer and powered on. Trying connecting it to another USB port or using a different cable. You may need to try on a different computer as well.
If the external drive is showing up in Disk Management but is unallocated and not initialized, follow the same steps above to initialize it. Right-click and choose to create a new simple volume (Source 1).
If the drive is not detected at all, try using Windows’ Device Manager to troubleshoot. Uninstall the drive from Device Manager and reboot to redetect it. You can also try updating drivers for the external drive (Source 2).
As a last resort for external drives not initializing, you may need to initialize the disk on another computer where it is detectable first before using it again on your main computer.
Recovering Data from Uninitialized Disk
If your hard drive is uninitialized and you have important files stored on it that you need to recover, there are a couple options:
Using recovery software: Specialized data recovery software like Disk Drill or EaseUS Data Recovery can help scan uninitialized disks and recover deleted or lost data. These programs work by scanning the raw sectors of the drive to find files that still exist.
Sending to a data recovery service: For more complex cases of data recovery from uninitialized disks, you may need to use a professional data recovery service. They have specialized tools and clean room facilities to physically repair drives and recover data at the sector level. This is the best option if DIY software can’t find your files.
The key when recovering data from an uninitialized disk is to avoid anything that may overwrite the existing data like reformatting or repartitioning the drive. Once you initialize a disk, any existing files will be permanently erased. So first try read-only recovery software or services.
Preventing Uninitialized Hard Drives
There are a few key steps you can take to help prevent your hard drive from becoming uninitialized:
Safely remove external drives – Always use the “Safely Remove Hardware” option when disconnecting an external drive to ensure no data is corrupted or lost in the process. Improperly ejecting drives is a common cause of initialization issues.
Proper OS shutdown – Always shut down your computer through the operating system rather than forcing power off. Forcing power off could lead to potential file system or drive errors that leave the drive uninitialized.
Regular backups – Maintaining regular backups of your data can help minimize potential data loss if an uninitialized drive occurs. Backup important data to an external drive or cloud storage for redundancy.
Checking disk health – Periodically check your disk health and scan for errors to catch potential problems early. Using built-in utilities like CHKDSK or a SMART disk monitoring tool can alert you to issues before they lead to initialization problems.
By following best practices around drive handling, system operation, and data backups, you can greatly reduce the chances of waking up to an uninitialized drive.
Sources:
[1] https://www.easeus.com/resource/disk-unknown-not-initialized.html
[2] https://www.ubackup.com/data-recovery-disk/disk-unknown-not-initialized-0044-rc.html
When to Seek Professional Help
In some cases, DIY solutions for fixing an uninitialized hard drive may not be successful or advisable. Here are some situations where you may want to seek professional data recovery services:
If the hard drive contains critical or seemingly irrecoverable data that you absolutely need to restore, using a professional service may give you the best chance of getting that data back. Professionals have specialized tools and techniques that go beyond typical DIY software.
If the hard drive has suffered physical damage, such as from a drop or liquid spill, attempting to initialize or access it yourself could make things worse. Professional data recovery services are equipped to handle delicate physical repairs.
If you have already unsuccessfully tried every DIY solution like Disk Management, Diskpart, and third party tools, your last resort may be seeking professional assistance. Professionals can try advanced techniques that may still recover data after failed DIY attempts.
Overall, critical data, physical damage, or exhausted DIY options are good reasons to turn to professional hard drive recovery services. While this can cost hundreds to thousands of dollars, it may be worth it to retrieve truly valuable data. Just be sure to select a reputable service with a good track record of results.