There are a few different formats you can use to erase a disk on a Mac. The best format to choose depends on how you want to use the erased disk afterwards. Here are the main options for erasing a disk on a Mac:
APFS Format
APFS (Apple File System) is the default format for flash drives and SSDs on modern versions of macOS. Erasing a disk using APFS format will delete all data and partition information from the disk and leave it ready to be reformatted.
To erase a disk with APFS format:
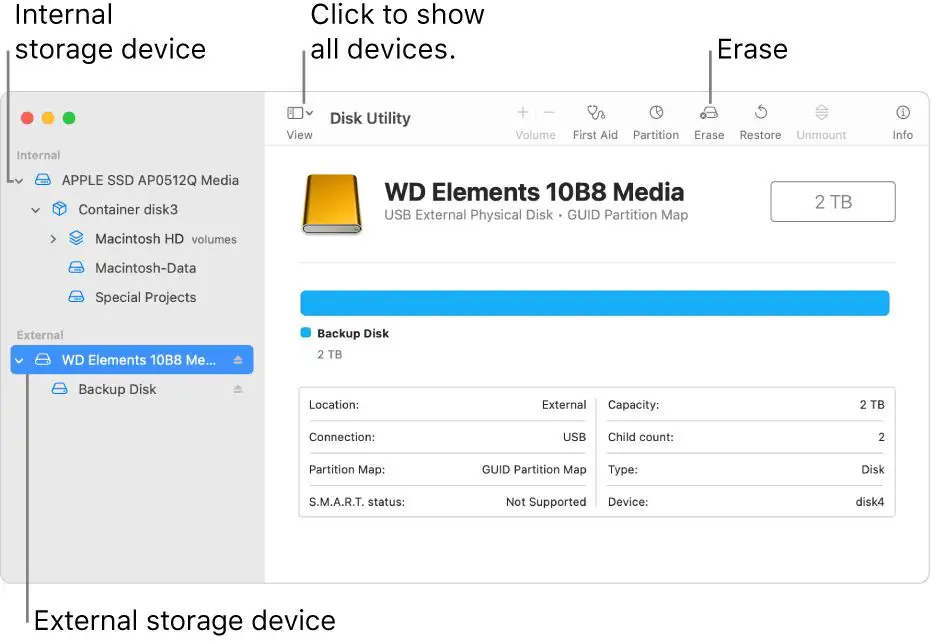
1. Open Disk Utility on your Mac. You can find this in the Applications > Utilities folder or by searching for it using Spotlight.
2. Select the disk you want to erase in the sidebar of Disk Utility. This will usually be labeled something like “Untitled” or the manufacturer name.
3. Click the “Erase” button near the top of the Disk Utility window.
4. Choose “APFS” from the Format dropdown menu.
5. You can give the erased disk a name if you want, or leave it as “Untitled”.
6. Click “Erase” to confirm you want to wipe the disk.
Mac OS Extended Format
Mac OS Extended (also known as HFS+) is an older Mac formatting system that is compatible with older versions of macOS. Erasing a disk with Mac OS Extended will delete all data and partition information and leave the disk ready to be reformatted.
To erase with Mac OS Extended:
1. Open Disk Utility on your Mac.
2. Select the disk you want to erase in the sidebar.
3. Click “Erase” near the top of the window.
4. Choose “Mac OS Extended” from the Format dropdown menu.
5. Name the disk if desired.
6. Confirm by clicking “Erase”.
Mac OS Extended is a good choice if you need compatibility with older Macs running OS X 10.5 or earlier.
ExFAT Format
ExFAT is a format that allows a drive to be used between Mac and Windows computers. Erasing a disk with ExFAT will wipe it and leave it ready for cross-platform use.
To erase with ExFAT:
1. Open Disk Utility.
2. Select the disk.
3. Click “Erase”.
4. Choose “ExFAT” from the Format dropdown.
5. Name the disk.
6. Click “Erase” to confirm.
Use ExFAT if you need to frequently transfer files between Mac and Windows machines.
FAT32 Format
FAT32 is an older Windows format that can also be read on Macs. Erasing a disk with FAT32 will delete all data and partition information.
To erase with FAT32:
1. Open Disk Utility.
2. Select the disk to erase.
3. Click “Erase”.
4. Choose “MS-DOS (FAT)” from the Format dropdown.
5. Name the disk if desired.
6. Confirm by clicking “Erase”.
FAT32 can be used to create cross-platform disks but has some limitations compared to ExFAT. Use it for very old versions of Windows or if you need FAT32 for a specific reason.
Securely Erasing a Disk
If you need to permanently erase all data from a disk so that it can never be recovered, use the secure erase options in Disk Utility. This will overwrite the disk with gibberish data multiple times to prevent any chance of recovery.
To securely erase a disk:
1. Open Disk Utility and select the disk to erase.
2. Click “Erase” at the top.
3. Choose a format like APFS or Mac OS Extended.
4. Select “Security Options…”
5. Choose how many passes you want – more passes take longer but make data recovery impossible. The maximum 35-pass overwrite meets government security standards.
6. Give the disk a name if desired.
7. Confirm by clicking “Erase” and waiting for the disk to be securely overwritten.
Secure erase can take hours depending on the size of the disk and number of passes chosen. But it ensures no trace of your data remains on the disk afterwards.
Erasing External Drives
Erasing external hard drives, SSDs, and flash drives works the same way as internal disks:
1. Connect the external drive to your Mac.
2. Open Disk Utility.
3. Select the external drive in the sidebar.
4. Click “Erase” then choose a format.
5. Name the disk if desired.
6. Click “Erase” to confirm.
This will completely wipe the external drive and leave it like new. Just remember to backup any important data on the drive before erasing!
Erasing USB Flash Drives
USB flash drives should be erased using the FAT32 or ExFAT formats:
– FAT32 works with all operating systems but has a 4GB per-file limit. Use it for general file transfers under 4GB.
– ExFAT removes the 4GB file limit and is the best choice for large file transfers between Mac and Windows.
To quickly erase a flash drive on Mac:
1. Insert the flash drive into a USB port.
2. Right click on its icon on the desktop and select “Eject”.
3. In the dialog that appears, click “Erase” to wipe the flash drive.
This will automatically erase the flash drive to FAT32 format. Quick and easy!
Erasing CDs and DVDs
Erasing rewritable CDs and DVDs works differently than erasing a disk or drive. To erase a CD or DVD:
1. Insert the disc you want to erase into your Mac.
2. Open Disk Utility.
3. Select the disc in the sidebar.
4. Click “Erase” at the top.
5. Set the format to “Mac OS Extended (Journaled)”.
6. Type a name for the blank disc.
7. Click “Erase” to confirm.
This process will completely wipe a rewritable disc back to a blank slate. You can then burn new content to the erased disc.
Non-rewritable discs cannot be erased. You’ll need to physically destroy them to dispose of the data.
Erasing Disk Images
A disk image is a single file containing an entire file system. To securely erase data from a disk image:
1. Locate the disk image file in the Finder.
2. Drag the disk image file to the Trash.
3. Choose Finder > Secure Empty Trash to permanently shred the file.
Or, you can use Disk Utility:
1. Open Disk Utility and go to File > Open Disk Image.
2. Select the disk image file you want to erase.
3. Click “Erase” at the top and choose a format.
4. Name the disk image.
5. Confirm by clicking “Erase”.
This will wipe all data from a disk image file. Remember to backup anything important from the virtual disk before erasing!
Erasing Partitions
To erase just a single partition on a drive instead of the entire thing:
1. Open Disk Utility.
2. Select the drive (not a specific partition).
3. Click the “Partition” button.
4. Highlight the partition you want to erase.
5. Click the “-” button below to delete it.
6. This will leave you with one big chunk of “free space”.
7. Click “Apply” then create a new partition in the free space.
8. Select the new partition and click “Erase” to format it.
That’s all there is to it! With those steps you can selectively erase just one partition on a drive.
Using Terminal to Erase a Disk
You can also use the Terminal app to erase a disk if you’re comfortable using command line tools.
To format a drive from Terminal:
1. Open Terminal (in /Applications/Utilities).
2. Type `diskutil list` and note the disk identifier of the drive you want to erase, usually something like `disk2`.
3. Use the `diskutil eraseDisk` command with the disk ID and chose a format, for example:
“`
diskutil eraseDisk JHFS+ BlankDisk disk2
“`
This will erase “disk2” to Mac OS Extended format and name it “BlankDisk”.
To securely erase a drive from Terminal:
“`
diskutil secureErase freespace LEVEL /dev/disk2
“`
Replace “disk2” with the target drive and LEVEL with a number 0-4 for different secure erase levels.
So in summary, Terminal can be used to achieve the same drive erasure as Disk Utility, but requires exact disk identifiers and commands. For most users the Disk Utility GUI is recommended for simplicity.
Conclusion
– To quickly erase a disk on Mac, use Disk Utility and choose APFS or Mac OS Extended format.
– For cross-platform use, ExFAT is ideal while FAT32 has some limitations.
– Securely erase disks using the secure erase options in Disk Utility.
– External drives are erased the same way as internal ones.
– CDs and DVDs need to be rewritable to be erased.
– Erase disk images by deleting the files or using Disk Utility.
– Partitioned drives can be selectively erased.
– Terminal diskutil commands can also erase drives if preferred.
Erasing a disk completely wipes it ready for reuse. Just be absolutely certain to backup any important data first! With the steps covered here, you’ll be erasing disks on your Mac smoothly and securely.