There are several reasons why Mac users may need to completely erase their hard drive. First, before selling or giving away a Mac, it is important to securely wipe the hard drive to protect personal data from being accessed by others. Second, if a Mac is experiencing performance issues or crashes, erasing the hard drive and reinstalling macOS can often resolve software-related problems. Finally, some users may want to switch from a Mac-compatible file system like HFS+ to a more universal file system like exFAT when repurposing a Mac hard drive for use with both Mac and Windows machines. Completely erasing the hard drive wipes it clean so you can start fresh with a new file system.
This guide will walk through the different options for securely erasing a Mac hard drive using Disk Utility or from Recovery Mode. We’ll also look at the differences between erasing HDDs and SSDs, and how to recover deleted files if needed after wiping a hard drive.
Back Up Important Data
Before erasing your Mac’s hard drive, it is crucial to back up any important files or data you want to keep. Failure to properly back up data before erasing can result in permanent data loss. According to this EaseUS article, you can back up a hard disk before formatting using third-party backup software like EaseUS Todo Backup or using native backup tools built into macOS like Time Machine. It is recommended to backup your entire hard drive to an external hard drive or cloud storage before proceeding with an erase. Backing up individual files and folders may be tedious and lead to important data being left behind. Once backed up, be sure to verify the backup completed successfully before moving forward with erasing the hard drive.
“How can I back up all of my data on a hard drive before formatting it?” 3 Nov 2022. Retrieved from https://www.quora.com/How-can-I-back-up-all-of-my-data-on-a-hard-drive-before-formatting-it
How Erasing Works
Erasing a hard drive completely deletes all data and partitions on the drive. When files are normally deleted on a computer, only the reference to their data on the hard drive is removed. The actual data remains on the hard drive until it is overwritten by new data over time. Erasing a hard drive wipes all the existing data by overwriting the entire drive with zeros or random data, making the previously stored data unrecoverable.
According to PCMag, erasing a hard drive removes any trace of files, programs, operating systems, and partitions [1]. The drive is restored to its factory state, as if it just came out of the box. The erasing process writes over all sectors of the hard drive, replacing former contents with meaningless filler data. This prevents deleted files from being recovered by data recovery software.
Once a hard drive is erased, it appears empty and ready to be repartitioned and reformatted. The hard drive can then have a new operating system installed and be reused as if it were brand new. Proper hard drive erasing leaves no residual data behind for prying eyes to recover with forensics.
Erase in Disk Utility
One of the easiest ways to erase your Mac’s hard drive is by using Disk Utility, which comes pre-installed on all Mac computers. Here are the steps to erase your hard drive using Disk Utility:
1. Restart your Mac and immediately press and hold Command + R to boot into Recovery Mode. The OS X Utilities screen will appear.
2. Select Disk Utility and click Continue.
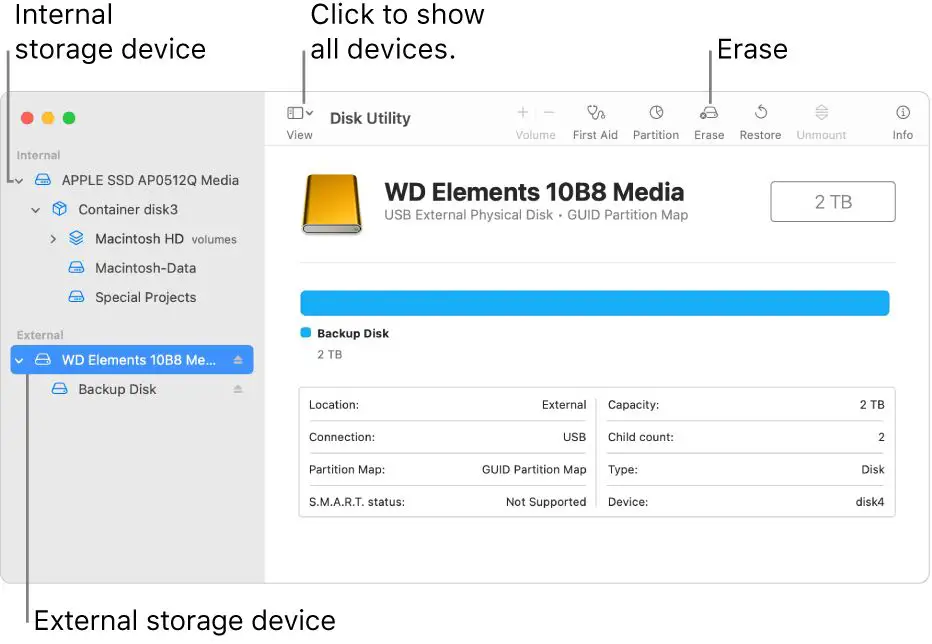
3. In the sidebar, select the disk or volume you want to erase, usually named “Macintosh HD.”
4. Click the Erase button at the top of the Disk Utility window.
5. Enter a name for the erased volume.
6. Select a format to use from the Format drop-down menu, such as APFS or Mac OS Extended (Journaled).
7. Click Erase to confirm and erase the volume. This process may take several minutes depending on your drive size.
8. When done, quit Disk Utility to return to the OS X Utilities screen. You can now reinstall macOS if desired.
Using Disk Utility is a simple and effective way to securely erase your Mac’s hard drive. Just be sure to backup any important files before erasing. More details can be found in Apple’s support guide on using Disk Utility to erase a Mac https://support.apple.com/en-us/HT208496.
Erase from Recovery Mode
You can also erase your Mac’s hard drive from Recovery Mode if you can’t access Disk Utility normally. Follow these steps:
- Restart your Mac and hold down the Command + R keys immediately after you hear the startup chime. This will boot your Mac into Recovery Mode.
- When the Recovery window appears, select Disk Utility from the Utilities menu.
- In Disk Utility, click Continue to confirm.
- Select your Mac’s internal hard drive from the sidebar.
- Click the Erase button at the top of the Disk Utility window.
- Choose a format – Mac OS Extended (Journaled) is recommended.
- Type a name for your erased volume.
- Click Erase.
- Quit Disk Utility when the erase is complete.
- You can now reinstall macOS if desired or close the Recovery window to restart your Mac.
Erasing your hard drive from Recovery Mode is useful if you can’t boot normally into macOS or access Disk Utility. Just make sure to back up your data first.
Erase and Reinstall macOS
One of the most thorough ways to erase your Mac is to erase the disk and reinstall macOS from scratch. This will completely wipe the drive and install a fresh copy of the operating system.
To erase and reinstall macOS, you will need to boot into Recovery Mode. On an Intel-based Mac, restart your computer and hold Command + R to boot into Recovery Mode. This will launch the macOS Recovery system (source).
From the macOS Recovery menu, choose Reinstall macOS and follow the onscreen instructions. This will completely erase your drive and install a new copy of macOS and factory default apps (source).
Reinstalling macOS is the most thorough option if you want a completely clean slate. However, it takes time to redownload and reinstall all apps and data. It requires an internet connection and you will lose all user data and custom settings.
Erase SSDs vs HDDs
There are some key differences when it comes to erasing data from solid state drives (SSDs) versus traditional hard disk drives (HDDs). SSDs and HDDs have different underlying storage architectures that impact how data is written, erased, and overwritten.
On a HDD, data is stored on spinning magnetic platters. When you erase data, the drive simply marks the occupied sectors as available for new data. The existing data isn’t actually removed until it gets overwritten by new data [1].
SSDs have no moving parts. Data is stored in NAND flash memory cells arranged in pages and blocks. Erasing data involves resetting pages to a blank state by removing electronic charge. SSDs also use wear leveling and garbage collection processes that move data around, meaning erasing files doesn’t guarantee immediate removal of data from the physical media [2].
Due to these architectural differences, securely erasing SSDs requires using the drive’s built-in erase commands (like ATA Secure Erase), versus simply deleting files or formatting the drive. HDDs can be securely erased using multiple overwrites or physical destruction of the platters.
Secure Erase Options
If you need to securely erase your Mac’s hard drive to ensure no data can be recovered, there are a few options:
One is to use a dedicated secure erase tool like Disk Drill. This will completely overwrite the drive with random data to make recovery impossible. Disk Drill offers different levels of secure erase, with more passes taking longer but being more secure. A 3-pass erase is generally sufficient.
The downside to secure erase tools is the process can take hours depending on the size and speed of your drive. But they ensure no trace of your old data remains recoverable.
Apple’s Disk Utility also includes a “zero-out data” option when erasing, which overwrites data once. This is reasonably secure as long as confidential data is not a major concern.
In summary, secure erase tools like Disk Drill provide the best security by overwriting all data, though the process takes time. Disk Utility’s single zero-out pass offers decent security much faster.
Recover Deleted Files
If you accidentally delete important files when erasing your Mac’s hard drive, don’t panic. There are recovery options available. Data recovery software like iSkysoft Data Recovery can scan your drive and recover deleted files, even after a format. The key is to avoid writing new data to the drive, as this overwrites the deleted data.
Data recovery has the best chance of success if performed immediately after deletion. The longer you wait, the higher the chance of permanent data loss. As soon as you realize files were mistakenly deleted, stop using the drive and run data recovery software. This gives you the best shot at recovering your lost data.
However, recovery can still be possible even days or weeks later in some cases. Software like iSkysoft relies on scanning the drive and finding traces of the old deleted data. As long as that data hasn’t been overwritten, there’s a chance for recovery. But the odds diminish over time.
It’s also important to choose a reputable recovery tool like iSkysoft that offers deep scanning capabilities. Avoid untrusted software that could potentially damage the drive further. With the right tool, you’d be surprised how much data can be recovered after an accidental erase or format.
Summary
Erasing your Mac’s internal hard drive can be done in a few different ways depending on your needs. The easiest option is to use Disk Utility. Open Disk Utility, select your Mac’s internal drive, click Erase, choose a format, and click Erase again. For more security, you can erase from Recovery Mode or erase and reinstall macOS. To securely delete specific files, use a third party app.
The best method depends on whether you have a HDD or SSD. For HDDs, a simple erase in Disk Utility is typically sufficient. For SSDs, using the secure erase options in Disk Utility provides more protection by overwriting data. No matter what erase method you choose, make sure to have a current backup of your important files.
Following these steps will allow you to completely wipe your Mac’s hard drive before selling, giving away or reusing the computer. Just be aware that deleted files can potentially be recovered, so use secure erase options if your data is highly sensitive.