Seagate Tools for Windows is a software suite developed by Seagate Technology to help users manage and configure Seagate brand hard drives and solid state drives. It includes various utilities to test drive health, securely erase data, configure drive settings, and backup and restore data.
Overview of Seagate Tools for Windows
Seagate Tools for Windows allows users to manage Seagate drives through an easy-to-use graphical user interface. It works with internal and external Seagate hard disk drives (HDDs) and solid state drives (SSDs) connected via USB, Thunderbolt, FireWire, or SATA interfaces. The suite includes the following key features:
- Drive health monitoring – Check drive temperature, performance, and error counts.
- Drive diagnostics – Perform comprehensive tests to detect drive issues.
- Secure drive erase – Permanently delete data on a drive by overwriting it.
- Drive partition management – Create, delete, format, and manage drive partitions.
- Backup and restore tools – Create full system or file/folder backups, and restore from backups.
- Customizable settings – Configure drive sleep, LED behavior, and error handling.
- Drive updates – Download and install the latest drive firmware and security updates.
Seagate Tools for Windows provides drive utilities for both HDDs and SSDs. However, some tools like Secure Erase are optimized specifically for HDDs. The suite helps users monitor drive health, maintain optimal performance, securely erase sensitive data, and ease backup/recovery of important files.
Getting Started with Seagate Tools for Windows
Follow these steps to get started with Seagate Tools for Windows:
- Check compatibility – Seagate Tools works with most Seagate drives. Verify your drive model is supported.
- Download the software – Get the latest version from the official Seagate website.
- Install Seagate Tools – Run the installer and follow prompts to install on your Windows PC.
- Connect Seagate drives – Attach supported Seagate drives to your computer via USB, Thunderbolt etc.
- Launch Seagate Tools – Find the program in the Start Menu and open it.
- Detect attached drives – Seagate Tools will automatically detect supported drives.
- Select a drive – Pick a connected Seagate drive to manage from the list.
- Explore available tools – Use the various utilities to manage your drive.
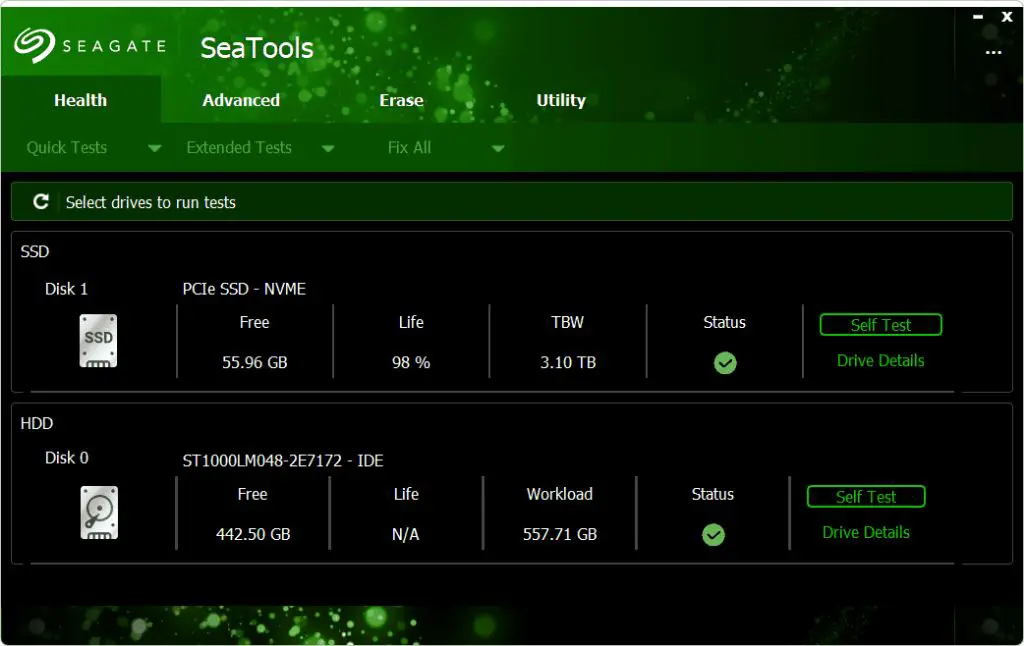
Take time to familiarize yourself with the Seagate Tools user interface. The dashboard clearly highlights the detected Seagate disk drives. Use the left pane to pick available utilities for managing the selected disk drive shown in the main window.
Key Features and Tools
Here is an overview of some of the most useful features and utilities bundled in Seagate Tools for Windows:
Drive Health Monitoring
Seagate Tools makes it easy to monitor the health of connected Seagate drives. It reports drive temperature, performance benchmarks, bad sector counts, and other vital statistics. The software can also be configured to send email alerts for early warnings if drive issues are detected.
Drive Diagnostics
The built-in diagnostics toolkit performs a comprehensive set of tests to identify potential drive problems. This includes:
- Short Drive Self Test – Quickly checks drive components.
- Drive Read/Write Heads Test – Checks electrical and mechanical head components.
- Sequential Media Scan – Scans drive media for readability issues.
- Random Seek Test – Checks drive head positioning and speed.
Based on test results, Seagate Tools provides actionable recommendations to resolve drive problems or recover data from failing drives.
Secure Drive Erase
Before disposing of an old Seagate drive, you can securely wipe all data from it using the Secure Drive Erase utility. It provides two methods:
- Quick Erase – Overwrites data once.
- Multi-Pass Erase – Makes 3-7 overwrite passes for higher security.
This utility permanently destroys all data on the selected Seagate drive to prevent unauthorized data recovery.
Backup and Restore
Seagate Tools enables simple backup and restoration of important files on your Seagate drives. The backup utility supports:
- Full system backup to protect everything on the drive.
- File or folder backup to selectively backup data.
- Incremental backup to only backup new/changed files periodically.
- Scheduling automated backups.
- Saving backup files as compressed images for efficiency.
You can restore backed up files and folders back to the original or new location. This protects against data loss in case of drive failures.
Drive Partition Management
You can use Seagate Tools to easily manage partitions on Seagate HDDs and SSDs without needing third-party partitioning tools. It enables actions like:
- Creating partitions and formatting with NTFS, FAT32, etc.
- Shrinking or expanding existing partitions.
- Deleting and merging partitions.
- Hiding and unhiding partitions.
- Changing partition labels and letters.
The intuitive Seagate drive partitioning toolkit simplifies management of partitions and volumes on external and internal Seagate drives.
Customizing Drive Settings
Configure customizable drive settings to control performance, acoustics, LED lights, and error handling on your Seagate drive. Tweak settings like:
- LED brightness, color, and activity light pulsing.
- Drive sleep and standby times for power savings.
- Write caching policies and acoustic profiles.
- Error recovery controls and failure alerts.
Tune your Seagate drive’s settings for optimal performance, minimal noise, and customized visual LED effects.
Compatibility and System Requirements
Seagate Tools for Windows is designed to work with a wide range of Seagate drive models. Here are the compatibility and system requirements:
Supported Drives
Seagate Tools supports the following Seagate drives:
- Internal desktop HDDs like Barracuda, IronWolf, SkyHawk
- Portable external HDDs like Backup Plus Portable
- External desktop HDDs like Expansion Desktop
- Solid state drives like Barracuda SSD and IronWolf SSD
- Older drive models (see official compatibility list)
Support varies for legacy Seagate drives. Refer to the detailed compatibility matrix on Seagate’s website.
Supported Operating Systems
Seagate Tools can be installed on Windows PCs running:
- Windows 7 SP1 and higher
- Windows 8 and 8.1
- Windows 10
- Windows Server 2012 and higher
The software is not compatible with the MacOS, Linux, etc. Non-Windows users can instead use Seagate’s Toolkit for disk utilities.
System Requirements
You PC should meet the following minimum system requirements:
- 1 GHz 32-bit (x86) or 64-bit (x64) processor
- 1 GB RAM (2 GB RAM recommended)
- 1.5 GB free disk space
- 1024 x 768 display resolution
- .NET Framework 4.5.2 or later
Administrator privileges are required to install and use certain features like drive erasing, partition management etc. Seagate recommends running the latest version of the software for best compatibility.
Installation and Setup
Installing Seagate Tools for Windows only takes a few quick steps:
- Download the Seagate Toolkit installer file from the official Seagate Support website. Get the latest version.
- Double click the downloaded Setup file and click Yes to allow it to make changes.
- On the setup wizard, accept the terms and click Next.
- Select features to install like drive utilities, documentation etc. Click Next.
- Confirm the installation folder location, typically C:\Program Files\Seagate. Click Next.
- Wait for the installer to copy files and extract components. This may take several minutes.
- When complete, check the box to launch Seagate Tools and click Finish.
If you get any driver compatibility prompts during setup, restart your PC and retry installation in Windows Safe Mode. This will prevent conflicts.
Once installed, Seagate Tools will launch automatically when you connect supported drives. The system tray icon indicates it’s running. You can also launch it manually from the Start Menu.
Using Seagate Tools for Common Tasks
Here are some step-by-step guides for using Seagate Tools to accomplish common tasks with your Seagate drives:
Checking Drive Health
- Launch Seagate Tools and select your Seagate drive.
- Go to the Tools section and click the Drive Health option.
- This will display drive temperature, performance benchmarks, bad sector count, and other stats.
- The performance results indicate if your drive speed is consistent with its specifications.
- Monitor this periodically to check for anomalies indicating potential drive issues.
Running Drive Diagnostics
- In Seagate Tools, under the Tools menu pick Drive Diagnostics.
- Select which diagnostics tests to run – short DST, read/write head check etc.
- Click the Start button to begin the automated test sequence.
- This will take 10-20 minutes typically. Progress will be shown.
- Once complete, the results will indicate if errors were found or not.
- If errors are reported, consider backup up data and replacing the drive.
Backing Up Files or Folders
- Under the Tools menu, launch Backup and Restore.
- Select Backup files and folders to open the backup wizard.
- Pick files or folders to backup by browsing and adding them individually or selecting the entire system drive.
- Choose backup destination like another Seagate drive or shared network location.
- Schedule recurring backups or start a one-time backup.
- Wait for the backup process to fully complete before disconnecting drives.
Erasing a Drive
- In Seagate Tools, select the drive to securely erase under the Tools menu.
- Choose Security Options and pick either Quick Erase or Multi-Pass Erase.
- Click Erase Drive and confirm you want to permanently destroy all data.
- The process will overwrite all drive data to make it unrecoverable.
- Multi-pass can take many hours to complete but is more secure.
These examples demonstrate just a few of the popular uses of Seagate Tools for maintaining and managing Seagate drives. The software makes it easy to complete many such tasks related to drive health, performance, backups, erasing, partitioning and more.
Diagnosing and Troubleshooting Issues
Seagate Tools for Windows aims to simplify drive management and reduce technical hassles. But in some cases, you may encounter issues like:
- Seagate Tools not detecting the connected drive
- Unable to run drive diagnostic tests
- Backup or partition management failing
- Error messages during operation
- Unexpected shutdowns and tools not responding
Here are some things to try when troubleshooting issues with Seagate Tools:
- Update Seagate Tools to the latest version in case the issue is fixed.
- Try disconnecting and reconnecting drive to reset detection.
- Change the SATA cable or USB port used for the drive.
- Check if the same error occurs on another computer.
- Boot into Windows Safe Mode to prevent conflicts from other software.
- Verify you have admin rights needed to run certain tools.
- Turn off any security software temporarily interfering with the drive utilities.
- Review Windows Event Logs for app crashes and disk errors.
- Ensure your drive’s firmware is updated for compatibility.
For advanced troubleshooting, contact Seagate Support and they can help diagnose the problem based on debug logs and identify a solution or workaround.
Conclusion
Seagate Tools for Windows offers an essential suite of drive management utilities optimized for Seagate HDDs and SSDs. It simplifies tasks like health monitoring, diagnostics, backups, drive erasing, partitioning, and security. The suite helps both home users and IT professionals maintain, manage, and utilize Seagate drives for optimal performance and safety of data. Seagate Tools works with most Seagate drive models and can be easily downloaded from the company’s support website. With its intuitive interface and seamless drive integration, Seagate Tools is a recommended utility for getting the most out of Seagate storage.