Formatting a hard drive for your Mac is an important step to optimize performance and ensure compatibility. Properly formatting the drive enables faster read/write speeds, improves reliability, and allows the drive to be used with Time Machine for backups. It also cleans the drive of any previous data or remnants from other operating systems, wiping it fresh for Mac. Additionally, choosing the right format prevents errors that might occur if the drive is incorrectly formatted or is using a format natively incompatible with macOS. The three main formatting options for Mac hard drives are APFS, Mac OS Extended (HFS+), and exFAT. Understanding the key differences between these formats will allow you to pick the best choice for your specific needs.
Different Formatting Options
The two main options for formatting a drive on a Mac are APFS (Apple File System) and Mac OS Extended (HFS+). APFS is newer and optimized for solid state drives (SSDs), while HFS+ is older and was designed for hard disk drives (HDDs).
APFS offers several advantages over HFS+. It supports strong encryption, faster directory sizing, space sharing within a container, cloning files and directories instantly, snapshots for backups, and better handling of document revisions. Overall, APFS provides better performance and reliability compared to HFS+ (Source).
However, benchmarks show minimal differences in read/write speeds between APFS and HFS+ on traditional hard drives. The performance gains of APFS are more noticeable on SSDs, where it can be up to 2x faster than HFS+ for read/write operations (Source). Overall though, APFS is newer and more advanced compared to the dated HFS+ system.
Choosing a Format
When formatting a hard drive for Mac, you need to choose between the Mac OS Extended format (also known as HFS+) and the newer Apple File System (APFS). The format you choose depends on several factors:
OS Compatibility: APFS is only compatible with macOS High Sierra and later. Older versions of macOS require HFS+. Check which version of macOS your Mac is running before choosing a format. If compatibility with older operating systems is important, use HFS+ [1].
Drive Type: APFS is optimized for solid-state drives like flash storage and SSDs. The format offers features like fast directory sizing, space sharing, and cloning. HFS+ is better suited for hard disk drives [2].
Features: APFS has more advanced features like native encryption, better file system integrity, and faster metadata operations. But HFS+ may be a better choice if you need Time Machine backups or Boot Camp support [3].
Consider which features are most important for your needs. In general, APFS is recommended for newer Macs with SSDs running High Sierra or later. Older systems may benefit from sticking with the tried-and-tested HFS+ format.
Formatting an External Drive
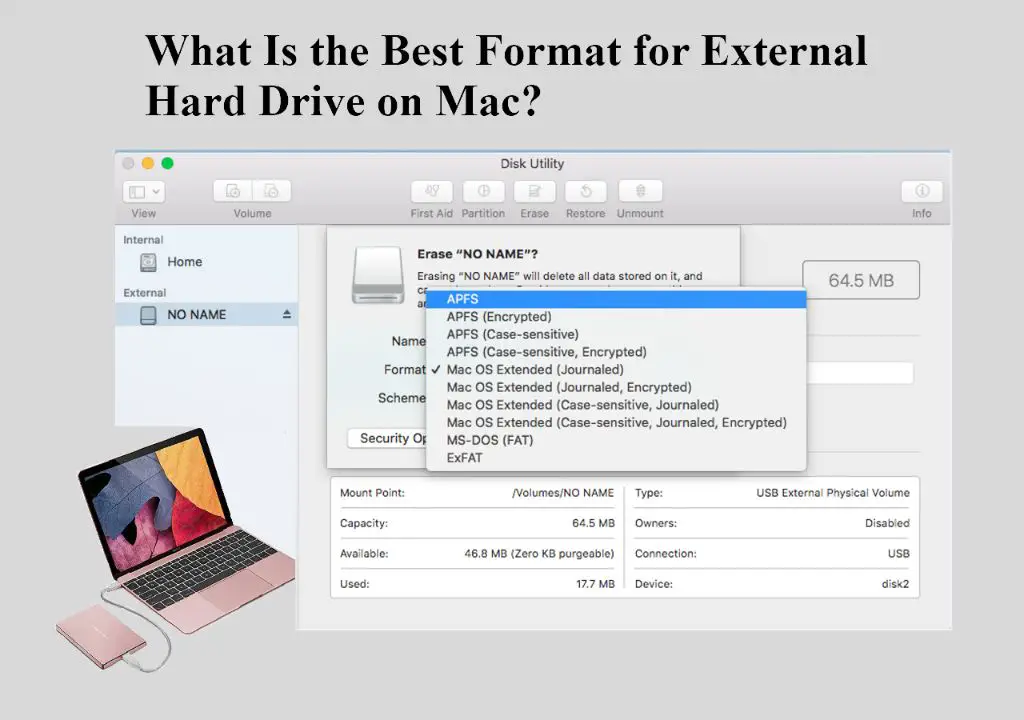
The easiest way to format an external drive on a Mac is to use Disk Utility. Disk Utility is an app included for free with every macOS install (Apple Support). To format an external drive in Disk Utility:
- Connect the external drive to your Mac.
- Open Disk Utility (located in Applications > Utilities).
- Select the external drive from the left sidebar.
- Click Erase at the top.
- Choose a format like APFS or Mac OS Extended.
- Give the drive a name.
- Click Erase to start the formatting process.
Disk Utility will format the external drive, write a new file system, and prepare it for use. The format APFS is optimal for SSDs, while Mac OS Extended works well for HDDs. Both formats support Time Machine backups.
When completed, the external drive will be formatted and ready to use with your Mac. You can easily transfer files back and forth from the external storage.
Formatting an Internal Drive
There are two main ways to format an internal drive on a Mac – using Disk Utility or the Terminal.
Disk Utility is an application included with macOS that provides a graphical user interface for managing disks and volumes. To format an internal drive with Disk Utility:
- Open Disk Utility (located in Applications > Utilities)
- Select the internal drive you want to format in the sidebar
- Click “Erase” at the top
- Choose a format like APFS or Mac OS Extended
- Give the drive a name
- Click “Erase” to confirm
For more advanced options, you can format a drive from the Terminal using the diskutil command. This allows you to do things like:
- Choose custom partition schemes
- Add encryption
- Perform secure erase options
To format a drive from Terminal:
- Open Terminal (located in Applications > Utilities)
- Type
diskutil listand identify the disk identifier for the internal drive (such as disk2) - Use
diskutil eraseDiskwith the disk identifier and chosen format (ex:diskutil eraseDisk APFS disk2)
For step-by-step guidance, refer to this guide: How to Format Internal Hard Drive Mac
Partitioning
Partitioning allows you to divide your hard drive into multiple logical volumes. This can be useful for organizing your data or creating separate partitions for different operating systems.
To partition your drive on a Mac, first launch Disk Utility. Select the hard drive you want to partition from the left sidebar. Click the “Partition” button at the top. From here, you can specify the number of partitions, their names, formats, and sizes. Make sure to click “Apply” when you are done to execute the changes.
When creating multiple partitions, you can choose between formats like Mac OS Extended (Journaled) for Mac or ExFAT for cross-platform compatibility. You can also select different partition schemes – GUID Partition Map for Intel Macs or Apple Partition Map for older PowerPC Macs.
Keep in mind that partitioning will erase all existing data on the drive. So make sure to backup your data first. The partition process may take some time to complete depending on the drive size and number of partitions.
Overall, Disk Utility provides an easy way to divide and format your Mac hard drive into multiple partitions. Just plan ahead and be cautious when repartitioning, as it can be a destructive process if not done properly. Refer to Apple’s Disk Utility guide for step-by-step instructions.
Encryption
One of the most important choices when formatting a drive is whether or not to enable encryption. macOS includes a built-in encryption option called FileVault that allows you to encrypt the contents of your drive.
Enabling FileVault encryption provides an extra layer of security by preventing unauthorized access to your data. When FileVault is enabled, the contents of your drive are encrypted using strong 256-bit AES encryption. To access the data, the correct password must be entered.
FileVault can encrypt the startup drive on your Mac as well as any external drives. Encrypting external drives is recommended if you store sensitive documents or information on them. Enabling encryption does come with a small performance hit, but for most users the increased security is worth it.
You can enable FileVault encryption when first setting up your Mac, or later on in System Preferences. Make sure you backup your data first, as enabling encryption will require reformatting the drive.
Erasing Data
When erasing data from a hard drive, it’s important to securely wipe the drive to prevent recovered data. Simply deleting files or reformatting the drive does not fully erase the data. To securely erase a drive on Mac:
1. Open Disk Utility and select the drive from the sidebar.
2. Click the Erase button in the toolbar. In the dialog, choose a name for the drive and select “Mac OS Extended (Journaled)” as the format.
3. Under “Scheme,” select “GUID Partition Map.”
4. Choose “35-Pass Erase” from the Security Options drop-down menu[1].
5. Click Erase. This will overwrite the drive 35 times, meeting the DoD 5220.22-M standard for securely wiping a drive.
Erasing with 35 passes will take much longer than a standard erase, but is necessary to prevent any chance of recovery. For quickly erasing an external drive, a 1-pass erase is sufficient.
[1]Apple Support: Erase and reformat a storage device
Troubleshooting
Formatting a drive can sometimes fail or encounter issues. Here are some common troubleshooting tips for formatting problems on a Mac:
If you get an error like “Erase process has failed” or “Couldn’t unmount disk”, the drive may not be properly mounted. Try unplugging the drive, restarting your Mac, and replugging the drive before attempting to format again. You can also try mounting the drive manually using Disk Utility or Terminal (source).
Your Mac’s OS version needs to be up to date to format and recognize newer drive formats. If formatting fails, check for any available macOS updates and install them before trying again (source).
The drive itself could be damaged, especially if you get errors like “Couldn’t open device” or problems with the partition map. You may need to try a different drive or contact the manufacturer if it’s still under warranty (source).
Third-party disk utility software sometimes works better than Disk Utility for formatting stubborn drives. Apps like DriveDx and iBoysoft Mac Data Recovery can forcibly reformat drives that give Disk Utility trouble.
If nothing seems to work, you may need to erase your Mac’s SMC and PRAM/NVRAM to reset the Mac’s hardware. This can clear out any glitches causing format issues.
Summary
In summary, there are a few key things to keep in mind when formatting a hard drive for Mac:
– The most common formatting options are APFS (for SSDs) and Mac OS Extended (for HDDs). APFS offers better performance and newer features.
– Both external and internal drives can be formatted using Disk Utility on your Mac. For external drives, connect the drive and open Disk Utility. For internal drives, boot to Recovery Mode.
– You can partition drives to create separate sections that function independently. This allows you to install multiple operating systems or keep data separate.
– Encrypting your drive adds an extra layer of security to protect sensitive data. Just be sure to remember your password.
– Erasing/resetting a drive completely wipes all data. Make backups first if needed.
– If you run into any issues formatting, try troubleshooting steps like using a different cable or port, verifying the drive format, or contacting Apple support.
Properly formatting your Mac drive using APFS or Mac OS Extended ensures maximum performance and compatibility for your needs.