What is the Toshiba Satellite Boot Menu?
The boot menu on Toshiba Satellite laptops allows you to select a boot device or access the BIOS settings. It is displayed when you first turn on the laptop, before the operating system loads. The purpose of the boot menu is to give you control over the boot process.
From the boot menu, you can change the boot order, which determines the order in which devices are checked for a bootable operating system. For example, you can set your laptop to first check for a bootable USB drive, then the hard drive. This allows you to boot from a different device than the default.
The boot menu also provides access to the BIOS (Basic Input Output System) settings. Here you can change configuration options, update the BIOS version, reset to factory defaults, and more. Any changes made in the BIOS will impact how the system boots up.
Overall, the Toshiba Satellite boot menu is an important interface that enables modifying boot order and accessing advanced firmware settings before the operating system starts.
Accessing the Boot Menu
To access the boot menu on Toshiba Satellite laptops, you need to press a specific key combination at a certain time during the boot process. The exact keys to press vary slightly between models, but generally involve tapping the F12, 0, or F2 key multiple times as the laptop powers on.
For most recent Toshiba Satellites, the method is to turn on or restart the laptop, then immediately and repeatedly tap the F12 key until the boot menu appears. This should occur within the first few seconds of the Toshiba or Phoenix splash screen being displayed. Timing here is important – pressing too late may boot straight into Windows instead. Continue tapping F12 until the menu comes up. [1]
On some models, the 0 key is used rather than F12. Turn on the laptop and tap 0 repeatedly instead. For older Toshiba Satellites, especially those running Windows 7, it may be the F2 key that needs rapid pressing to launch the boot menu at startup. [2]
So in summary, try F12, 0, or F2 when booting your Toshiba Satellite to access the boot menu. Keep tapping the key for a few seconds until the menu appears.
Using the Boot Menu
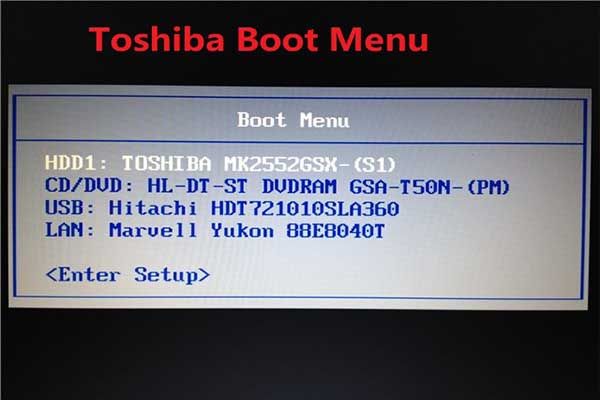
The boot menu allows you to select which device to boot your Toshiba Satellite from. Here are some tips for navigating and using the boot menu:
To navigate the boot menu, use the arrow keys on your keyboard. The up and down arrows will move the highlight to select different boot devices. Press Enter to boot from the highlighted device.
The boot menu will show different storage devices connected to your Toshiba laptop, such as the hard drive, DVD drive, USB drives, etc. Select the USB drive option if you want to boot from a USB.
To exit the boot menu without changing the boot order, press Esc or select the “Exit” option if available. This will continue booting from the default boot device set in the BIOS.
Once you’ve selected a boot device, your Toshiba Satellite will restart and boot from that device. Remember to exit the boot menu to return to the default boot order when you are done.
If your USB drive is not showing up in the boot menu, you may need to check the boot order settings in the BIOS to ensure USB boot is enabled first. Refer to this guide for further troubleshooting.
Change Boot Order
You may want to change the boot order on your Toshiba Satellite if you want it to boot from a different device, like a USB drive or external hard drive. Here are the steps to change the boot order using the boot menu:
First, access the BIOS settings from the boot menu. Restart your Toshiba Satellite and press the appropriate key to bring up the boot menu, usually Esc, F2, F12 or Del. From the boot menu, select the option to enter BIOS setup.
Once in the BIOS, locate the Boot or Boot Priority tab. This allows you to change the order in which devices are checked for bootable operating systems. Use the arrow keys to highlight the device you want to boot from first, usually the hard drive or solid state drive. Move it to the top using the F5 and F6 keys.
Finally, press F10 to save changes and exit BIOS. The computer will reboot and check devices for bootable OS in the new order you specified. Be sure to select the correct device containing your OS to boot into your operating system.
If the changes don’t seem to take effect, you may need to disable Secure Boot in the BIOS as well. This will allow more control over customizing the boot order.
Boot From USB
Booting from a USB drive can be useful for installing a new operating system, running diagnostics, or accessing files and programs.
To boot from USB on a Toshiba Satellite laptop:
- Create a bootable USB drive. This requires formatting the drive and transferring system files using a tool like Rufus or the Microsoft Media Creation Tool. See this guide for instructions.
- Insert the bootable USB drive into an open port and restart the laptop.
- Press the boot menu key (F12 or F2 on most Toshiba Satellite models) when the Toshiba logo appears to open the boot selection menu.
- Select the USB drive from the boot menu using the arrow keys and Enter.
- The laptop should now boot from the USB instead of the hard drive.
If the laptop does not detect the USB drive on boot, you may need to enable USB booting in the BIOS settings. The boot order priority can also be changed to prioritize USB drives first.
Boot From CD/DVD
The Toshiba Satellite allows you to boot from a CD or DVD disc. This can be useful for installing a new operating system, running diagnostics, or troubleshooting boot issues.
To boot from a CD or DVD:
- Burn your bootable disc image onto a CD or DVD. Make sure the disc is bootable and contains the operating system or tools you need.
- Insert the disc into your Toshiba Satellite while powered off.
- Power on your laptop and press the appropriate boot menu key during the initial boot process. On most Toshiba Satellite models this is F12.
- Select your optical drive from the boot menu to boot from the CD/DVD disc.
You may need to change the boot order in BIOS to prioritize the CD/DVD drive over the hard drive. To do this:
- Access the BIOS setup utility by pressing F2 during boot.
- Navigate to the “Boot” section of the BIOS.
- Prioritize the optical drive boot option over Hard Drive.
- Save changes and exit BIOS.
Now your Toshiba Satellite will check for bootable media in your CD/DVD drive first before booting from the hard drive. This allows you to easily boot into CD/DVD discs for system recovery, installations and more.
Resolve Boot Issues
Toshiba Satellite laptops can sometimes experience boot issues that prevent Windows from loading properly. Here are some tips for troubleshooting common boot problems:
If the laptop is stuck on the Toshiba splash screen, try letting it run for several minutes to see if it will boot up on its own. Sometimes updates or other background processes cause temporary delays at startup. If this doesn’t resolve it, try rebooting and tapping the F8 key repeatedly to access the Advanced Boot Options menu. From here, you can boot into Safe Mode or use other options to troubleshoot.
If Windows is loading but gets stuck or freezes, it may be caused by a software conflict. Restart in Safe Mode and see if the issue persists. If Safe Mode loads normally, it indicates a problematic app or driver that’s loading at normal startup. Use Safe Mode to uninstall recently added programs or update drivers.
For more persistent boot problems, you may need to access the recovery options in Windows. Press the F10 key on boot to access the BIOS menu. From there, select the Boot tab and change the boot order to boot from the recovery partition first. This will initiate the Windows recovery environment, where you can access system restore, refresh/reset Windows, or advanced startup options.
As a last resort, it may be necessary to reset the BIOS settings to factory defaults. This should only be done if absolutely needed, as it will erase all custom settings. Access the BIOS menu again using F10 and look for an option to load optimized or default settings. Save changes and exit to restart.
For additional troubleshooting, refer to this video guide or contact Toshiba support.
BIOS Updates
Keeping your Toshiba Satellite laptop’s BIOS up to date is important for maintaining system stability and compatibility with new hardware and software. Here are the steps to check your current BIOS version and update it if needed:
First, boot into your laptop’s BIOS setup utility, usually by pressing a key like F2 or Delete during startup. In the main BIOS menu, look for a section labeled “BIOS information” or similar to find the current BIOS version installed.
To get the latest BIOS update for your specific Toshiba Satellite model, visit the Toshiba BIOS updates page. Download the relevant BIOS file for your model and save it to a USB drive.
Finally, boot back into your BIOS setup utility and select the BIOS update option. This will initiate the flashing process to install the new BIOS file from your USB drive. Follow the on-screen prompts until the update completes. Flashing a new BIOS can help resolve many system issues and incompatibilities.
Reset BIOS to Defaults
Resetting the BIOS on a Toshiba Satellite laptop to its factory default settings can help resolve certain system issues and errors. The process is straightforward:
First, access the BIOS reset option by pressing F2 or Delete immediately after powering on the laptop to enter the BIOS setup utility. From there, navigate to the “Exit” tab and select “Load Default Settings” then confirm. This will restore the default BIOS settings.
Resetting to defaults clears any customized settings, including boot order, and reverts the BIOS to its original configuration. This can be useful for troubleshooting problems that may have been caused by incorrect or outdated BIOS settings.
It’s a good idea to reset the CMOS after updating the BIOS or if the laptop is having issues booting up properly. Just be aware that resetting will wipe any customizations made to the BIOS. Refer to your user manual if unsure about any specific settings.
Overall, the process to reset the Toshiba Satellite BIOS to factory defaults is very straightforward – simply access the BIOS, load defaults, save and exit. This can help resolve a variety of system issues caused by incorrect BIOS configurations.
Boot Menu on Other Toshiba Models
The key combination to access the boot menu can vary across different Toshiba models. Here are some of the common boot menu keys for other Toshiba laptop lines:
For Toshiba Portégé models, the key is typically F12. However, some models like the Portégé R830 use F2 instead [1].
On Toshiba Equium models, F12 is the standard boot menu key. This applies to laptops like the Equium A100 and Equium A210 [2].
For Toshiba Tecra laptops, F12, F1 or Esc can bring up the boot menu depending on the specific model. The Tecra A50 for example uses F12 [3].
Older Toshiba laptops predating the Satellite line also used F12 or F1 for the boot menu. So the key can vary even on vintage Toshiba models.
In summary, while F12 is the most common Toshiba boot menu key, it’s a good idea to check your specific model’s manual or support site to confirm the right key combination.
