Quick Answer
The bootable key on Toshiba laptops allows you to access the BIOS settings or boot menu. This key is typically one of the F keys along the top row of the keyboard, such as F2, F10, or F12. Pressing this key during startup will interrupt the normal boot process and allow you to select boot options like booting from a USB drive or DVD.
What Does the Bootable Key Do?
The bootable key on a Toshiba laptop provides access to the BIOS (Basic Input/Output System) settings and boot menu. When you first turn on a Toshiba laptop, it goes through a POST (Power-On Self Test) and then loads the operating system from the designated boot drive, typically the internal hard drive.
Pressing the bootable key during the initial startup will interrupt this process before the operating system loads. This brings up the BIOS settings screen or the boot menu, depending on when exactly you press the key.
From the BIOS, you can change low-level system settings like the boot order, enable/disable devices, set the system clock, and more. The boot menu allows you to select a temporary boot device like a USB drive or optical disc to start up from.
So in summary, the main functions of the Toshiba bootable key are:
– Access the BIOS setup utility to view and change system settings
– Select alternative boot devices like USB drives or DVDs
– Troubleshoot boot issues by booting externally or changing boot order
Which Key is the Bootable Key?
Toshiba uses several different keys for accessing the BIOS and boot menu depending on the specific laptop model:
– F2 – Most common bootable key on newer Toshiba laptops
– F12 – Most common key on older Toshiba models
– F8 – Used on some Toshiba Satellite laptops
– ESC or F10 – Seen on a few other Toshiba models
Generally, F2 or F12 are the most common choices across Toshiba’s laptop lineup. Some examples where these keys are used include:
| Toshiba Model | Bootable Key |
| Toshiba Satellite | F2 or F12 |
| Toshiba Portege | F12 |
| Toshiba Tecra | F2 |
| Toshiba Kirabook | F2 |
If you are unsure which key to use, you’ll need to check your specific model’s manual or use the trial-and-error method to figure out which F key enters the boot menu. The key is usually noted briefly during the POST screen when you first turn on the laptop.
How to Use the Toshiba Bootable Key
Using the Toshiba bootable key to access the BIOS or boot menu is straightforward:
1. Turn off the laptop if it’s currently on.
2. Press and hold the appropriate F key (F2, F12, etc) for your model.
3. While still holding the key, press the Power button to turn the laptop back on.
4. Keep holding the key down until you see the BIOS screen or boot menu appear. This typically takes 5-10 seconds.
5. The BIOS setup utility will allow you to navigate various system settings with the arrow keys and Enter key.
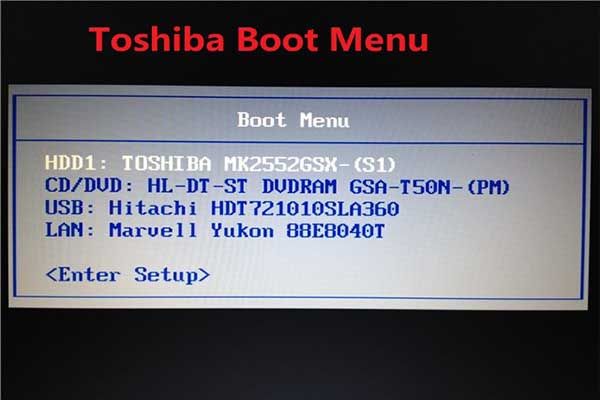
6. The boot menu will show you available boot devices to select as the temporary startup disk.
7. Select the desired boot device or make needed changes in the BIOS.
8. To exit and boot normally, choose the Exit option in the BIOS or your normal boot drive from the device menu.
Note that the boot menu key typically needs to be pressed each time you restart the computer, as it does not permanently change the boot order itself. Changing boot order in the BIOS would make the selection more permanent.
Key Things You Can Do From the Boot Options
Here are some of the most common and useful things you can do from the BIOS settings and boot menu accessed using the Toshiba bootable key:
– Select a different boot device to start up from, like optical media or an external USB drive. This enables you to boot independently from the internal hard drive.
– Change the boot order and set a USB drive or other external media as the first boot option. This allows quick access to alternate operating systems.
– Access system diagnostics and testing utilities included in the BIOS. This can help identify hardware issues.
– Adjust hardware settings related to storage, ports, graphics, security, and more. This allows fine-tuning devices and troubleshooting resource conflicts.
– Reset the BIOS settings to default values if they get configured incorrectly. A corrupted BIOS can prevent booting.
– View system information like the BIOS version, CPU type, installed memory, and other details.
So in summary, the boot options unlocked by the bootable key provide an escape hatch to boot externally, run diagnostics, and override standard boot for system repair and maintenance.
Reasons to Use the Bootable Key
Here are some of the most common reasons to use the Toshiba bootable key to enter the BIOS or access the boot menu:
– Booting from external installation media to install a new operating system or run recovery tools. This allows installing OSes like Windows, Linux, etc without an internal drive.
– Booting from a live CD/USB to access files on a hard drive with issues. For example, antivirus or recovery CDs.
– Selectively booting into alternate operating systems on a multi-boot computer. Allows choosing between Windows, Linux, etc.
– Resolving boot issues caused by missing system files or other damage. Booting externally circumvents internal drive errors.
– Changing the boot order to select a preferred boot device upon restart. Sets default startup disk.
– Checking detailed system information only available in the BIOS. Helps identify hardware issues.
– Reconfiguring hardware settings to resolve conflicts between devices. For example, IRQ conflicts.
– Resetting the BIOS to recover from crashing/freezing issues caused by incorrect settings. Gets BIOS settings back to a working state.
– Running hardware diagnostics to check for problems in system memory, storage, CPU, etc. Isolates faults.
So in summary, accessing the underlying boot options opens up many repair and troubleshooting options not normally available once the operating system starts loading.
How to Enter the Boot Menu on a Toshiba Laptop
Here is a step-by-step guide to enter the boot menu on a Toshiba laptop:
1. Start with the laptop powered off.
2. Press and hold the bootable key for your specific model. This is typically F2, F12, or another Function key noted in your user manual.
3. While continuing to hold the boot key, press the Power button to turn on the laptop.
4. Keep holding the boot key down until the Toshiba logo appears on screen.
5. Release the boot key when you see the text “F2 = System Setup” or “Please select boot device” appear. This indicates you’re in the BIOS or boot menu.
6. The BIOS setup utility will display basic system info and settings you can navigate with arrow keys.
7. For the boot menu, use arrows to select the drive or device to boot from one time.
8. When ready to boot, select the boot drive and press Enter or choose “Save” or “Exit” in the BIOS utility.
9. The computer will now boot from the selected device or drive this one time.
Following these steps should reliably bring up the boot options on any Toshiba laptop model so you can access boot devices, change BIOS settings, or run hardware diagnostics.
Conclusion
In summary, the bootable key allows low-level access to boot options before the operating system on Toshiba laptops. Pressing this key (typically F2, F12, or another Function key) during POST brings up the BIOS settings utility or the boot device selection menu. From here, you can change hardware settings, select alternative boot devices, and troubleshoot problems that prevent normal booting. Knowing how to access the Toshiba boot menu using the correct hotkey for your model provides important repair and maintenance abilities.