What is a Write Protection Switch?
A write protection switch is a physical mechanism built into some storage devices that prevents the data on the device from being modified or erased (Lenovo). It essentially makes the device read-only and protects against accidental or unauthorized writing.
The main purpose of a write protection switch is to safeguard important data by locking the device into a read-only state. This prevents any changes from being made to the data, either intentionally or unintentionally. It ensures the integrity and security of the contents on the device (Wikipedia).
The write protection switch physically disconnects the write circuitry inside the device. When switched on, it breaks the connection between the write head and the storage medium, making it impossible for the write head to alter the stored data. This renders the device read-only until write protection is disabled again (Computer Hope).
Types of Write Protection Switches
There are a few different types of write protection switches available on USB drives:
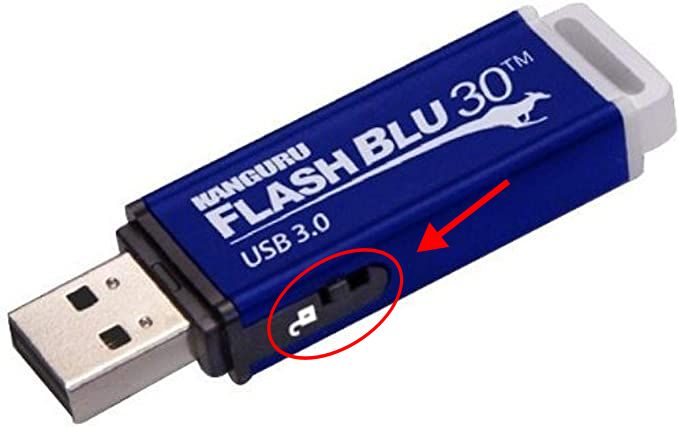
The most common is a physical switch that slides or toggles between on and off positions. This switch is built into the USB drive hardware and physically blocks the drive’s ability to write data when enabled. Sliding the switch to the locked position prevents files from being deleted or changed on the drive. These types of switching mechanisms vary between manufacturers, with some using a sliding tab and others a small toggle.
Another method is through software write protection. Some USB drives have a setting built into their software that can enable or disable write protection. This is configured through the drive’s settings interface or proprietary software. The drive interface essentially ignores any write commands when write protection is enabled via software. This allows protecting the drive’s contents without physically locking the hardware switch.
For permanent write protection, some methods like covering the USB connectors with epoxy resin can be used. This physically blocks the connectors to prevent any changes to the drive. There are also hardware methods like removing onboard flash memory chips or fuses that can enable permanent write protection. However, these methods are usually not reversible.
Using the Physical Switch
Many USB drives come with a physical write protection switch to prevent data from being overwritten or deleted. These switches are typically located on the side or edge of the USB drive housing.
On most models, the switch slides or toggles between two positions to enable or disable write protection 1. When write protection is enabled, the switch is slid into the “Lock” position. This blocks any write operations to the drive. To disable write protection, the switch is slid back into the “Unlock” position.
Some USB drives use an LED light near the switch to indicate the status. A solid or blinking light means write protection is active, while no light means it is disabled. The LED gives visual confirmation that the drive is in read-only mode 2.
Toggling the physical switch makes it easy to enable write protection when needed, like when transporting sensitive files. Just remember to disable it again when you need to modify data on the drive.
Enabling Software Write Protection
In addition to physical write protection switches, many USB drives can be write protected through software settings. This allows users to enable write protection without physically moving a switch on the drive.
One way to set software write protection is through USB drive utilities provided by the manufacturer. For example, SanDisk offers a SecureAccess application that can password protect files and set read-only access. Kingston’s Device Manager tool enables write protection on select USB drives as well.
On Windows, write protection can also be enabled through the Device Manager. To do this, connect the USB drive, right click it in Device Manager, and select Properties. In the Properties window, go to the Policies tab and check “Read Only” to prevent files from being modified or deleted on that drive.
Software write protection gives users more flexibility than physical switches. It can be easily enabled, disabled, and configured through software rather than physically manipulating the USB drive hardware.
Permanent Write Protection
Some USB drives have a physical write protection switch, while others can be permanently write protected through software tools. Permanent write protection prevents any changes to the drive’s data until it is reversed.
One hardware method is removing the small tab from inside the USB connector, which enables write protection that cannot be disabled through software (Source). Some bootable tools like HP USB Disk Storage Format Tool can also set permanent firmware write protection on drives (Source).
The main benefits of permanent write protection are preventing any accidental or malicious changes to important data on the drive. It also allows safely sharing the drive without worrying about others modifying anything. However, it limits flexibility since you cannot add or edit files until reversing the write protection.
Permanent hardware write protection is more robust than software methods like file attributes. But software tools allow more control over selectively write protecting files or partitions. Overall, permanent write protection is best for archiving unchanging data like operating system files orregulated content.
Uses & Benefits
The main uses and benefits of a write protection switch on a USB drive are preventing accidental deletion of data, securing sensitive data from modification or deletion, and limiting drive viruses and malware.
With write protection enabled, you don’t have to worry about accidentally formatting the drive or deleting critical files. The write protection acts as a safeguard against human error that could result in data loss (Barman). This makes write protected USB drives ideal for storing important documents, financial records, photos, or other irreplaceable data.
Write protection also secures sensitive data against unauthorized changes or tampering. Once enabled, no one can intentionally or accidentally modify, overwrite, or delete the data. This prevents compromised drives from spreading malware or allows someone to secretly alter files (Lenovo). Government agencies, financial institutions, healthcare organizations, and others rely on write protection when transferring confidential data.
By limiting any writes to the drive, viruses and malware cannot infect or propagate through the USB drive. The immutable data preserves forensic evidence for law enforcement and protects systems from malicious payloads.
Drawbacks & Limitations
Enabling write protection on a USB drive has some notable drawbacks and limitations to be aware of:
Inability to save new data to the drive – Once write protection is enabled, no new data can be saved to the drive. This prevents making any changes or additions to files already on the drive. Attempting to save new data will result in errors.
Troubleshooting usability issues – If you run into problems using a write protected drive, it can be difficult to troubleshoot and fix issues since you cannot make any changes to the drive. This could require disabling write protection to resolve problems.
Confusion over state of write protection – It may not always be clear whether a USB drive is currently write protected or not based on looking at it. Accidentally trying to save data to a protected drive could lead to frustration.
Overall, while write protection has benefits for securing data, it can also introduce headaches if you need to use the drive more dynamically. Understanding these limitations is important when deciding whether to enable write protection.
Troubleshooting Issues
There are a few common issues that can occur with write-protected USB drives:
Drive not showing up correctly: If your USB drive is not being detected properly by your computer, it could be due to write protection being enabled. Try toggling the physical switch on the drive to the opposite position and reconnect it to your computer (Reference: https://linustechtips.com/topic/416956-gorilladrive-16gb-usb-write-protected/).
Read-only errors: You may get errors about not being able to save or modify files on the drive. This is because write protection is turned on. Disable write protection in the software or via the physical switch to resolve this (Reference: https://linustechtips.com/topic/62231-usb-write-protected/).
Corrupted data problems: Write protection can sometimes lead to data corruption if enabled while writing files. Scan the drive for errors and consider reformatting it to fix corruption issues.
Removing Write Protection
There are a few ways to remove write protection from a USB drive depending on the type of protection enabled.
For USB drives with a physical write-protect switch, you simply need to slide the switch back to the off position. The switch is typically located on the side of the USB drive and sliding it towards the USB port will disable write protection. This allows full read/write access to the drive again[1].
If software write protection was enabled, you can disable it through your operating system’s settings or third party software used to enable it. For example, on Windows you can go to Device Properties > Policies > Optimize for Performance to remove the write protection[1].
For permanent write protection, you may need a third party removal tool designed for your specific USB drive brand. Tools like HP USB Disk Storage Format Tool or Transcend JetFlash Recovery Tool can remove hardware-level protection applied at the factory[1]. However, this will erase all data on the drive.
In summary, toggling physical switches, changing software settings, or using removal tools can all disable write protection depending on how it was enabled in the first place.
[1] https://4ddig.tenorshare.com/usb-recovery/remove-write-protection-from-usb-windows-10.html
Summary
Write protection switches or modes prevent files on a USB drive from being altered, deleted, or copied. They provide a useful safeguard against accidental data loss or corruption from viruses. However, they can also cause headaches if you need to format, update, or make changes to files on the drive.
Enabling write protection is recommended when storing important data you want to keep in its original state. But it’s best to avoid write protection if you need to frequently add, edit, or erase files on the drive. The physical slider switch offers a quick on/off toggle, while software write protection gives more granular control. Just be aware that removing write protection requires extra steps compared to a normal USB drive.
In summary, write protection has its benefits for archiving unchanging data, but weigh whether the extra precautions are worth the inconvenience. Check both physical and software write protection settings if you get “disk is write protected” errors. With the right expectations, write protection can effectively safeguard your irreplaceable files.
