RAID stands for “Redundant Array of Independent Disks” and refers to a way of combining multiple physical disks into a single logical unit to improve performance and/or reliability. The main benefits of using RAID for home users include:
Improved performance – By spreading data across multiple disks, RAID can allow for faster reads and writes. For example, RAID 0 stripes data across disks with no redundancy, optimizing for speed.
Increased capacity – Multiple disks can be combined to create a larger logical volume.
Redundancy/fault tolerance – If a disk fails, the data can be rebuilt from parity or a mirrored copy. Common redundant RAID levels include RAID 1, RAID 5, and RAID 6.
The most common RAID levels used in home NAS setups are:
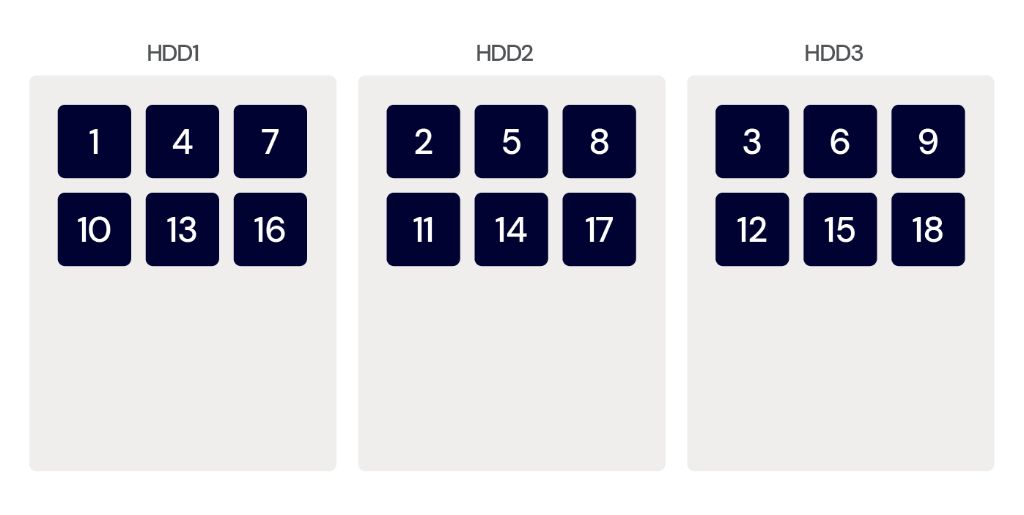
- RAID 0 – Stripes data across disks for performance, no redundancy
- RAID 1 – Mirrors data across disks for redundancy
- RAID 5 – Stripes data and parity across disks, allowing for 1 disk failure
- RAID 6 – Stripes data and dual parity, allowing for 2 disk failures
- RAID 10 – Mirrored stripes, combines mirroring and striping
The right RAID level depends on your specific needs for capacity, speed, and data protection.
RAID 0
RAID 0, also known as disk striping, is a RAID configuration that splits data evenly across two or more drives with no parity or mirroring (TechTarget, 2022). The main benefit of RAID 0 is improved performance since data can be read and written in parallel across multiple disks (IONOS, 2023).
RAID 0 arrays provide faster read and write speeds compared to a single disk, making them well-suited for applications that demand high I/O performance like video editing or gaming. However, RAID 0 provides no redundancy or fault tolerance. If one drive fails, all data across the array will be lost. For this reason, RAID 0 is generally not recommended for mission critical data or system drives.
Key pros of RAID 0:
- Increased read/write performance
- Full capacity utilization
Key cons:
- No fault tolerance
- Entire array fails if one drive goes down
Overall, RAID 0 can deliver blazing fast speed but with serious risks. It’s best suited for non-critical data where performance is paramount over redundancy.
RAID 1
RAID 1, also known as disk mirroring, creates an exact copy of a drive by writing identical data to two or more drives simultaneously (Source: https://www.ionos.com/digitalguide/server/security/raid-1/). This provides redundancy and increases fault tolerance. If one drive fails, the system can instantly switch to the mirrored drive with no downtime. RAID 1 requires at least two drives of equal size. The usable storage capacity will be equal to the capacity of one drive.
The key advantages of RAID 1 include:
- Enhanced data security and integrity since all data is written to multiple disks (Source: https://www.liquidweb.com/kb/raid-level-1-5-6-10/)
- Improved read performance and data throughput speeds since data can be read simultaneously from multiple disks (Source: https://www.stellarinfo.co.in/blog/advantages-and-disadvantages-popular-raid-systems/)
- High availability since the system can continue operating if a single disk fails
The main disadvantages are:
- Higher cost since twice the number of disks are required compared to a single disk
- Lower storage efficiency as only 50% of total capacity is usable
- Slower writes as data has to be written twice
RAID 1 is best suited for situations where high availability, fault tolerance, and data integrity are critical, such as databases, email servers, and other mission-critical systems. It offers redundancy without the complexity of parity calculation in RAID 5. For home NAS systems, RAID 1 provides a simple mirrored option if protecting data is the priority over storage capacity.
RAID 5
RAID 5 uses distributed parity and striping (https://www.techtarget.com/searchstorage/definition/RAID-5-redundant-array-of-independent-disks). Data and parity information is striped across all disks in the array. The parity information allows for recovery of data in the event of a single disk failure. RAID 5 requires a minimum of 3 disks.
Some key advantages of RAID 5 include (https://www.stellarinfo.co.in/blog/advantages-and-disadvantages-popular-raid-systems/):
- Increased read performance compared to a single disk or mirrored disks
- Ability to withstand the failure of 1 disk without data loss
- Cost efficient – uses less disks than mirroring for same usable capacity
Some disadvantages of RAID 5 include:
- Reduced write performance compared to a single disk due to parity calculation overhead
- Increased risk of data loss during resilvering after a disk failure
- Not ideal for large capacity drives due to greater rebuild times and error rates
RAID 5 provides a good balance of performance, redundancy, and efficiency for home and small office use cases needing increased capacity without mirroring. However, for mission critical data, RAID 6 or 10 may be preferable.
RAID 6
RAID 6 is a storage configuration that uses block-level striping with double distributed parity. This means that data is distributed across multiple disks, similar to RAID 0, but RAID 6 uses parity data on two disks to allow for the failure of up to two disks without data loss (TechTarget).
Some key advantages of RAID 6 include:
- High fault tolerance – With double parity, RAID 6 can withstand the failure of up to two disks without data loss.
- Good performance – Read speeds are fast since data is striped across multiple disks. Write speeds are slower than RAID 0 or 1 due to parity calculation.
- Capacity efficiency – Only two disks are needed for parity, so RAID 6 is more storage efficient than RAID 1.
Some disadvantages include:
- Slow write performance – The parity calculation can impact write speeds.
- Long rebuild times – Rebuilding a failed drive takes longer due to the double parity.
- High cost – RAID 6 requires a minimum of 4 drives.
RAID 6 is best suited for situations that require high fault tolerance and capacity, such as large storage pools and data archives. The ability to withstand two disk failures makes it a good option for mission critical data (IONOS).
RAID 10
RAID 10, also known as RAID 1+0, is a hybrid RAID level that combines mirroring and striping to provide increased performance and fault tolerance. It requires a minimum of four drives and combines a RAID 1 mirrored pair with a RAID 0 striped set.
With RAID 10, data is written in stripes across primary disks while a duplicate set of data stripes is maintained across mirrored disks. This provides the performance benefits of RAID 0 striping and the fault tolerance of RAID 1 mirroring. If one drive fails in the RAID 10 array, the data can be rebuilt from the mirrored drive.
Some of the key benefits of RAID 10 include:
- Increased read and write performance compared to a single drive or RAID 1
- Ability to withstand multiple drive failures as long as no more than one drive fails in each mirrored set
- Relatively simple to implement and doesn’t require parity calculations like RAID 5/6
The downsides of RAID 10 include:
- High disk overhead, requires minimum 4 drives and only stores the equivalent capacity of half the number of drives
- More expensive than RAID 5 or 6 for large arrays
- Rebuild times can be long after a failure since entire disks have to be copied
RAID 10 is best suited for applications that require high performance and availability such as databases, virtualization, email servers etc. The combination of mirroring and striping makes it a good fit for transactional workloads that require low latency and high I/O. It provides a balance of speed, fault tolerance and usable capacity.
Comparison of RAID Levels
When choosing a RAID level, it is important to compare the key attributes, pros, cons, and typical use cases. This side-by-side comparison covers the most common RAID levels for home NAS systems.
RAID 0
RAID 0 (also called striping) spreads data across multiple disks with no redundancy. It offers fast read/write speeds by striping data in parallel across disks, but provides no fault tolerance. If one disk fails, all data will be lost. RAID 0 is best for non-critical data where speed is most important.
RAID 1
RAID 1 (also called mirroring) duplicates data across disks for redundancy. It provides good read performance and 100% redundancy, as all data is copied on a second disk. But write performance suffers due to the need to write copies. RAID 1 protects against disk failure but not controller failure. It is ideal for critical data that needs full redundancy.
RAID 5
RAID 5 stripes data across disks with distributed parity information that allows for one disk failure without data loss. It provides good read performance and 100% redundancy for one disk failure. But write performance suffers due to parity calculation. RAID 5 is commonly used for important data that requires fault tolerance and efficient storage.
RAID 6
RAID 6 is similar to RAID 5 but with dual distributed parity, allowing for two disk failures without data loss. It provides fault tolerance for up to two failed disks. But RAID 6 has slower write performance than RAID 5 due to more complex parity calculations. It offers excellent redundancy for critical data at the cost of some speed.
RAID 10
RAID 10 combines mirroring and striping for both speed and redundancy. It mirrors two stripes of disks, providing fast read/writes by striping across mirrors. RAID 10 can withstand multiple disk failures so long as no mirror loses all disks. It requires at least 4 disks and offers a balance of speed, redundancy, and storage efficiency.
Choosing a RAID Level
Choosing the right RAID level depends on your specific needs and priorities. Here are some key factors to consider:
- Performance – RAID 0 offers the fastest performance for read and write operations, while RAID 1 and RAID 5 have slower write speeds due to parity calculations. RAID 10 balances speed and redundancy.
- Redundancy – RAID 1 and RAID 10 provide the best redundancy for disk failure protection. RAID 5 provides redundancy for 1 disk failure. RAID 0 has no redundancy.
- Capacity – RAID 0 makes full use of disk capacity, while parity RAIDs like RAID 5 use some capacity for parity data. Mirrored RAIDs like RAID 1 require at least 2 disks.
- Cost – RAID 1 and RAID 10 are more expensive since they require more disks. RAID 5 provides good economy for redundancy. RAID 0 is most affordable but lacks redundancy.
- Ease of recovery – RAID 1 and RAID 10 allow for easy disk replacement and rebuilding. RAID 5 rebuild times can be long with large arrays.
For home NAS use, RAID 1 provides a simple redundant setup for backing up important personal files and photos, while RAID 5 is recommended for media servers that need large capacities. RAID 10 balances performance and redundancy for more demanding use cases. RAID 0 may be appropriate for scratch disks with non-critical data.
Online RAID calculators and resources like the Backblaze guide can provide specific recommendations based on your planned number of disks.
Implementing RAID
Setting up a RAID array requires some specific hardware and software requirements depending on the type of RAID you want to implement. For software RAID using Windows 10, you’ll need:
- A computer with at least two internal SATA hard drives or SSDs of equal capacity for RAID 0 or 1 configurations (cite: https://www.diskinternals.com/raid-recovery/how-to-set-up-raid/)
- RAID controller capable of supporting the RAID level you want to implement (cite: https://www.hp.com/us-en/shop/tech-takes/how-to-set-up-raid-windows-10-pc)
- Windows 10 OS
The basic steps for setting up software RAID in Windows 10 are:
- Open up Disk Management in Windows 10 by right clicking on Start Menu and selecting “Disk Management”
- Initialize each hard drive you want to include in the RAID array
- Right click on the unallocated space on one of the drives and select “New Mirrored Volume” for RAID 1 or “New Striped Volume” for RAID 0
- Select the disks you want to include in the array
- Specify the RAID volume size and drive letter
- Allow the process to complete, which may take some time depending on the drive sizes
For hardware RAID, you’ll need a dedicated RAID controller card and the physical hard drives. The setup process will depend on the specific controller and its configuration utility.
Maintaining and Monitoring
It’s crucial to maintain your RAID array properly to ensure maximum uptime and prevent data loss. Some best practices include:
- Check the disk health status regularly using tools like Stellar RAID Recovery or Nagios XI to monitor for signs of disk failure.
- Replace failed disks immediately to avoid overtaxing the remaining disks.
- Follow the manufacturer’s guidelines for drive firmware updates, temperature thresholds, vibration control, etc.
- Use enterprise-grade disks designed for RAID rather than consumer-grade disks.
- Consider hot spares to allow quick rebuilt after disk failure.
Tools for monitoring RAID health and status include:
- LSI MegaRAID Storage Manager for LSI RAID controllers.
- Disk management utilities like Stellar Disk Manager.
- SMART monitoring tools to check disk health metrics.
- Operating system utilities like
mdadmfor Linux software RAID. - Third-party monitoring platforms like Nagios XI and Zabbix.
Monitoring RAID health regularly and following best practices for maintenance helps prevent failures and ensure maximum uptime.