Introduction
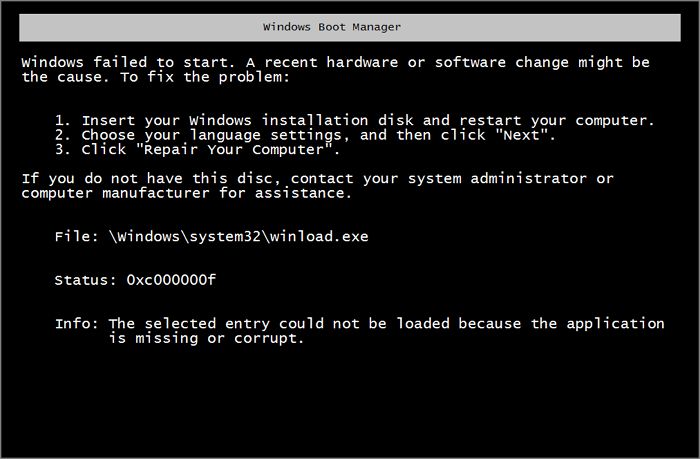
A failed boot is when a computer is unable to load the operating system during the boot process. This can be caused by a variety of issues such as hardware failures, software corruption, or configuration problems. A failed boot prevents accessing the operating system, programs, and data on the computer’s hard drive. It essentially renders the computer unusable beyond the BIOS or boot menu. This is problematic for several reasons:
- Prevents everyday use of the computer until the issue is resolved.
- Could result in permanent data loss if failures are related to hard drive issues.
- Causes productivity and workflow disruptions for the user.
- Requires time-consuming troubleshooting and repairs to fix.
- In business settings, can lead to revenue and opportunity losses.
Therefore, it’s important to understand the common reasons for failed boots and how to troubleshoot them in order to get the system functioning again as quickly as possible.
Check the BIOS
The BIOS (Basic Input/Output System) controls the basic startup operations of the computer. It is a good first troubleshooting step to check the BIOS for errors or incorrect settings that could be preventing the PC from booting properly.
To check the BIOS, restart the computer and press the BIOS access key (often Delete, F1, F2, F10 or F12) during the initial boot process to enter the BIOS settings menu. Here, look for a few common issues:
- Check that the boot mode for storage devices is set properly, usually to AHCI or RAID mode depending on your system.
- Make sure the boot order lists the correct storage device that contains the operating system first.
- Check for any other incorrect settings like disabled security features.
Making changes and saving can reset the BIOS to boot properly. If the BIOS itself is corrupted, it may need to be re-flashed or updated to restore functionality.
Check hardware connections
One of the most common reasons for a failed boot is improperly connected or faulty hardware. Before troubleshooting other issues, it’s important to check that all of your PC’s internal components are properly seated and connected.
First, make sure that both the power and data cables are securely attached to each of your storage drives, including your primary boot drive. Loose or disconnected cables are a frequent cause of boot errors. You should also confirm that storage drives are properly mounted in their bays 1.
Next, check that your RAM modules are fully inserted in the correct motherboard slots. Boot failure can occur with improperly installed RAM. The same applies to your graphics card – make sure it is properly seated in the PCIe slot and has supplementary power connected if required 2.
Finally, inspect the motherboard power connectors, processor socket, and fans to ensure no loose connections. Reconnecting all power and data cables is recommended as a first step in troubleshooting boot failure.
Test hardware components
One of the key troubleshooting steps when dealing with a failed boot is to test individual hardware components and try booting with only the essentials installed. This helps isolate if a faulty or incompatible component is causing the boot failure.
First, remove any non-essential hardware like additional hard drives, expansion cards, and external peripherals. Then, try booting with just the CPU, 1 RAM stick in the primary slot, integrated GPU if available, and the system drive connected.
If it boots properly with just the essential hardware, begin adding components back one at a time while testing after each addition. If the failures returns after adding a specific component, that points to it being faulty or incompatible.
According to How to Determine PC Boot Failure Causes, “One of the best ways to test for hardware failure is to remove all unnecessary hardware and boot the computer with only the essential components. This will confirm whether the issue stems from a flaky component.”
This methodical approach helps isolate the root cause when troubleshooting a failed boot situation.
Reset CMOS
One step to troubleshoot a failed boot before the operating system loads is to reset the CMOS (Complementary Metal-Oxide Semiconductor). The CMOS stores your BIOS settings and configuration information. Resetting it clears these settings and restores the CMOS back to factory default.
There are two main ways to reset the CMOS on a motherboard:
- Remove the CMOS battery for a few minutes. This battery provides power to keep the CMOS settings saved when the computer is turned off. Removing it temporarily erases the settings.
- Use the CMOS reset jumper or button. Motherboards have a reset jumper or button that can be used to clear the CMOS. Refer to your motherboard manual for the location and steps.
After resetting the CMOS, the BIOS settings will be reset to default. This can resolve boot issues caused by incorrect or corrupted BIOS settings that were preventing a successful boot. However, resetting the CMOS will not fix hardware failures or component damage. But it is one troubleshooting step to try before the operating system loads.
Sources:
https://forums.tomshardware.com/threads/pc-wont-boot-until-i-clear-cmos.3131009/
https://www.reddit.com/r/MSI_Gaming/comments/gq5y6g/no_monitor_signal_when_booting_only_cmos_reset/
Update BIOS
If you suspect the BIOS update failed or introduced an incompatibility, try flashing the latest BIOS version for your motherboard 1. Locate the latest BIOS from your manufacturer’s website and follow their instructions to flash the BIOS using a USB drive. Flashing the BIOS rewrites the entire BIOS chip with a fresh copy, which can resolve issues from a bad flash or buggy BIOS version. Make sure not to interrupt the flashing process. If flashing the latest BIOS still doesn’t allow booting, you may need to clear the CMOS or replace the motherboard.
Check boot order
One of the first troubleshooting steps when a computer fails to boot properly is to check that the boot order or boot sequence in the BIOS is set correctly. The boot order determines the order of devices that the computer will check to find an operating system to load. Make sure the boot order lists the drive with your operating system first. This is usually the hard drive or SSD. If it is out of order or a different drive is listed first, it may cause boot problems or fail to start the operating system.
To check and set the proper boot order:
- Access the BIOS setup utility, usually by pressing a key like F2, F10 or Del during bootup.
- Navigate to the “Boot” section and look at the boot order/sequence.
- If necessary, use the arrow keys to move the correct drive to the top of the boot order.
- Save changes and exit BIOS.
If the computer is set to boot to another device before the system drive, it may explain the failed boot. Try setting the proper drive with the operating system to be first in the boot sequence.
It’s also possible to select a specific drive to boot from temporarily without changing the BIOS boot order. During POST, you can usually press F9, F10 or F12 to select a boot device for just that one boot.
If you cannot access BIOS or it does not seem to allow changing the boot order, you may need to reset the BIOS to default settings. There may also be other settings like secure boot interfering.
Check for physical damage
Before troubleshooting other components, physically inspect the motherboard, CPU socket, and RAM slots for any signs of damage. Look closely for bent or broken pins in the CPU socket, which can prevent proper contact between the CPU and motherboard. Also check for any bent or damaged pins in the RAM slots, as this can lead to RAM not being detected. Carefully examine the capacitors on the motherboard for any signs of bulging or leaking, which can cause a wide variety of problems.
Additionally, check for loose cables or connectors. Make sure the power supply cables are firmly plugged into the motherboard power connectors. Reseat connectors for front panel buttons/LEDs, USB ports, etc. If your case uses riser cables for PCIe slots, check that the GPU is properly seated in the riser. Finally, examine for any signs of physical damage like cracks in the motherboard itself. A physical issue like damaged pins or deteriorated capacitors can prevent the computer from booting properly.
Sources:
How does physical damage reduction work exactly?
byu/zuckerjoe inpathofexile
https://pathofexile.fandom.com/wiki/Physical_damage_reduction
Try system repair tools
One troubleshooting step before the operating system loads is to try system repair tools from a bootable USB or DVD. Windows includes several built-in repair tools that can diagnose and fix boot issues.
Some recommended repair tools to try are:
- chkdsk – Checks the drive for errors and attempts to fix any found errors. Can fix corruption issues that are preventing boot.
- bootrec – Repairs the master boot record, boot sector, or BCD store. Useful for fixing bootloader issues.
- sfc – Scans system files and replaces damaged or corrupt files. Can restore important system files needed for booting.
To use these tools, you’ll need to create a bootable USB or DVD with the Windows recovery tools. The Windows 10 recovery drive contains the necessary repair tools.
Booting from the USB or DVD will load a recovery environment. From there you can access the Command Prompt to run chkdsk, bootrec, sfc, and other repair commands to diagnose and fix the boot issue.
Replace faulty component
If all other troubleshooting steps fail to resolve the boot issue, it may be time to replace a faulty hardware component. Common culprits include the RAM and motherboard.
Start by removing and reseating the RAM modules. If the issue persists, try booting with only one RAM stick installed at a time to isolate if one module is bad. Faulty RAM can prevent successful booting.
The motherboard could also be the cause of boot problems. Motherboard failure is rare, but does happen over time. If you recently replaced the CPU or motherboard, make sure the BIOS is properly configured and compatibility issues are ruled out. According to this Microsoft Answers post, changing motherboard settings to CSM or Legacy BIOS can help fix boot issues after swapping the motherboard.
As a last resort, replace the suspected faulty component like the RAM or motherboard. Hardware incompatibility or failure can prevent booting even before the operating system loads.
