Don’t Panic, Your Data May Still Be Recoverable
Accidentally erasing files from your Mac can be stressful, but try not to panic just yet. In many cases, erased files and data can be recovered, as long as you act quickly and avoid using the computer further. When you delete a file on your Mac, the operating system does not immediately overwrite the data on your hard drive. Instead, it simply marks the space that file was occupying as available for new data. The original data from the deleted file remains on your hard drive until it gets overwritten by something else.
Therefore, if you stop using your Mac right away after accidentally erasing files, the chances of recovering that data are good. There are various data recovery software tools and services that can scan your hard drive and restore deleted files that have not yet been overwritten. The key is to not save or move anything new onto your Mac until after you have recovered the erased data, as this increases the risk of permanent data loss.
While accidental file deletion can be disheartening, try to stay calm and know that your data may still be retrievable. Just be sure to stop using your Mac right away and look into the data recovery options covered in this guide.
Stop Using the Mac Immediately
If you’ve accidentally erased your Mac, it’s crucial to stop using the computer right away. Every time you use the Mac and write new files, you risk overwriting the deleted data and making it unrecoverable. This is because the storage space occupied by the erased files is now marked as available for new data. So using the computer normally can easily overwrite your deleted files bit by bit.
The more you use the Mac as usual, the higher the chance of overwriting crucial data. Any additional software installs, file imports, browser history, or new documents created in productivity apps – all of this writes more data and eats into the available space marked for overwrite. Therefore, it’s essential to power down the Mac immediately after accidentally erasing and not let any new data get written.
Leaving the Mac untouched preserves the best chance for specialists to recover the erased data. When the deleted files aren’t overwritten, data recovery software and services stand the highest likelihood of rescuing them and restoring your lost information. So resisting the urge to keep using the Mac normally can make a huge difference in getting back your erased data.
Try Your Backup
The first step you should take after accidentally erasing your Mac is to check your backups. If you’re using Time Machine or another backup service, there’s a good chance your erased files are still stored there.
Connect your external hard drive where Time Machine saves its backups. Open Time Machine and navigate back to the state of your system before you accidentally erased files. You should be able to recover missing documents, photos, or other data this way.
If you use another backup service like iCloud or Dropbox, you may also be able to restore erased files by digging into previous versions or file histories. Don’t continue using your Mac until you’ve checked for everything you can restore from backups.
Use Data Recovery Software
If you don’t have a backup or your backup is also missing the files, your best bet is to use a data recovery app. Data recovery software scans your storage drives and attempts to restore deleted files.
Some of the top data recovery apps for Mac include:
- Disk Drill – Scans internal and external drives, memory cards and iOS devices. Easy to use with a basic and advanced recovery mode.
- Stellar Data Recovery – Retrieves data from crashes, corrupted drives, deleted files, Time Machine backups, and encrypted volumes.
- EaseUS Data Recovery Wizard – Recovers documents, photos, videos, emails, and other lost files from Mac systems.
- Data Rescue – Powerful deep scanning and robust file recovery from hard drives, SSDs, optical media, and external drives.
The best recovery apps allow you to preview found files before deciding what to recover. Some even offer a free trial so you can test them out before buying. Be sure to download apps only from the official developers.
With the right software, there’s a good chance your “deleted” files can be recovered if they haven’t been overwritten by new data yet. But act quickly before that space is reused.
Send to a Data Recovery Service
For difficult cases, a pro service may be able to recover data from the disk directly. This option should be considered if DIY software recovery tools did not work and you have critical files to restore. Data recovery services are equipped with specialized tools and clean room facilities to attempt recovering data directly from the drive or SSD.
The process involves opening up the Mac and removing the drive in a dust-free environment to read it at a binary level. The service will then use advanced recovery software to extract lost files and folders. This is an expensive option, but may be worthwhile for irreplaceable data.
Reputable data recovery companies like DriveSavers, Kroll Ontrack, and Gillware offer Mac data recovery services starting around $300-500 for basic recovery, but costs can run into the thousands for difficult cases. The process takes about 1-2 weeks typically.
Before choosing a service, be sure to vet reviews and compare prices. Also find out if they offer free evaluations or money-back guarantees in case your data is unrecoverable. This gives peace of mind that the company will only charge if they are able to recover your lost files.
Recover Deleted Files from iCloud
If you have iCloud backups enabled, you may be able to restore deleted files from there. iCloud automatically backs up your Mac’s most important files, including documents, photos, contacts, calendars, and more. Here’s how to check for and restore deleted files from iCloud:
1. Open System Preferences > Apple ID > iCloud.
2. Make sure iCloud Drive is enabled.
3. Click Manage to view storage usage and see which apps are being backed up.
4. Open the iCloud Drive app and look for recently deleted files that may still be there.
5. Click Restore next to any deleted documents or files you want to recover.
6. You can also restore from older iCloud Drive backups by clicking Manage Versions when viewing a file.
7. Additionally, you can restore Contacts, Calendars, and other iCloud data from backups in System Preferences.
With some luck, you may find the lost files still available in iCloud. Just remember to be careful about overwriting current versions of files when restoring from an older backup.
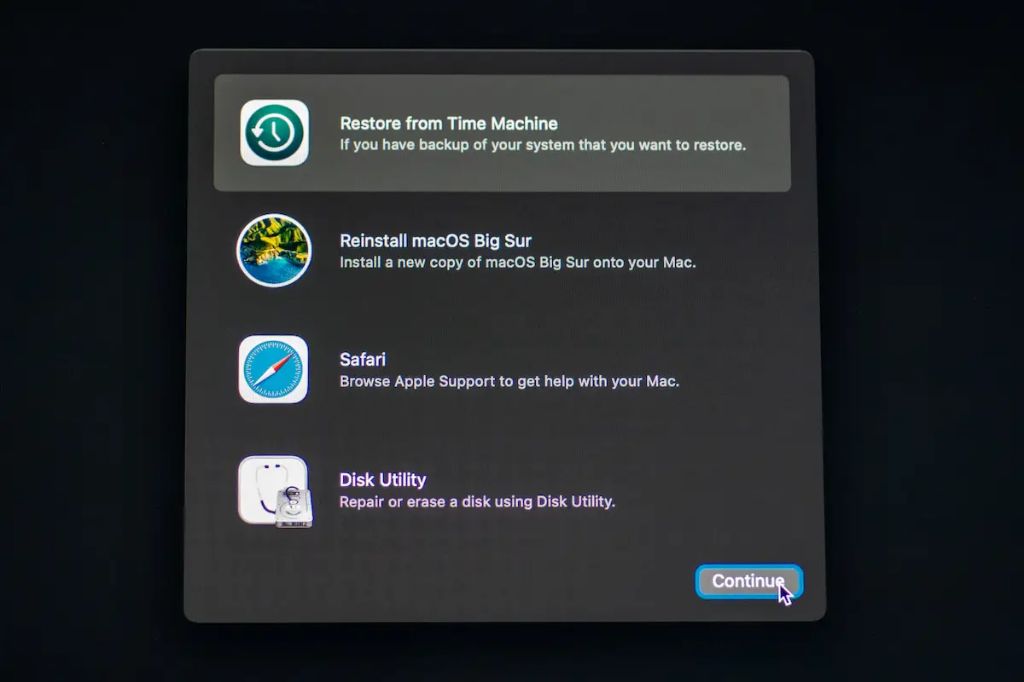
Restore from a Bootable Backup
If you have a full system backup of your Mac created using Time Machine or another backup utility, you may be able to restore your entire system from that backup. This will essentially reset your Mac to the state it was in when you created that backup.
To restore from a bootable Time Machine backup, first start up your Mac from the recovery partition by holding down Command-R at startup. Then select “Restore from Time Machine Backup” and follow the onscreen prompts to restore your system from the backup. Keep in mind this will erase everything currently on your Mac.
For third-party backup tools like Carbon Copy Cloner, the steps to restore from a bootable backup will depend on the specific software. Check the documentation for your backup utility for instructions on how to boot from and restore your full system backup.
The benefit of restoring a full bootable backup is it can completely reset your Mac as if the system erase never happened. The downside is it will also undo any changes, software updates, new files, etc you’ve added since your last backup. So only use this if you have a recent full backup of your entire Mac.
Reinstall macOS
If you accidentally deleted critical system files or your Mac is not functioning properly, a clean install of the operating system may help restore functionality. Here are the steps to reinstall macOS:
- Back up any important files you may still have access to before wiping your Mac.
- Boot into Recovery Mode by restarting your Mac and holding down Command+R.
- Select “Reinstall macOS” from the macOS Utilities window.
- Follow the onscreen instructions to complete the installation process.
Reinstalling the OS will wipe your Mac’s hard drive and start fresh. While this takes time, it can fix many issues caused by accidentally deleting system files. Make sure to restore your data from a backup after reinstalling.
Contact Apple Support
If you’ve exhausted all other options, Apple’s support team may be able to help recover your lost data. As the manufacturer of your Mac, Apple technicians have access to proprietary tools and advanced recovery methods that everyday users don’t.
When you contact Apple Support, explain exactly what happened and what data you are trying to recover. The more details you can provide, the better. Apple will likely ask you to schedule a Genius Bar appointment at an Apple Store where a technician can examine your Mac in person.
Apple Geniuses are trained and certified to perform high-level troubleshooting and repairs. They may attempt data recovery using internal tools, or in some cases extract the storage drive and connect it to specialized hardware designed to read even damaged drives. This gives them the best chance of recovering your files.
While Apple cannot guarantee a successful recovery, their authorized technicians have the best expertise when it comes to Mac data rescue. Before taking any further actions on your own that could overwrite the deleted data, consult with Apple Support to see if they can work their magic recovering your lost files.
Learn from This Experience
While accidentally deleting important files can be stressful and upsetting, you can take steps to prevent it from happening again in the future:
- Set up a robust backup system, like Apple’s Time Machine, to automatically back up your Mac on a regular basis. This will ensure you have a recent backup if needed.
- Enable versioning in apps like Photos to preserve previous versions of changed files.
- Make use of cloud storage services like iCloud, Dropbox or Google Drive to keep copies of important files.
- Be very careful when permanently deleting files – always check the Trash before emptying it.
- UsePrecise file management – organize your files carefully into well-named folders.
- Consider using data recovery software as a safety net for deleted files.
- When in doubt, contact an expert for help rather than attempting advanced recovery yourself.
Following these tips will help ensure you have multiple backups and redundancy for your important data. With some care, you can avoid accidentally losing your files in the future.