Hearing strange noises coming from your hard drive can be alarming. These noises are often a sign that something is wrong with your drive. The most common causes of a noisy hard drive include:
- Mechanical failure
- Loose internal parts
- Bad sectors or corrupted data
Figuring out the root cause of the noise and addressing it promptly is important to avoid potential data loss. This guide will walk through the steps to diagnose the issue and resolve it, whether that involves troubleshooting, repairing, or replacing the hard drive.
We’ll start by determining where the noise originates and when it occurs. Next, we’ll check connections, update drivers, and inspect for physical damage. If the noise persists, we’ll test the drive and try isolating it from the system. Finally, we’ll look at replacing the hard drive itself or pursuing data recovery options if the drive is failing.
Identifying and addressing hard drive noises quickly can help prevent catastrophic failure and data loss. With the right troubleshooting approach, you can resolve the issue and get your hard drive back to silently storing and accessing files.
Determine Where the Noise is Coming From
The first step is to locate where the concerning noise is coming from – whether it’s the internal hard drive inside your computer or an external hard drive. Pay close attention to distinguish if the sound is coming from inside the computer case or from an externally connected hard drive.
Also make note of the specific details of the noise. A grinding, buzzing, or clicking noise could indicate different potential issues. As per experts, clicking noises usually signify the read/write head getting stuck or impacted, buzzing indicates electrical issues, while grinding noises point to problems with the physical disk rotation (Source).
Documenting these specifics will help better diagnose the problem. Determining the exact location and nature of the unusual hard drive noise is the crucial first step before proceeding with further troubleshooting.
Back Up Your Data
One of the most important steps when your hard drive starts making noise is to immediately back up your data. A noisy hard drive is often an early warning sign of potential failure, so you don’t want to risk losing your files if the drive stops working entirely.
It’s highly recommended to back up your data to an external drive and/or cloud storage right away. An external hard drive that you can plug in via USB is a great way to quickly copy your most important files. Cloud backup services like iDrive and Backblaze are also excellent options for safely storing copies of your data offsite.
Don’t wait to back up your data – unusual hard drive noises are frequently followed by drive failure. As soon as you notice the concerning sounds, take action to protect your valuable photos, documents, music, and other personal or work files. It’s much easier to restore your data from a recent backup than attempt recovery from a failed drive.
Back up any data you don’t want to lose before troubleshooting the noisy hard drive further. Having a reliable backup ensures you can recover from potential hard drive failure without permanent data loss.
Check Connections and Cables
One of the easiest things to check is making sure all the cables are fully plugged in. Over time, cables can become loose from repeated plugging/unplugging or vibration. Unplug each end of the power and data cables from the hard drive and reseat them firmly.
Inspect the cables closely for any damage like frayed wires or bent pins that could cause vibration or electrical issues leading to noise. Damaged cables should be replaced. For SATA data cables, make sure the small plastic clip on the cable connector is not broken or missing, as this helps keep the cable firmly attached.
Cables that are too long and not secured can also vibrate. Use twist ties or velcro straps to bind together any excess cable length to limit movement. Some have also had success reducing noise by swapping the standard power and data cables for premium braided cables, which can dampen vibrations.
According to forums, a loose or damaged power cable is a common source of unusual hard drive noises. Carefully check both ends of the power cable and make sure they are fully inserted and locked in place[1].
[1] https://forums.tomshardware.com/threads/can-a-bad-hdd-power-cable-cause-weird-noise.2788383/
Update Drivers
Another step to try is updating your motherboard drivers and hard drive controller drivers. Outdated drivers can sometimes cause buzzing or clicking noises from a hard drive.
Go to your computer or motherboard manufacturer’s website and search for the latest drivers available for your specific model. Focus on updating chipset drivers, SATA/IDE drivers, hard drive controller drivers, and anything else related to storage and disk management. Install any available updates.
Device drivers communicate between your operating system and hardware components. By keeping your drivers updated, you ensure optimal performance and reduce the likelihood of conflicts that can cause issues like unusual noises. Motherboard and hard drive controller drivers play a direct role in how your hard drive operates, so they are good candidates to update when troubleshooting drive noises.
After updating any relevant drivers, restart your computer and see if the noise persists. Updating drivers provides an easy fix for some hard drive noise issues.
For more details, refer to:
https://www.seagate.com/support/kb/identifying-hard-drive-sounds-and-determining-what-they-mean/
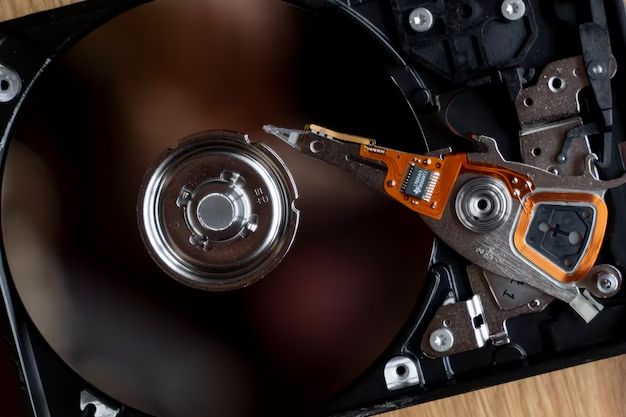
Check for Physical Damage
Carefully inspect the exterior and interior of the computer for any obstruction or damage to fans/components that could be causing the noise. According to Identifying Hard Drive Sounds and Determining What They Mean, physical damage to the hard drive’s platters can cause grinding noises during use.
Look for any obstructions blocking fans or tangled cables hitting components. Also check for loose screws or connectors. Physical impacts can damage the platters inside the hard drive. If the hard drive’s read/write heads are touching or scraping the platters as they spin, it will cause buzzing or grinding noises.
Treat the computer gently during inspection to avoid further issues. If you spot any physical damage, it’s best to stop using the drive immediately to prevent destroying your data. The noise indicates serious problems – continuing to use the damaged drive risks permanent data loss.
Test the Hard Drive
The most direct way to check for issues with your hard drive is to use the built-in hard drive diagnostics and monitoring tools. All modern hard drives support SMART (Self-Monitoring, Analysis and Reporting Technology). Download a SMART testing utility and run a full scan to check for errors.
Pay close attention to key SMART attributes like read error rate, reallocated sectors count, and seek error rate. A rise in any of these values indicates your hard drive is deteriorating. Reallocated sectors count is especially important – it tracks sectors that have been remapped due to errors. An accelerating rise in this value means the hard drive has bad sectors and could fail soon.
Ideally, update the SMART data regularly and monitor for changes. That gives you early warning of impending failure before the noises get worse. If the SMART stats are normal but you still hear noises, the drive may have physical damage or firmware issues. In that case, it’s best to replace the drive.
Try Isolating the Hard Drive
One way to determine if the noise is coming from the hard drive itself is to remove it from the computer and connect it externally via a USB enclosure or dock. This isolates the drive from other internal computer components.
To isolate the drive:
- Shut down the computer and disconnect the power cable.
- Open the computer case and locate the hard drive.
- Disconnect the SATA and power cables from the hard drive.
- Remove the hard drive from the drive bay.
- Place the hard drive in an external USB enclosure or dock.
- Connect the USB enclosure/dock to your computer.
- Power on the external enclosure/dock.
If the irregular noise continues even with the drive isolated externally, it likely indicates a problem with the hard drive itself. However, if the noise stops, then the issue is related to something internal to the computer.
Testing the drive in an external enclosure allows you to isolate whether the noise stems from the hard drive or other internal computer components. This is an important troubleshooting step before considering replacing the drive.
Replace the Hard Drive
If the noise from your hard drive persists after trying the troubleshooting steps above, it likely indicates a mechanical failure or imminent failure of the drive. At this point, the hard drive needs to be replaced.
To replace the hard drive:
- Purchase a new internal hard drive that is compatible with your computer. Match the interface (SATA, IDE, etc.), size, and form factor (2.5-inch or 3.5-inch).
- Make sure you have backed up any important data from the old drive if possible.
- Follow the instructions in your computer or external enclosure manual to physically remove the old hard drive and install the new one.
- Insert the Windows installation disc or bootable USB and install the operating system on the new hard drive.
- Once Windows is installed, install any necessary drivers for the hard drive.
- Partition and format the new hard drive through Windows Disk Management.
Installing a new hard drive and formatting it properly will help ensure maximum performance and reliability. With a new drive installed, your computer should run quietly again without any bothersome noises emanating from the hard drive.
Data Recovery Options
If data could not be backed up before issues arose, utilizing professional data recovery services may be necessary. Companies such as DriveSavers and Gillware specialize in recovering data from failed hard drives and charge on average $400-$700 for basic recoveries. Rates typically depend on the severity of issues and amount of data (Source 1, Source 2). The success rate for recovering data from mechanical failures averages over 90%, while logical recoveries from corruption or deletion have closer to a 70% success rate. More extensive clean room procedures may be required in severe cases of physical damage, which significantly increases costs to $1,200 or more.
It’s important to choose a reputable recovery company with strong security practices, certification, transparency about process/pricing, and experience recovering from specific issues you’re facing. While costs can quickly add up, data recovery services may retrieve irreplaceable or critical data when all other options have been exhausted.