What is Disk Utility?
Disk Utility is an application included with every macOS installation that allows users to manage internal and external disks and storage devices. It provides tools to repair disk errors, format drives, create and restore disk images, securely erase data, and more.
Some of the key features and capabilities of Disk Utility include:
- View details and health information about internal and external drives
- Repair disk errors and permissions issues
- Format drives to compatible file systems like APFS, Mac OS Extended, FAT32, and exFAT
- Create disk images (.dmg files) to store backups or distribute software
- Securely erase data from drives by overwriting free space
- Manage storage devices like hard drives, SSDs, flash drives, RAID arrays, and more
With its ability to verify, repair, manage, and erase disks and volumes, Disk Utility is an essential tool for any Mac user to keep their system running smoothly.
Why Use Disk Utility?
Disk Utility is an important tool included with every Mac for managing internal and external drives. Using Disk Utility provides several key benefits:
Repair disk errors – Disk Utility can check for and repair disk errors and permissions issues that may be causing problems. This helps optimize performance and fix crashes or data corruption.
Securely erase data – When it’s time to sell or dispose of a Mac, Disk Utility allows you to completely erase data by overwriting free space. This is more secure than simply deleting files.
Format drives – Disk Utility can format internal or external drives to work with a Mac. This includes options like Mac OS Extended for Time Machine backups.
Create disk images – Disk images allow you to mount drives or files as virtual disks on your desktop. Disk Utility provides an easy way to create and encrypt disk images.
Optimize performance – Checking and repairing disk errors can significantly improve speed and stability. Disk Utility gives you tools to verify and optimize your drives.
Overall, Disk Utility is a critical macOS utility for monitoring drive health, erasing data, creating disk images, formatting volumes, and optimizing performance.
Locating Disk Utility
Disk Utility is an application included with macOS that allows users to manage and configure disks and volumes. Disk Utility is located in the Utilities folder within the Applications folder on a Mac.
To open Disk Utility on a Mac:
- Click on the Finder icon in the Dock to open a Finder window.
- In the Finder sidebar, select “Applications” under “Places.”
- Scroll down and double click on the “Utilities” folder within the Applications folder.
- Double click the Disk Utility application icon to launch Disk Utility.
Disk Utility can also be accessed by using Spotlight Search. Hit Command+Spacebar to bring up Spotlight Search, type in “Disk Utility,” and hit Return to launch the application (Intro to Disk Utility on Mac).
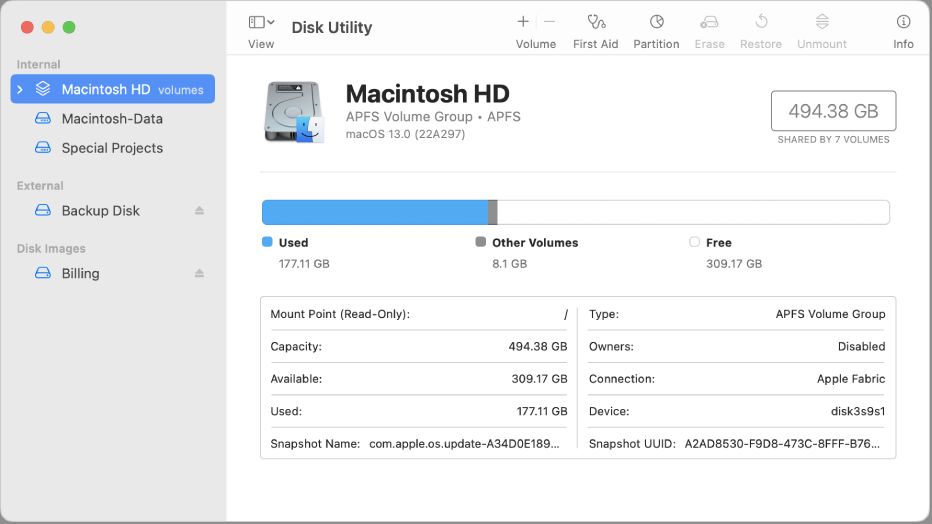
The Disk Utility Interface
The Disk Utility interface on macOS is divided into three main sections – the toolbar, sidebar, and content pane (What Is Disk Utility in macOS? (and How to Use It)).
The toolbar across the top provides quick access to common tasks like mounting and unmounting drives, erasing disks, creating disk images, and verifying or repairing disks. You can also view disk information and select different view modes like list view or column view.
The sidebar on the left shows a hierarchical list of all available disks and volumes. This lets you easily see the different drives connected to your Mac and available for you to manage.
The main content pane takes up most of the Disk Utility window. This area displays details about any drive or volume selected in the sidebar. You can see information like capacity, format, number of partitions, and status. The content pane is also where you perform many Disk Utility operations like erasing, partitioning, or repairing a drive.
Between these three panes, you have access to all the disk management features within Disk Utility on your Mac (How to Use Disk Utility on Mac – A Beginner’s Guide). The sidebar and toolbar make navigation easy, while the content pane is where you can view disk information and perform core disk tasks.
Viewing Disks and Volumes
Disk Utility’s sidebar allows you to easily view all available disks and volumes on your Mac. This provides a convenient overview of your storage devices and file systems. To view disks and volumes:
- Open Disk Utility (located in /Applications/Utilities/).
- In the sidebar on the left, click “Show All Devices”. This will display both disks and volumes.
- Disks are shown with a drive icon and represent the entire physical drive.
- Volumes are shown as containers and represent the formatted partitions on the disks.
You can click on a disk or volume to see more detailed information and options. The sidebar makes it easy to see all mounted storage devices at a glance in Disk Utility.
For more information, see Apple’s guide on Viewing Disks and Volumes.
Get Info on Drives
You can use Disk Utility to access detailed information about your drives, including capacity, S.M.A.R.T. status, and partitioning. To get this info:
1. Open Disk Utility (located in Applications > Utilities).
2. In the sidebar, select the drive you want info about.
3. Click the Info button in the toolbar.
4. In the info window you’ll see details like capacity, partition map scheme, and S.M.A.R.T. status. S.M.A.R.T. (Self-Monitoring, Analysis and Reporting Technology) monitors your drive’s health and can warn of potential issues.
5. Click Show More Info to view additional details like firmware version, interface, and rotational speed.
Getting comprehensive drive info in Disk Utility can help you monitor disk health, troubleshoot issues, and make informed decisions about partitioning or reformatting drives.
Repairing Disks
Disk Utility includes a feature called First Aid that can be used to verify the disk structure and repair any errors it detects. First Aid scans the drive and checks for problems with the file system structure, directory structure, and other important elements. If any errors are found, First Aid will attempt to repair them automatically.
To run First Aid on your startup disk or external drive in Disk Utility:
- Open Disk Utility (located in Applications > Utilities)
- Select the disk you want to verify and repair from the sidebar
- Click “First Aid” in the top center of the Disk Utility window
- Click “Run” to begin the verification and repair process
First Aid will scan the disk and report back with either “The volume appears to be OK” if no errors were found, or a report on what specific errors were detected and whether they were able to be repaired. Some errors may require additional steps beyond First Aid to fully resolve.
Running First Aid regularly can help identify and prevent minor disk problems from becoming serious issues. It’s a good idea to run it on your main startup disk once a month or so, and any time you notice odd behavior that could indicate disk problems. With the power of First Aid, Disk Utility can keep your drives healthy and error-free.
Format Drives
Disk Utility allows you to erase, repartition, and format drives on your Mac. Here are the steps to format a drive:
- Open Disk Utility (located in Applications > Utilities).
- Select the drive you want to format in the sidebar.
- Click the Erase tab.
- Enter a name for the drive.
- Select a format from the drop-down menu:
- APFS is optimized for SSDs and is the default for macOS.
- Mac OS Extended is optimized for HDDs.
- MS-DOS (FAT) and ExFAT allow compatibility with Windows.
- Click Erase to confirm.
Disk Utility will repartition and format the drive according to your selections. Formatting a drive erases all data, so be sure to back up first if needed. You can also partition drives to create multiple volumes using Disk Utility.
For more details, refer to Apple’s support article on how to format drives on a Mac: https://support.apple.com/en-us/HT208496
Create Disk Images
Disk Utility allows you to create disk images, which are files that contain the contents of an entire drive or volume (Gnome Disk Utility: Create Disk Image W/O Free Space – Applications, 2023). Disk images can be used to back up important data, move data between computers, duplicate volumes for testing purposes, and more.
To create a disk image in Disk Utility, click the New Image button at the top of the Disk Utility window. This allows you to choose to create the image from a connected drive/volume or from a folder. You’ll also be able to choose the name, location, and encryption of the new disk image file.
Once created, disk images appear in the sidebar in Disk Utility like other drives and volumes. You can mount disk images to access the files, unmount them when done, and easily create new versions to back up changes. Disk images can also be opened in the Finder for file management.
When creating disk images, it’s important to have enough free space on the target drive to hold the full size of the image. If the image creation fails part way through, you may need to delete the partially created image file and start over after freeing up disk space (Disk Utility backup error “status 1”, 2018).
The format of the target drive where you save the disk image can also be a factor. Some formats like FAT32 may not allow storing very large disk images (Target drive file system requirements for gnome disk imaging, 2018).
Overall, Disk Utility makes it easy to create disk images on a Mac for backing up and porting data. Just be sure to have adequate disk space for the image size you need.
Securely Erase Data
Mac users may want to securely erase free space on a hard drive, SSD, or thumb drive to prevent recovery of deleted files. Disk Utility in macOS provides a straightforward way to overwrite deleted data for improved security.
To use Disk Utility to erase free space:
- Open Disk Utility, located in /Applications/Utilities/ or via Spotlight search.
- Select the drive you want to erase free space on from the sidebar.
- Click the Erase tab.
- Choose “Erase Free Space” from the dropdown menu.
- Click Erase. This overwrites the free space on the drive with zeroes to securely delete any previously deleted files.
The “Erase Free Space” option is designed to target only the portions of the drive not currently occupied by files to improve performance. It can help protect privacy by making it much harder for data recovery software to restore deleted files [1].