What is AutoRecovery on Mac?
AutoRecovery is an automatic backup feature on Macs that saves versions of your open documents (https://support.microsoft.com/en-us/office/recover-files-in-office-for-mac-6c6425b1-6559-4bbf-8f80-4f038402ff02 ). It saves backups every 10 minutes by default so you can recover unsaved changes if your Mac crashes or a document becomes corrupted.
AutoRecovery automatically creates temporary backup copies of your open Office documents like Word, Excel, and PowerPoint files while you work. This allows you to restore unsaved changes if you experience an unexpected issue.
The AutoRecovery feature runs in the background to save interim versions of your work. You don’t need to manually save anything for AutoRecovery to work.
Why Use AutoRecovery?
AutoRecovery is an important feature on Mac that helps protect against data loss from crashes, power outages, or force quits. Without AutoRecovery, if your computer unexpectedly shuts down or an application like Word crashes, any unsaved changes will be lost since the last manual save. AutoRecovery automatically saves temporary versions of your open documents at regular intervals in the background. This saves you time from having to constantly stop and manually hit save yourself.
According to Microsoft’s support article, “AutoRecover, a feature that is available in some Office applications, attempts to recover files automatically in the event of an application or system crash…” (source). So AutoRecovery acts as your safety net if something unexpected happens, helping you avoid losing hours of work and having to start over.
Overall, AutoRecovery provides important protection and automation that saves Mac users time, headaches, and potential heartache over lost data. Turning it on is a smart precaution for anyone working on critical documents, presentations, or other files on a Mac.
How to Enable/Disable AutoRecovery
To enable or disable AutoRecovery in Mac OS X, you have a couple options:
First, you can go to System Preferences > General and check or uncheck “Close windows when quitting an app” to turn AutoRecovery on or off. This will apply the setting system-wide.
Alternatively, you can use Terminal to enable or disable AutoRecovery. To turn it off, enter this command in Terminal:
defaults write -g NSQuitAlwaysKeepsWindows -bool false
To turn AutoRecovery back on, use this command:
defaults write -g NSQuitAlwaysKeepsWindows -bool true
Using Terminal allows you to toggle AutoRecovery on or off for all apps with a simple command. Just keep in mind this affects the whole system.
So in summary, use System Preferences to easily toggle the setting on or off, or use Terminal for more granular control over AutoRecovery system-wide.
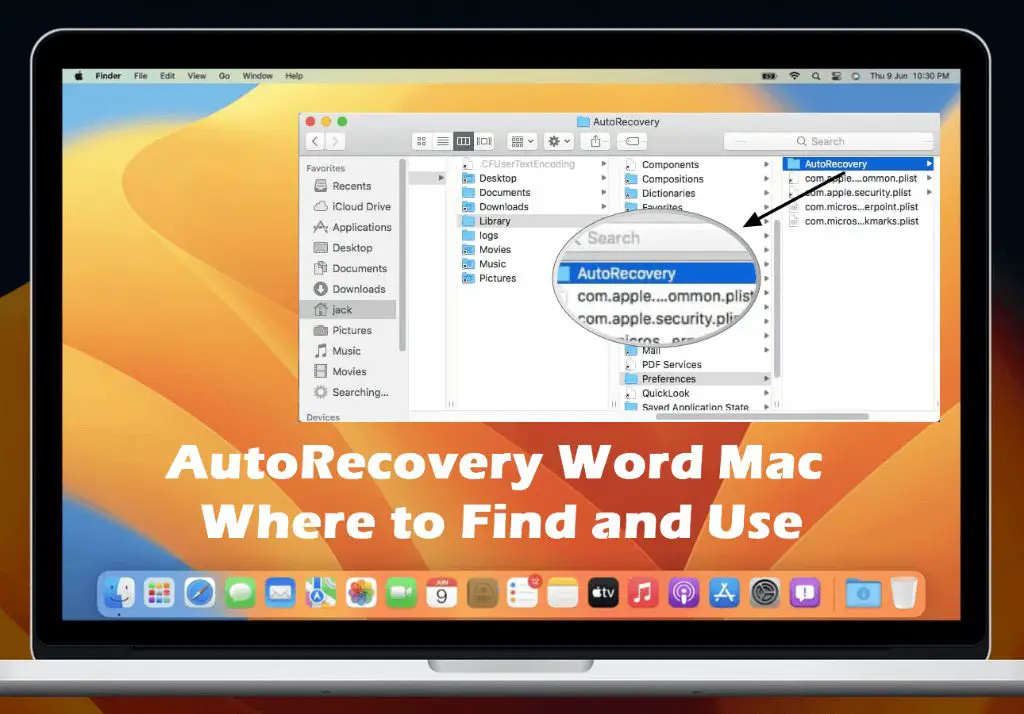
AutoRecovery File Locations
AutoRecovery files are stored in specific hidden folders on your Mac. For Microsoft Office applications like Word, Excel, and PowerPoint, AutoRecovery files are saved here:
/Library/Containers/com.Microsoft/Data/Library/Preferences/AutoRecovery
For other applications, AutoRecovery files may be stored in the Saved Application State folder:
/Library/Saved Application State
Because these folders are hidden, you’ll need to use the Finder’s “Go to Folder” function to access them. AutoRecovery does the backup saving automatically, so you don’t need to navigate to these folders yourself unless you need to recover an unsaved file.
Recovering Unsaved Documents
If you accidentally closed an unsaved Word document on your Mac, there are a few ways you may be able to recover it:
First, reopen Word and check if your unsaved document is still open. Word for Mac has an AutoRecovery feature that saves drafts of open documents every 10 minutes, so you may find your unsaved file still available.
If not, navigate to ~/Library/Containers/com.Microsoft/Data/Library/Preferences/AutoRecovery in Finder to access the AutoRecovery folders where Word saves backup versions of open files [1]. Look for a version of your unsaved document here.
As a last resort, use Time Machine backups to restore earlier versions of files. Open Time Machine, navigate to the folder where your unsaved document was located, and search for backups from before you lost the file. You can restore the entire folder or just the unsaved Word file [2].
Setting Word to save AutoRecovery versions more frequently, or manually saving drafts often, can help avoid losing substantial work on unsaved documents.
Customizing AutoRecovery
You can customize certain AutoRecovery settings in some apps like Microsoft Word to better meet your needs. Here are some of the options available:
Change auto save frequency in app preferences – You can adjust how often AutoRecovery saves backup versions of your open documents. In Word, go to File > Options > Save and under “Save AutoRecover information every” specify how often you want backups created (default is every 10 minutes).
Set custom save locations for some apps – Instead of saving to the default AutoRecovery location, you can choose a different folder to store AutoRecovery files. In Word’s preferences, under File Locations > AutoRecover files, select “Modify” to choose a custom save location.
Adjust when/how backups are deleted. You can configure AutoRecovery to delete outdated versions after a certain time period has passed. This helps avoid filling up disk space with old unused files. In Word’s Save preferences, you can set “Delete AutoRecover files older than” to your desired timeframe.
Improving Reliability
There are a few ways to improve the reliability of file recovery using AutoRecovery on Mac:
First, you can increase the AutoRecovery frequency to every 5 minutes for critical work. This ensures versions are saved more often so less work will be lost if there is a crash or power outage. In the AutoSave section of System Preferences, you can set “Save every:” to 5 minutes.
Second, use the continuous save or auto save features in apps like Microsoft Word. This saves revisions continuously so you minimize losses. In Word, enable AutoRecover in the Preferences.
Third, consider backing up important files separately. Use Time Machine or cloud backup services to create copies of critical documents. This gives you an additional restore point beyond AutoRecovery files. As a rule of thumb, separate backups are wise for any work you can’t afford to lose.[1]
Alternatives to AutoRecovery
While AutoRecovery can be a helpful safety net, there are other ways to protect your work in case of crashes or lost documents:
Use Time Machine for more regular system-wide backups. Time Machine will save hourly versions of all your documents, so you can restore to an earlier point if you ever lose your work. Just open Time Machine and browse back to find previous iterations of your files [1].
Rely on cloud syncing services like iCloud or Dropbox to keep continuous backups. With real-time syncing to the cloud, you’ll have an online copy to revert to if your local version is ever lost. Apps like Microsoft AutoSave similarly save incremental versions to the cloud [2].
Manually save iterations as you work. Get in the habit of manually saving drafts with version numbers or dates, e.g. document-v1. This creates recoverable milestones you can go back to if needed.
Troubleshooting Issues
If AutoRecovery is not creating backups as expected, there are a few troubleshooting steps you can take:
First, check your AutoRecovery settings in the app preferences to make sure AutoRecovery is enabled and backups are set to save at the desired interval (Microsoft).
Next, verify that you have write permissions for the save location. AutoRecovery files are usually saved in a temporary folder like /Users/[username]/Library/Containers/com.microsoft.[app]/Data/Library/Preferences/AutoRecovery. Try fixing permissions on that folder if needed (Apple).
Finally, app crashes or freezes during saves can interrupt the AutoRecovery process and lead to data loss. Check for and install any app updates to resolve stability issues. You may also need to troubleshoot system problems causing the crashes (Microsoft Answers).
Taking these steps should help get AutoRecovery working properly again so your unsaved work is protected.
Key Takeaways
AutoRecovery is an important built-in feature on Mac that automatically saves versions of your documents as you work. This helps prevent against data loss from application or system crashes. There are a few key points to remember about AutoRecovery:
1. AutoRecovery automatically saves document versions periodically based on a default time frequency. This acts as a safety net against data loss.
2. If an app or your system crashes, you can recover your unsaved work from the AutoRecovery file versions. This makes it a valuable protective measure.
3. You can customize the AutoRecovery frequency and locations to best fit your needs. Adjust the time intervals and choose alternate save locations if desired.
4. If you ever need to recover an unsaved document, check the AutoRecovery folders for automatically saved versions. This provides a way to retrieve work even if you forgot to manually save.
Overall, AutoRecovery gives you peace of mind that your work will be periodically saved behind-the-scenes. Take advantage of this built-in Mac feature to avoid data loss frustrations.
