What is Disk Management?
Disk Management is a built-in utility in Windows that allows users to manage storage disks and volumes on a computer. Its key functions include creating, deleting, and formatting disk partitions, assigning or changing drive letters, creating striped, spanned, or mirrored volumes across multiple disks, and converting between basic and dynamic disks.
Disk Management provides a graphical interface to view all the disks and disk partitions on a system. It shows details like partition sizes, free space, drive letters, types of partitions, and file systems. This allows performing storage management tasks in a visual way.
Some key capabilities provided by Disk Management include:
- Initializing new disks
- Creating and deleting partitions
- Formatting partitions with file systems like NTFS and FAT32
- Extending or shrinking existing partitions
- Changing drive letters and paths
- Converting basic disks to dynamic disks
- Creating volumes with multiple disks like RAID configurations
- Checking disks and volumes for errors
Overall, Disk Management is a critical built-in tool on Windows platforms to manage storage, optimize disk usage, troubleshoot issues, and configure disks and volumes as needed (https://technoresult.com/add-disk-management-to-control-panel-in-windows-10/). It provides both a visual overview and a set of tools for storage management tasks.
Why Use Disk Management?
Disk Management is a built-in Windows utility that allows you to perform various disk and volume management tasks. Here are some of the most common reasons to use Disk Management:
Format drives and partitions – Disk Management provides an easy way to format disks and partitions to NTFS, FAT32, exFAT, or other file systems. This allows you to prepare new disks for use or reformat existing partitions.
Extend a volume – If you need more space on an existing volume or partition, Disk Management can help you extend the volume onto available space on the same disk. This allows expanding volumes without loss of data.
Shrink a volume – Conversely, if you need to reclaim space from an oversized volume, Disk Management can shrink the volume by reducing its size.
Change drive letters and paths – You can add, change or remove drive letter assignments using Disk Management. This can help fix issues related to drive letters, mount points and volume accessibility.
Create and delete partitions – Disk Management allows creating and deleting primary partitions, logical drives, and extended partitions on disks. This helps manage disk space allocation.
Convert between partition styles – Converting partitions between MBR and GPT styles is possible in Disk Management. This helps change partition layouts for different OS and disk requirements.
Mark partitions as active – Setting a partition as active makes that partition bootable. This can assist in fixing boot issues related to multiple operating systems.
View disk and partition information – The interface provides an overview of all disks and their partitions, capacities, types, status, etc. This is useful for troubleshooting disk problems.
Accessing Disk Management in Windows 10
In Windows 10, there are a couple different ways to open Disk Management:
From the Start menu, search for “Disk Management” and select the Disk Management app to open it.
You can also access Disk Management through Control Panel:
- Open Control Panel > Administrative Tools > Computer Management
- In the Computer Management window, select Disk Management on the left side.
Disk Management will open, allowing you to manage your disks and volumes.
Some key things you can do in Disk Management on Windows 10 include:
- Create and format new volumes
- Extend or shrink existing volumes
- Change drive letters and paths
- Convert between MBR and GPT disks
For more details, refer to this guide.
Accessing Disk Management in Windows 8/8.1
To access Disk Management in Windows 8 or 8.1, follow these steps:
- Right-click the Start menu in the bottom left corner of the screen.
- Select “Disk Management” from the context menu that appears.
- This will open the Disk Management utility.
Disk Management can also be accessed by pressing the Windows key + X on your keyboard to open the Power User menu, then selecting “Disk Management.”
One other method is to search for “Disk Management” from the Start Screen or Start menu search bar. Select “Create and format hard disk partitions” from the search results.
Disk Management is essential for managing storage drives and volumes in Windows 8/8.1. Key tasks include creating, deleting, and formatting partitions, changing drive letters and paths, converting between MBR and GPT, and extending volumes.
Accessing Disk Management in Windows 7
In Windows 7, Disk Management can be accessed through the Start Menu. Here are the steps:
- Open the Start Menu and click on Control Panel
- In Control Panel, click on System and Security
- Under Administrative Tools, double click on Computer Management to open it
- In the Computer Management window, click on Disk Management in the left pane
- The Disk Management interface will open, allowing you to manage your disks and volumes
The Disk Management tool is located within the Computer Management utility in Windows 7. By navigating to Start Menu > Control Panel > Administrative Tools > Computer Management, you can access the Disk Management interface and perform key tasks like creating and deleting partitions, formatting drives, extending volumes, and more.
Accessing Disk Management in Windows Vista
In Windows Vista, Disk Management can be accessed through the Start menu. Follow these steps:
1. Click the Start button and select Control Panel from the right side of the Start menu.
2. In Control Panel, click System and Maintenance.
3. Under Administrative Tools, double click Computer Management to open it.
4. In the left pane of Computer Management, click Disk Management to open it.
The Disk Management utility will open, allowing you to view and manage disks and volumes on your computer [1].
Alternatively, you can access Disk Management in Windows Vista by typing “diskmgmt.msc” in the Run dialog box or in the Start menu search box and pressing Enter [2].
Accessing Disk Management in Windows XP
To access Disk Management in Windows XP, follow these steps:
1. Click on the Start menu and go to Control Panel. Double click on Administrative Tools, then double click on Computer Management.
2. In the Computer Management window, expand the Storage section on the left side and click on Disk Management.
The Disk Management utility will open, allowing you to view and manage all the drives and partitions on your computer (“Disk Management.” O’Reilly Windows XP Professional).
Some key things you can do in Disk Management on Windows XP include creating and deleting partitions, changing drive letters, checking disk status, and initializing disks. The interface provides a graphical overview of your drives and volumes for easy management.
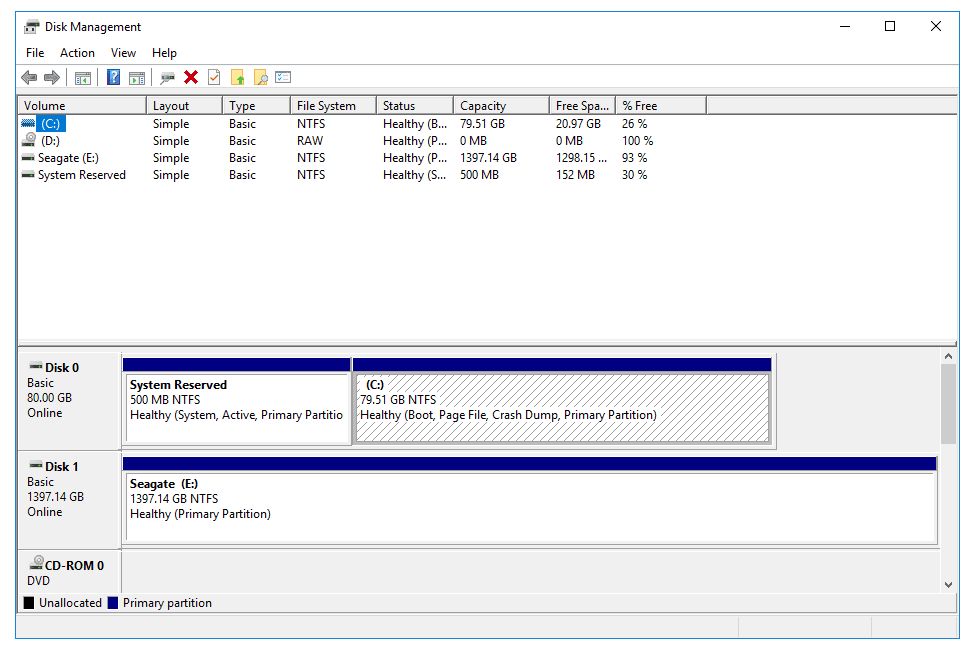
Disk Management Interface
The Disk Management interface provides a graphical view of the hard disk drives and volumes on a Windows system. It allows users to view disk space allocation and configure disks, volumes, and partitions.
The main sections of the Disk Management interface include:
- Disk graph – Displays a graphical representation of the hard disks and volumes. It provides an overview of used and free space.
- Volumes – Lists the drive letters, labels, size, and filesystem of volumes on the disks.
- Unallocated space – Shows space on the disks that is not currently part of a volume. This space can be brought online and turned into a new volume.
- Health status – Indicates if disks and volumes are healthy or have errors.
- Disk numbers – Provides the model and serial numbers to identify physical disks.
Overall, the interface aims to provide a centralized and visual way to manage the various aspects of disks and volumes on Windows systems.
Key Disk Management Tasks
Disk Management provides several useful functions for managing your disks and volumes in Windows.
Some key tasks that can be performed in Disk Management include:
- Formatting volumes – Disk Management allows you to format volumes using NTFS, FAT32, FAT, and other file systems. Formatting erases all data on a volume and prepares it for use.
- Extending volumes – You can use Disk Management to extend a volume to take up available unused space on a disk. This allows you to increase the storage capacity of an existing volume.
- Shrinking volumes – Volumes can also be shrunk to reclaim unused space. This freed up space can then be allocated as a new volume.
- Changing drive letters and paths – The drive letter or mount path of a volume can be altered using Disk Management.
- Converting between dynamic disks and basic disks – Disks can be converted between basic and dynamic types without losing data (Microsoft, 2022).
- Creating and deleting volumes – New volumes can be created out of unallocated space on disks. Existing volumes can also be deleted.
- Marking partitions as active – The active partition containing the operating system’s boot files can be set using Disk Management.
Overall, Disk Management provides a centralized interface to carry out most common volume and disk management tasks in Windows.
Disk Management Alternatives
Disk Management comes built-in to Windows operating systems as the main graphical tool for managing hard disk partitions and volumes. However, it is fairly basic and lacks some advanced functionality available in specialized third party disk management utilities. Here are some popular alternatives to the standard Windows Disk Management tool:
Third party disk partition managers like MiniTool Partition Wizard, EaseUS Partition Master, and GParted offer more features than standard Windows Disk Management. They allow for operations like non-destructive partition resizing, splitting partitions, converting between partition types, copying disks/partitions, and data recovery. Many also have bootable media for off-line disk partition operations.
PowerShell offers a scriptable command-line interface for managing disks and volumes. The Storage Module contains cmdlets for partitioning, formatting, cleaning, and repairing disks. PowerShell allows disk tasks to be automated through scripts.
DiskPart is another Windows command-line disk partitioning utility that offers functionality similar to Disk Management. It allows partitioning, formatting, extending volumes, and assigning drive letters through a CLI rather than GUI.
Overall, while Disk Management provides basic partition management, third party tools, PowerShell, and DiskPart offer more advanced capabilities for those with more specialized disk and volume needs.
