What is a Hard Disk Drive (HDD)?
A hard disk drive (HDD) is a non-volatile data storage device used in computers to store digital information. The term “hard” refers to the rigid platters inside the drive, as opposed to historical disk storage devices that used flexible media, such as floppy disks. HDDs use magnetic storage to write and read data on rotating platters.
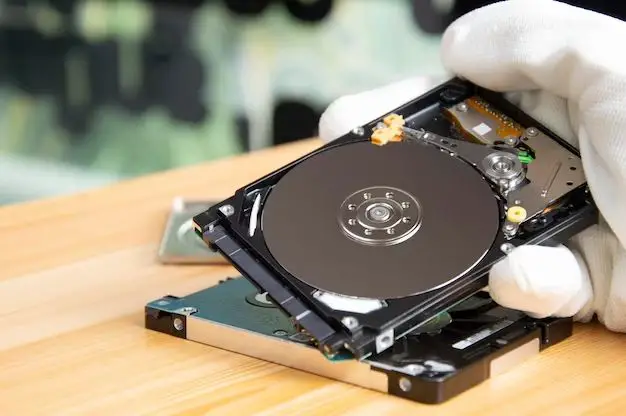
The key components of an HDD include:
- Platters – Disks made of rigid aluminum or ceramic that store data.
- Spindle – The rod that rotates the platters.
- Read/Write Head – The component that reads and writes data on the platter surface.
- Actuator Arm – Moves the heads to locate data.
- Motors – Provide power to spin the platters and move the head.
Data is written to the platter surfaces using magnetic polarization. By changing the magnetic orientation of a small section of the platter, 1s and 0s of binary data can be encoded. The read/write heads float just above the platters on a thin cushion of air, allowing them to move quickly and precisely to access data.
HDDs provide nonvolatile storage, meaning data persists even when power is removed from the device. They offer large capacities compared to solid state drives, making them well-suited for mass storage of data, applications, media files and more on desktop computers, servers, and external storage devices. However, HDDs have slower access times than SSDs.
Common HDD Form Factors
Hard disk drives come in a variety of physical sizes, known as form factors. The most common HDD form factors are:
3.5-inch
The 3.5-inch form factor is the most common size for desktop computer hard drives. 3.5-inch HDDs offer high storage capacities, with most models ranging from 250GB to 10TB. 3.5-inch drives utilize the standard SATA or SAS interfaces. Common dimensions are 4″ x 5.75″ x 1″.
2.5-inch
2.5-inch drives are commonly used in laptops due to their smaller physical size. They have lower capacities than 3.5-inch drives, typically 500GB to 2TB. 2.5-inch drives come in various heights like 7mm, 9.5mm, 12.5mm etc. to fit different laptop designs. They use the SATA interface.
1-inch
Extremely compact 1-inch HDDs were developed for small electronics like digital cameras and MP3 players. Capacities typically range from 4GB to 160GB. These drives use microSATA or PATA interfaces.[1]
mSATA
The mSATA form factor was designed for solid state drives but some compact HDDs use it too. mSATA drives are about a quarter the size of a 2.5-inch drive. Capacities range from 32GB to 1TB. The interface is SATA.
M.2
The M.2 form factor supports both HDDs and SSDs. M.2 HDD capacities range from 120GB to 1TB. The small physical size and PCIe interface make M.2 drives well-suited for ultrabooks and small form factor systems.
[1] https://en.wikipedia.org/wiki/List_of_disk_drive_form_factors
Finding the HDD in a Desktop PC
To locate the hard disk drive (HDD) in a desktop PC, you first need to open up the computer’s case. Desktop PC cases come in different shapes and sizes, but most have removable side panels that are secured with screws. Remove the side panel to gain internal access.
Once inside the computer, look for drive bays, usually located in the front of the case. Drive bays are plastic housings designed to hold internal hard drives in place. Most desktop PCs have multiple drive bays to allow for adding more storage drives. Identify which drive bay contains the hard drive you want to locate. It may be labeled “HDD” or have a model number on it.
The back of the hard drive inside the drive bay will have power and data connectors attached to it. Hard drives use a SATA interface for data, indicated by a long, thin L-shaped connector. They also require a power connector, usually coming from the power supply. Follow the SATA data cable from the drive bay to determine where it plugs into the motherboard.
Some high performance desktops may use the newer, faster NVMe SSDs as their primary storage drive instead of a traditional hard disk drive. NVMe drives mount directly to the motherboard, rather than using drive bays.
Finding the HDD in a Laptop
In a laptop, the hard drive can be located in a few different places depending on the make and model. However, it is most commonly found on the underside of the laptop.
To locate the hard drive, first identify the service panel on the bottom of the laptop. This will be a removable panel that provides access to the internal components. The service panel is often held in place by screws. Use a Phillips head screwdriver to remove the screws and take off the service panel.
Once inside, look for a large rectangular component, likely with manufacturer stickers on it. This will be the hard disk drive assembly. The HDD assembly will be secured in a drive bay with screws. Be careful not to damage any cables connected to the HDD when removing it.
On some laptops, especially ultrabooks and netbooks, the HDD may not be user serviceable. In these cases the HDD is often soldered directly to the motherboard, or uses an M.2 or proprietary connector that makes removal challenging. Refer to your laptop’s manual or contact the manufacturer to confirm HDD replaceability.
When accessing internal laptop components, always be sure to take proper electrostatic discharge precautions. Power down and unplug the laptop fully before opening the service panel. Avoid touching components directly and use an anti-static wrist strap if possible.
Locating External HDDs
External hard drives connect to a computer through a USB, Thunderbolt, FireWire, or eSATA interface. Most external hard drives today use a USB interface, connecting to a desktop PC or laptop via a USB port. Common USB versions for external hard drives include USB 3.0, USB 3.1, and USB-C.
External hard drives are enclosed in a drive enclosure that provides power, interface connectivity, and physical protection for the hard drive inside. Popular external hard drive enclosures connect via USB-A, USB-C, or Thunderbolt ports. For desktop computers, USB-A is the most common. For laptops, USB-C and Thunderbolt enclosures are popular choices.
To locate an external hard drive, look for drive enclosures designed for 3.5″ or 2.5″ hard drives. 3.5″ drives require an AC power adapter, while smaller 2.5″ drives can be bus-powered over the interface cable. External SSD drives in M.2 or PCIe form factors are also available. Check the ports on your computer to determine the best enclosure interface option.
According to Sweetwater’s guide, USB and Thunderbolt are the most common connections for external drives today (https://www.sweetwater.com/sweetcare/articles/getting-started-with-external-hard-drives/). Look for the drive enclosure’s interface ports to locate and connect your external HDD.
HDD Interfaces
Hard disk drives connect to a computer through drive interfaces. The main interfaces used today are Parallel ATA (PATA), Serial ATA (SATA), and Serial Attached SCSI (SAS).
PATA, also known as IDE, is an older parallel interface that was widely used from the late 1980s through the 2000s. PATA has a wide cable that can connect up to two drives per interface. Speeds range from 133 MB/s for Ultra DMA Mode 0 up to 133 MB/s for Ultra DMA Mode 6.
SATA was introduced in 2003 and uses a much narrower serial cable. SATA is the most common hard drive interface on desktop computers today. SATA revisions go from 1.5 Gbit/s for SATA 1.0 up to 16 Gbit/s for SATA 3.2. SATA allows connecting individual drives instead of daisy chaining.
SCSI is a parallel interface used primarily for servers and high-end workstations. The latest iteration is SAS which uses serial cables for better performance and thinner cables. SAS offers speeds ranging from 3 Gbit/s to 24 Gbit/s for the latest SAS-4 specification.
Overall, SATA provides the best balance of speed, cost, and ease of use for most consumer hard disk drives today. SAS offers faster speeds for enterprise use, while PATA is now obsolete.
HDD Storage Locations
There are several common locations where HDDs are found in computers:
Primary HDD Bay
The primary HDD bay is located inside the computer case and is designed to house the primary HDD. It is usually located near the front of the case and has a dedicated power cable and data cable to connect it to the motherboard. The primary HDD bay often contains the boot drive with the operating system installed.
Secondary HDD Bays
Many desktop computer cases have multiple secondary HDD bays to allow adding more hard drives. These are usually located behind or below the primary bay and have their own power and data cables. Secondary bays give you the flexibility to install additional HDDs for extra storage capacity.
External Enclosures
External hard drives are essentially HDDs placed inside an enclosure with standard interfaces like USB, Thunderbolt, or eSATA. The enclosure provides power delivery, data transfer, and physical protection for the drive inside. External drives connect to a computer externally instead of being located inside the case. They provide portable and flexible extra storage.
So in summary, computers provide internal bays for installing fixed HDDs as well as support for connecting external portable hard drives. With the right setup, you can combine multiple hard drives to build up substantial storage capacity.
HDD Diagnostics
Checking the health of your hard disk drive (HDD) is important to avoid potential data loss from drive failures. There are a few ways to check HDD health:
Use HDD diagnostics software like HDDScan or GSmartControl to run comprehensive tests on your drive. These tools can scan for bad sectors, measure drive performance, and check SMART (Self-Monitoring, Analysis and Reporting Technology) data.
SMART data indicates reliability and can warn of issues before failure. Tools like Drive Fitness Test in Windows 10 provide SMART status and let you check attributes like reallocated sectors count, spin up time, and temperature.
Online tools like HDDScan also allow you to check SMART data and run diagnostics from any internet-connected device. Regularly monitoring HDD health can help you identify problems early and prevent catastrophic failures.
Replacing and Upgrading HDDs
When replacing or upgrading a HDD, it’s crucial to properly back up your data first. There are a few options for backing up data:
- Backup to an external drive. Copy important files to an external HDD or SSD.
- Cloning the existing drive. Use drive cloning software to make an identical copy of your current HDD.
- Back up to the cloud. Use a cloud backup service to store files online.
After backing up data, you need to make sure the new HDD is compatible with your computer or laptop. Look up the specifications for your motherboard or laptop model to determine which HDD types, sizes, and interfaces are supported.
For desktop PCs, you’ll physically install the new HDD in the appropriate drive bay, connect the SATA and power cables, and mount it. For laptops, you’ll likely remove the bottom panel to access the HDD bay and swap in the new drive.
If cloning your previous drive, use disk cloning software to copy everything over before swapping drives. This makes the transition seamless. Popular drive cloning tools include Acronis True Image, Macrium Reflect, and Clonezilla.
Upgrading to an SSD provides a big speed boost. Follow the same backup process, ensure compatibility, clone if possible, and enjoy the performance gains!
Data Recovery
When an HDD fails or data is accidentally deleted, specialized data recovery software can help recover lost files. Some top data recovery software options for consumers include:
Kroll Ontrack EasyRecovery – This software recovered the most number of files in testing and offers a free trial version. It works to recover files from hard drives, external drives, USB drives, SD cards, etc.
Stellar Phoenix Windows Data Recovery – Designed specifically for Windows, this software provides a free trial and paid licenses. It can recover from formatted drives, RAID arrays, encrypted volumes, and damaged partitions.
Disk Drill – With free and paid versions, Disk Drill features a range of recovery tools for hard drives, SSDs, SD cards, and mobile devices. It offers a simple interface and recovery vault.
For more severe HDD failures, professional data recovery services may be required. Companies like DriveSavers offer advanced clean room facilities and proprietary recovery methods to attempt restoring data that consumer software cannot.
