When setting up a RAID (Redundant Array of Independent Disks) system, one of the most important decisions is choosing the right RAID level. The RAID level determines how data is distributed across the disks in the array and what level of redundancy and performance you get. There are several standard RAID levels to choose from, each with its own advantages and disadvantages. Selecting the right level depends on your priorities such as performance, redundancy, capacity utilization, and your budget.
What are the different RAID levels?
The most commonly used RAID levels are:
- RAID 0: Stripe set without parity or mirroring. Offers high performance but no redundancy.
- RAID 1: Mirroring without parity or striping. Provides redundancy through duplicating all data on secondary disks.
- RAID 5: Distributed parity with striping. Provides redundancy while also using storage capacity efficiently.
- RAID 6: Distributed dual parity with striping. Provides redundancy with up to two disk failures.
- RAID 10: Mirroring and striping without parity. Combines mirroring and striping for both redundancy and performance.
What is RAID 0?
RAID 0 or disk striping is focused purely on performance. It spreads data evenly across multiple disks in stripes, allowing simultaneous disk accesses. By striping data across n disks, RAID 0 provides n times the read/write performance of a single disk. There is no redundancy provided. RAID 0 is useful for non-critical data where high performance is required. The disadvantage is that if any disk in the array fails, all data will be lost.
When to use RAID 0
RAID 0 makes sense when:
- Performance is the top priority
- Redundancy is not needed
- The data is disposable or non-critical, such as temporary files
What is RAID 1?
RAID 1 or disk mirroring provides redundancy by duplicating all data from the primary disk to a secondary disk. This protects against disk failure since the data is fully duplicated on another disk. Write performance may be slower since all writes need to be committed to both disks. But read performance can be faster since reads can be distributed between the two disks. Capacity utilization is 50% since the effective capacity is equal to the smaller disk in the mirrored pair. RAID 1 makes sense for critical data that needs full redundancy. The downside is that you need double the disk capacity for the same usable space.
When to use RAID 1
RAID 1 is recommended when:
- Redundancy to protect critical data is crucial
- Performance needs are secondary to availability
- Budget allows for dual disk capacity
What is RAID 5?
RAID 5 stripes data and distributes parity information across all the disks. If any single disk fails, the missing data can be recreated from the distributed parity. RAID 5 provides redundancy while also using storage capacity efficiently unlike RAID 1. Usable capacity is (N – 1) disks worth when using N disks. RAID 5 performs well for reads since the workload can be distributed across multiple disks. But write performance may be impacted due to the parity calculation overhead. RAID 5 provides a good balance between redundancy, capacity utilization, and performance for general use cases.
When to use RAID 5
RAID 5 is a good fit when:
- Redundancy is important but RAID 1 is too costly
- A balance between performance, capacity, and redundancy is needed
- Losing a single disk can be tolerated
What is RAID 6?
RAID 6 is similar to RAID 5 but provides double distributed parity instead of single parity. With RAID 6, up to two disk failures can be tolerated without data loss. This makes RAID 6 suitable for large arrays where rebuilding data after a disk failure could take a long time. With dual parity, the array can sustain a second disk failure during the rebuild process. The tradeoff is lower usable capacity and write performance compared to RAID 5 due to the need for dual parity calculation. Usable capacity is (N – 2) disks worth when using N disks.
When to use RAID 6
RAID 6 becomes necessary for:
- Mission critical data where maximum redundancy is required
- Very large arrays where rebuilding data takes substantial time
- Situations where multiple disk failures are possible
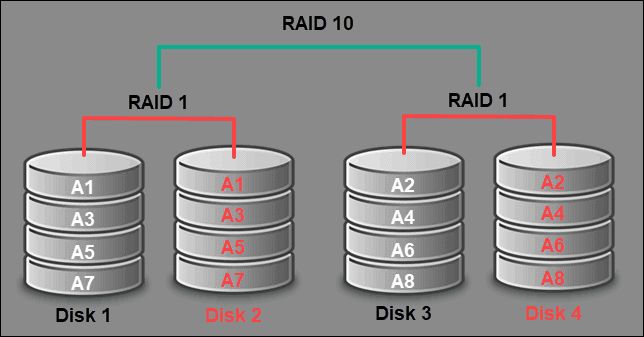
What is RAID 10?
RAID 10 combines mirroring and striping to provide redundancy through duplicating data while also enhancing performance via striping. RAID 10 writes and reads data in parallel across multiple mirrored pairs. If a disk in a mirrored pair fails, the system switches to the surviving mirror without any downtime. RAID 10 provides fast performance as well as the ability to survive multiple drive failures as long as one disk in each mirrored pair survives. The downside is capacity utilization is low since RAID 10 requires a minimum of four disks for a usable array.
When to use RAID 10
RAID 10 excels in these scenarios:
- Performance and redundancy are both critical
- The system needs to sustain multiple drive failures
- Budget allows for at least four disks
How to choose the right RAID level
Choosing the appropriate RAID level involves prioritizing your needs for performance, redundancy, and effective storage capacity. Consider these guidelines when selecting a RAID level:
- RAID 0 – When peak performance is mandatory and redundancy is not needed.
- RAID 1 – For critical data that requires full redundancy and availability.
- RAID 5 – For a balance between redundancy, capacity efficiency, and performance.
- RAID 6 – When maximum redundancy is crucial or rebuilding data after a failure takes very long.
- RAID 10 – When top performance and the ability to survive multiple disk failures is needed.
Also factor in your budget, number of disks you have, and expected workloads. Consulting with a storage specialist can help determine the optimal RAID level for your specific requirements and infrastructure.
Performance comparison of RAID levels
Let’s examine the performance characteristics of some common RAID levels to help choose the right option based on your speed requirements:
| RAID level | Read performance | Write performance |
|---|---|---|
| RAID 0 | Excellent | Excellent |
| RAID 1 | Excellent | Poor |
| RAID 5 | Good | Poor |
| RAID 6 | Good | Poor |
| RAID 10 | Excellent | Good |
As seen above:
- RAID 0 provides fast reads and writes making it ideal for high performance needs.
- RAID 1 delivers excellent read speed, but poor write speed due to mirroring overhead.
- RAID 5 and 6 have slower writes due to parity calculation but good read performance.
- RAID 10 combines excellent read speed with good write speed by striping mirrored pairs.
Redundancy and fault tolerance
The level of redundancy and fault tolerance also differs across RAID levels:
| RAID level | Redundancy | Withstand disk failures |
|---|---|---|
| RAID 0 | None | 0 disks |
| RAID 1 | Full duplication | Up to N/2 disks (N = No. of disks) |
| RAID 5 | Distributed parity | 1 disk |
| RAID 6 | Dual distributed parity | Up to 2 disks |
| RAID 10 | Mirrored striping | Up to N/2 disks (N = No. of disks) |
Key observations:
- RAID 0 offers no redundancy making it risky for critical data.
- RAID 1, 5, 6, and 10 provide varying levels of redundancy through mirroring or parity.
- RAID 6 can withstand up to two disk failures by using dual parity.
- RAID 10 provides excellent redundancy by combining mirroring with striping.
Storage efficiency
RAID levels also differ in how efficiently they utilize disk capacity:
| RAID level | Storage efficiency |
|---|---|
| RAID 0 | 100% |
| RAID 1 | 50% |
| RAID 5 | 67% to 94% |
| RAID 6 | 50% to 88% |
| RAID 10 | 50% |
Key takeaways on storage efficiency:
- RAID 0 uses full capacity since data is striped.
- RAID 1 uses 50% capacity since data is mirrored.
- RAID 5 uses 67%-94% capacity depending on number of disks.
- RAID 6 uses 50%-88% capacity as more disks used for parity.
- RAID 10 also uses 50% capacity due to mirroring.
Cost considerations
The financial costs of each RAID level also vary. Here are some guidelines on relative costs:
- RAID 0 has the lowest hardware cost since it requires no redundancy.
- RAID 1 has double the storage cost due to disk mirroring.
- RAID 5 and 6 have moderate hardware costs thanks to parity-based redundancy.
- RAID 10 has higher hardware costs as you need a minimum of 4 disks.
Operational costs also differ. Rebuilding failed arrays incurs downtime and admin costs. More complex RAID levels take longer to rebuild after failures:
- RAID 0 has the lowest rebuilding costs since failed arrays cannot be rebuilt.
- RAID 1 rebuilds are easier as only affected mirrors need to be duplicated.
- RAID 5 rebuilds need to recalculate parity, increasing downtime.
- RAID 6 and 10 rebuilds are most expensive due to more parity or mirrors.
Summary
Choosing the right RAID level requires juggling priorities for performance, redundancy, capacity utilization, and costs. Consider these guidelines:
- RAID 0 for non-critical data where speed is crucial.
- RAID 1 for critical data that needs full redundancy.
- RAID 5 for a balance between redundancy, capacity, and speed.
- RAID 6 when uptime and redundancy are paramount.
- RAID 10 when top performance plus availability is vital.
Consult experts to select the ideal RAID level based on your specific environment, performance benchmarks, growth projections, and application workload characteristics. The right RAID implementation delivers optimal speed, redundancy, and efficient storage capacity utilization at a reasonable cost.