iCloud Photos allows you to store all your photos and videos in iCloud so you can access them on all your Apple devices. By default, it automatically uploads new photos you take to iCloud so they are available on your Mac, iPhone, iPad, and more. However, some users find that their old photos from the Camera Roll do not appear in iCloud Photos, which can be frustrating if you were expecting all your photos to be there.
Checking iCloud Settings
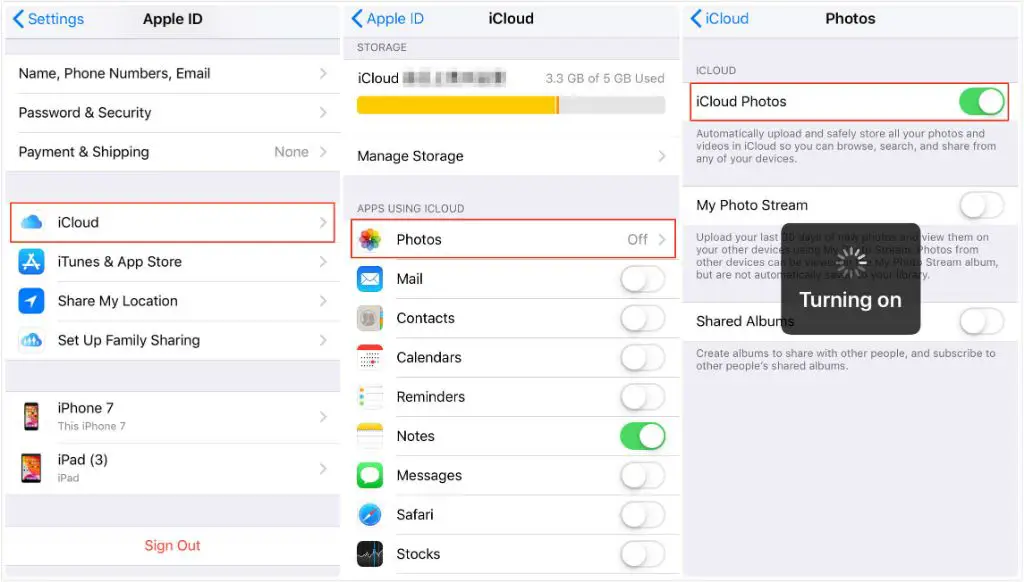
To ensure your photos are syncing properly with iCloud, you first need to check your iCloud settings. The iCloud Photos options can be accessed in the Settings app on your iPhone, iPad, or iPod touch. Go to Settings > [Your Name] > iCloud > Photos.
Here you can confirm that the iCloud Photos toggle is turned on (green). This enables your device to sync your photo library with iCloud. If the toggle is gray and off, tap it to activate iCloud Photos.
You can also check and adjust your iCloud storage allocation under Settings > [Your Name] > iCloud > Manage Storage > Photos. Make sure you have sufficient storage in iCloud to hold your photo library. The Library setting should be optimized to store your full photo history in iCloud rather than just recent photos.
On a Mac, open the Photos app, click Photos in the menu bar, select Preferences, and go to the iCloud tab to view your settings. Make sure Options is set to iCloud Photos so your entire library syncs.
Optimize iPhone/iPad Storage
The Optimize iPhone Storage setting can automatically manage the size of your iCloud Photos library on your device. When enabled, it will keep lower resolution versions of your photos and videos stored locally on your iPhone or iPad, while uploading the full resolution versions to iCloud. This frees up storage space on your device while still allowing you to access your full photo library from iCloud when needed [1].
With Optimize iPhone Storage turned on, your device will periodically review the photos and videos in your library and determine which ones to keep at full resolution locally based on usage and other factors. Less frequently accessed photos and videos may have lower resolution versions stored on your device, while more recent and frequently viewed ones will stay at full resolution [2].
The advantage of this setting is that you can store a larger photo library than what will fit solely on your device. However, a disadvantage is that you may notice lower image quality when accessing older or less used photos that are stored locally at reduced resolution. You would need to download the full resolution version from iCloud when you want the highest quality image [3].
Uploading from Camera Roll
To upload photos from your iPhone or iPad’s camera roll to iCloud, you first need to make sure Photos on your device is open and connected to WiFi. Photos will only automatically upload to iCloud when the app is open – having it running in the background is not enough. This is to prevent photos from uploading over cellular data, which could use up your monthly data allowance quickly.
Once Photos is open, it will start uploading new photos and videos from your camera roll to iCloud in the background as long as you are connected to WiFi. The upload progress is shown by a spinning circle next to each item in the camera roll. You can tap on a photo or video to see more details, including when it will finish uploading.
Bear in mind that the initial upload can take a long time if you have many photos and videos in your camera roll. Be patient and keep the app open and device on WiFi until everything fully uploads. After the initial upload, new photos and videos added to your camera roll will upload more quickly.
Photo Format Compatibility
iCloud Photos only supports certain file formats for photos and videos. According to Apple’s support page, iCloud Photos supports the following formats:
- JPEG
- HEIF
- MPEG-4
- HEVC (High Efficiency Video Coding)
This means that file formats like PNG, TIFF, RAW, and other proprietary raw formats are not supported. If you have a large library of photos in RAW or other unsupported formats, they will not be uploaded to iCloud.
RAW files contain uncompressed, high-resolution image data direct from the camera sensor. The large file sizes and proprietary nature of RAW formats means iCloud does not support storing or syncing them. While JPEGs and HEIFs will upload, the original RAW files will be left out of your iCloud library.
So if you are missing older photos in iCloud, it’s possible they are in a non-JPEG or RAW format that iCloud does not recognize. You would need to convert them to JPEG or HEIF first before the files can be uploaded and synced across your devices.
Large Libraries and Upload Time
The time it takes to upload all your photos and videos to iCloud depends on the size of your photo library. Apple notes that “When you turn on iCloud Photos, the time it takes for your photos and videos to upload to iCloud depends on the size of your collection and your internet speed.” (Source)
For very large photo libraries, the initial upload to iCloud can take days or even weeks to fully complete. One user reported it took nearly 12 hours to upload 13,000 photos to iCloud. (Source) The larger your library, the more time it will require.
This is because iCloud needs to upload every single photo and video in your library when you first enable iCloud Photos. So libraries with tens of thousands of items or more will naturally take much longer to upload compared to smaller libraries.
The key is to be patient and keep your devices connected to power and WiFi during the upload process. You can check the progress in Settings > [Your Name] > iCloud > Manage Storage > Photos. Just know that it can take days or weeks for very large libraries to fully upload to iCloud.
Selective Sync Settings
One potential reason your old photos aren’t showing up in iCloud Photos is because you have Selective Sync enabled. Selective Sync allows you to choose which albums and folders you want to sync from your computer to iCloud.
To check your Selective Sync settings on a Mac, open the Photos app and go to Preferences > iCloud. Click on the Options button next to iCloud Photos and make sure “Selected Albums” is not enabled. If it is enabled, you’ll want to select all of your photo albums and folders to sync.
According to an Apple Discussions thread, Photos for iOS does not allow selective sync and will upload all photos from your Camera Roll to iCloud. So if you have Selective Sync enabled on your Mac, photos not in your selected albums will only exist locally and not be uploaded.
Disabling Selective Sync ensures that your entire iCloud Photos library is available across all your devices. Just keep in mind this may increase your iCloud storage usage.
Download Originals Setting
One common reason old photos may be missing from iCloud is if the “Download Originals” setting is disabled. By default, iCloud Photo Library only stores optimized versions of photos on your devices to save storage space. The full resolution originals remain stored in iCloud.
To download the original versions, you need to enable the “Download Originals” option in iCloud settings on your iPhone, iPad, or iPod Touch. Go to Settings > [Your Name] > iCloud > Photos and toggle on “Download Originals.”
Enabling this setting ensures that the full resolution versions of all your photos and videos are downloaded to your device’s local storage. According to Apple Support, “This allows you to access your full resolution photos when your device is offline.”
With Download Originals turned on, iCloud will re-download any missing originals next time your device is connected to WiFi and power. You may need to be patient if you have a large photo library, as re-downloading all the originals can take substantial time depending on your library size and internet connection speed (Source). The download progress can be monitored in Settings.
Enabling Download Originals ensures you have full access to your entire high-quality photo collection on your iPhone or iPad for offline viewing and editing.
Re-Upload Option
Sometimes iCloud can become confused if there are changes or interruptions while photos are uploading, triggering it to start re-uploading the entire library again from the beginning. This most often happens if the phone lost connection during initial upload or was powered off, but can also occur if you switch between WiFi and cellular repeatedly.
If this re-upload gets stuck, you can manually initiate a fresh start. First quit the Photos app. Then hold the Option and Command keys together as you reopen Photos to bring up the Repair Library dialog. Select “Repair” and this will reset the upload and merge the online and local libraries cleanly. The process can take hours or days depending on your library size. Keep the device plugged in and on WiFi for best results.
Re-uploading the entire library ensures iCloud has the full set of photos again in case any got lost or corrupted. While inconvenient, it ultimately helps keep your library consistent and synchronized across devices. Some re-uploading may happen occasionally as a fail safe if iCloud detects potential missing data.
Summary
To briefly recap the main points, iCloud Photos allows you to store your photo library in the cloud and access it across devices. However, you may notice old photos missing for several reasons:
First, check your iCloud settings and make sure you have iCloud Photos enabled, with Optimize [device] Storage selected so all photos upload. Also confirm you have enough iCloud storage space for your entire library.
Next, if you have a large photo library, it can take time to fully upload depending on your internet speed. Have patience and leave your device connected to WiFi to allow uploads to continue.
Additionally, make sure you don’t have Selective Sync enabled, limiting what albums upload. You want the Download Originals setting on as well so full resolution versions are stored.
If your photos still don’t appear, you can try re-uploading your library to iCloud. Just remember with iCloud Photos, your images are safely stored and you can access them from iPhone, iPad, Mac, and iCloud.com as long as you have proper settings enabled.